
Managers and supervisors create and deploy surveys to understand customer satisfaction. Surveys may be used to review customer satisfaction and/or the work of the agent.
The following steps are required when creating a survey:
-
Create a new survey from the Questionnaires screen.
-
Add Survey Questions
-
Add New Questions and Answers
Create a New Survey Using a Template
To create a new survey create a questionnaire. We recommend that you use the Survey template or create a new Questionnaire of the type Survey.
Survey Template
Eleveo provides a basic NPS Survey template for your use. Check the list of Questionnaires for an NPS option and add the audio prompts. You can use the WAV files (listed at the bottom of this page) or you can create your own audio files (WAV format) as long as they conform to the specifications listed in the section Uploading an Audio Prompt for a Question on this page. Then upload them to the template.
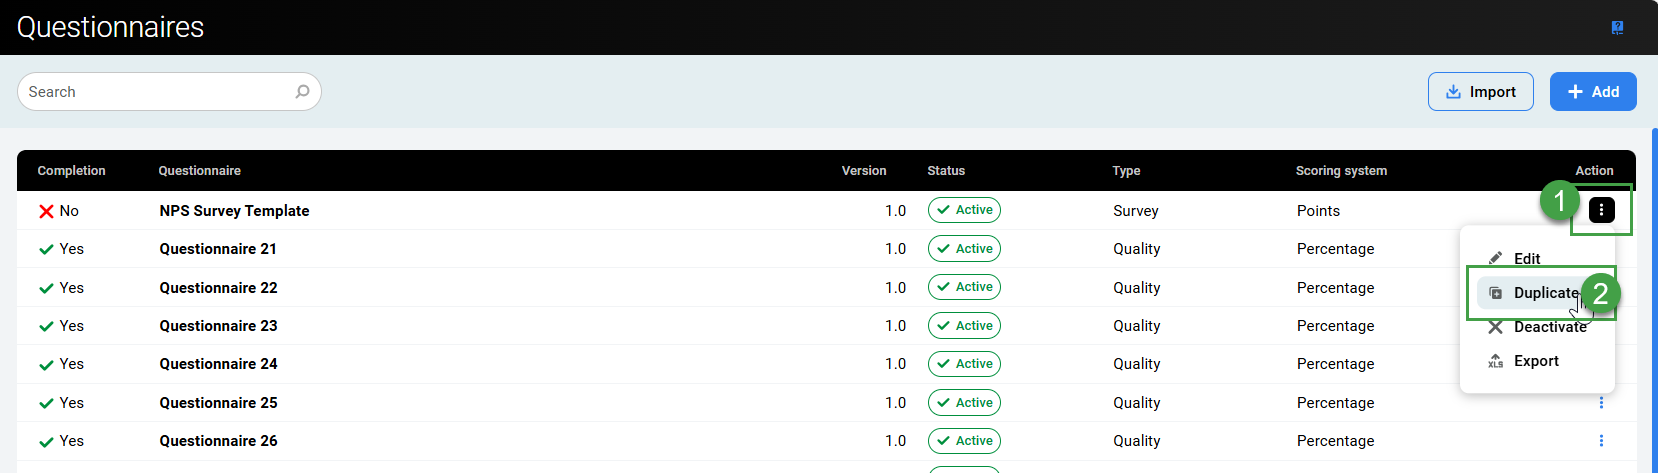
To add a new questionnaire (or edit/duplicate one that exists):
-
Go to Questionnaires to display the current list of questionnaires in Quality Management.
-
Click on the three dots menu to view options (or open the template to edit it). Click Duplicate to make a new editable copy of the template.
-
Modify the questionnaire as required.
Add questions - upload audio files that will be played back for customers. -
Save and activate the new survey questionnaire.
NPS® SURVEY: Please note! A Net Promoter ScoreSM (NPS) Survey template is provided for your convenience and further use under the Questionnaires list. Demo files are also provided for download (see the section at the bottom of this page).
-
The template provided does not allow users to upload the required Audio file.
-
Duplicate the NPS Survey Template in order to upload the required Audio file before activating the survey.
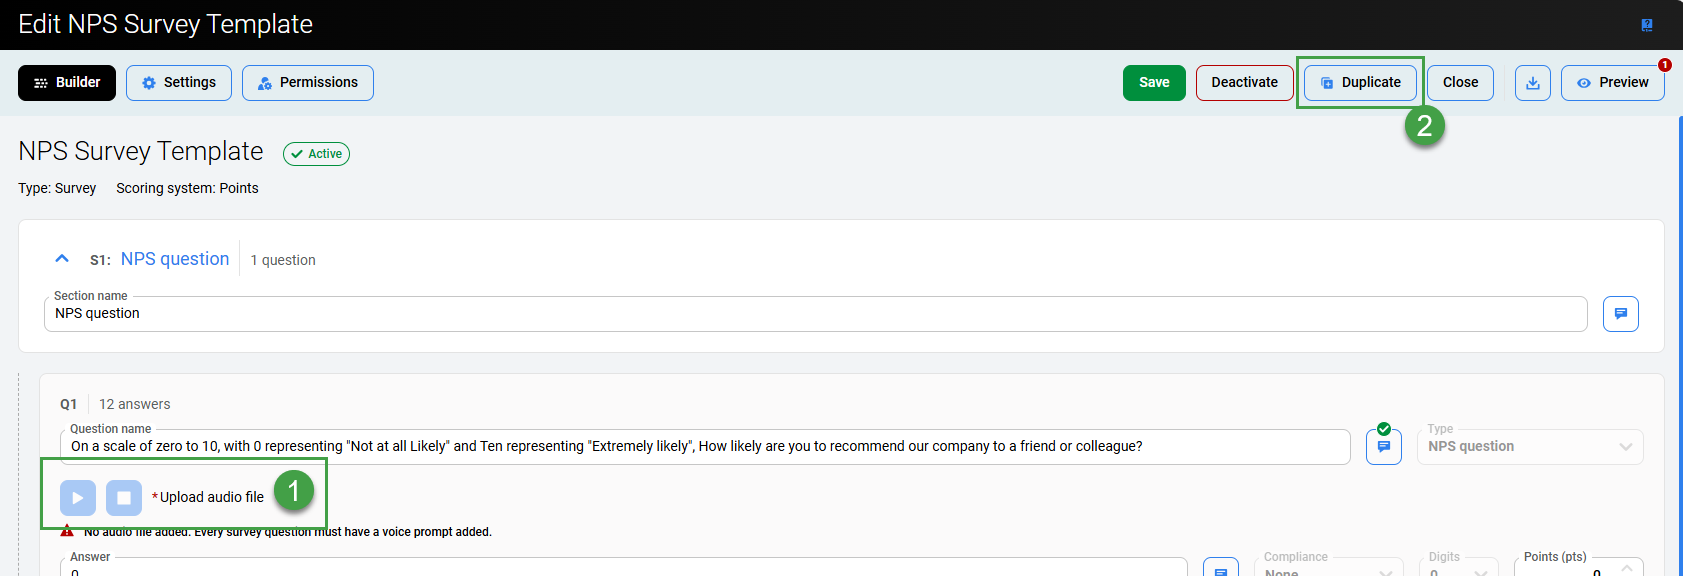
To create a new NPS Survey, the Scoring System must be set to Points.
CAUTION: Changing the scoring system for a questionnaire after question groups or questions and answers are added causes inaccuracy. Therefore check all weight values in the questionnaire for accuracy after changing the scoring system used.
Example NPS survey audio files
-
IVR NPS SCRIPT.wav IVR_NPS_SCRIPT_ulaw.wav
-
IVR SCRIPT ADDITIONAL COMMENTS.wav IVR_SCRIPT_ADDITIONAL_COMMENTS_ulaw.wav
-
Thankyou.wav Thankyou_ulaw.wav
Ensure that the saved files do not contain spaces in the name!
You may also choose to build your own survey.
Create a New Survey Questionnaire
To create a new survey create a questionnaire. We recommend that you use the Survey template or create a new Questionnaire of the type Survey.
Add or Edit a Questionnaire
To add a new questionnaire (or edit/duplicate one that exists):
-
Go to Questionnaires to display the current list of questionnaires in Quality Management.
-
Click Add to add a new blank questionnaire.
-
Alternatively, click on the three dots menu to edit or duplicate an existing Questionnaire (clicking on a Questionnaire will open it in edit mode).

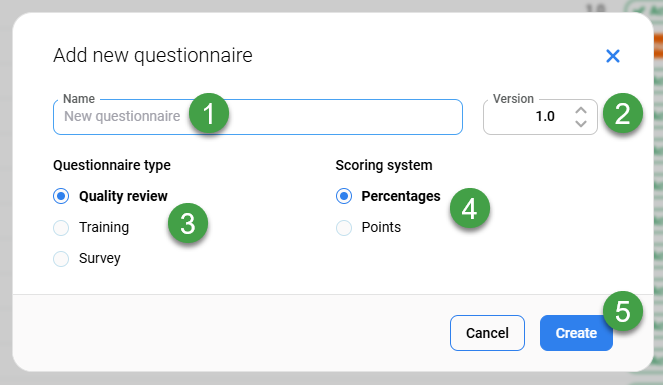
In the Add new questionnaire dialog:
-
Give the Questionnaire a meaningful Name.
-
Modify the Version # if needed (useful when making incremental improvements). Use the default value of 1.0 if this is the first questionnaire with that name or type a new version number in the Version field if the name has been used before or if you are duplicating a questionnaire.
NOTE – The name and version combination must be unique in Quality Management. It is not possible to change the name, version or type of questionnaire once the Questionnaire is active. Users can change only display settings, scoriing tiers and questionnaire permissions.
Changing the scoring system for a questionnaire is not possible. If you wish to change the scoring system, create a new questionnaire from scratch.
-
Select the type Quality Review, Training or Survey under Questionnaire type (it is not possible to change the type later on).
-
Quality Review – To create a questionnaire for agent-quality review.
-
Training – To create a training questionnaire (also known as a Quiz). For information on Training, go to the Training / eLearning page.
-
Survey – To create a post-call survey. For more information on Surveys, go to the Adding a New Survey page.
Options available later on will vary based on which type of questionnaire is being created.
-
-
Select the Scoring System. The default is Percent for Quality Reviews (it is not possible to change the questionnaire type or scoring system later on). The following options are available:
-
Percent: Each question and answer group is assigned a "weight" in percent. The minimum is 1%, the maximum is 100%. The final questionnaire percentage score is the weighted average of the selected answers. You may include a question or a whole section of questions with 0 percent weight, e.g., for information tracking purposes, without any impact on the score.
-
Points: Each answer is assigned a "weight" in points, for example, 10. The questionnaire score is the sum of all selected answer points. Answers can not have a negative point value. Select this option if you intend to create a new NPS® survey.
-
-
Click Create.
The Builder screen will open.
Builder Screen
The Builder screen will display.
Options may vary, but most questionnaires have the following menu items visible at the top of the screen when viewed, or when in edit mode.

-
Switch between the Builder screen, Settings screen, or Permissions screen.
-
Save – Save the current changes (will not activate the Questionnaire).
-
Save and activate – Available when editing a Questionnaire. Click to activate the Questionnaire, it will be available in other modules.
-
Deactivate – Deactivate an active Questionnaire. Users will not be able to use the Questionnaire in other modules.
-
Duplicate – Create an identical copy of the current Questionnaire; it is necessary to change the name or version of the copy.
-
Close – Exit without saving changes.
-
Download/Import – Download a copy of the current Questionnaire in XML format for archival purposes or later re-import.
-
Preview – View the Live preview pane. If any scores, sections or questions are incorrect, they will be highlighted in the Live Preview pane.
-
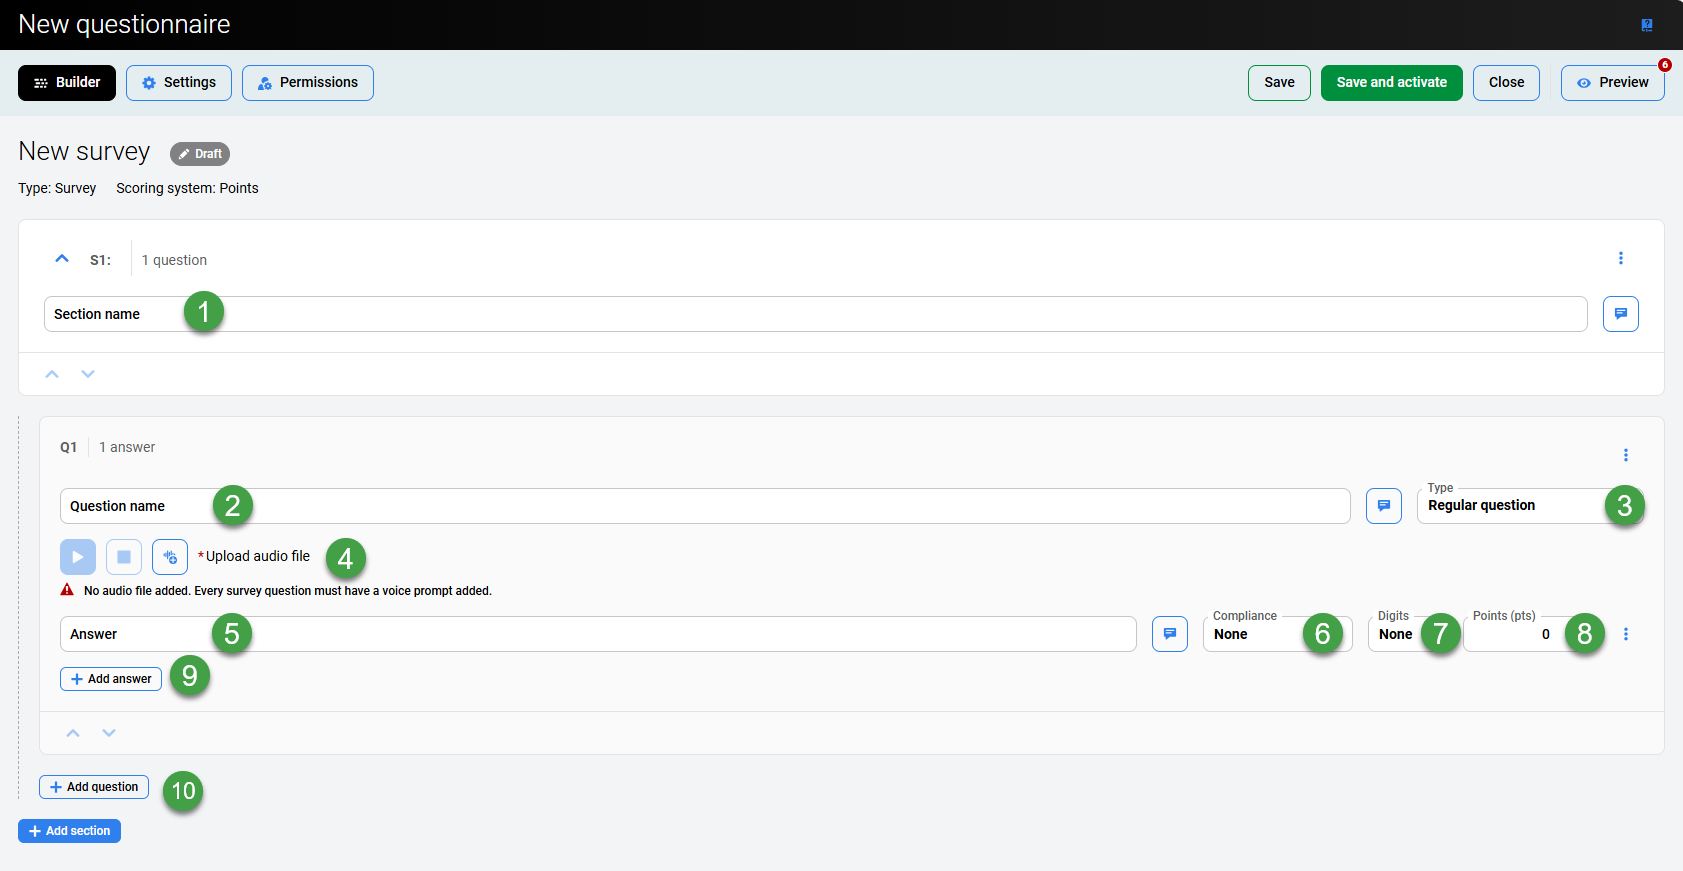
Add a Section group and give it a clear title.
-
Add Questions.
-
For each question, (applies only to Surveys) select the Type from the dropdown.
-
Regular question – Select this to create a simple question and manually create answer(s) for the question.
-
NPS question – Select this to quickly create a question with answers ranging from 0 to 10.
-
Prompt only – Select if an audio prompt will be played back, but no answer is expected.
-
Customer feedback – Select this to create a question and manually create the answer(s) for the question.
-
-
Add an Answer for each question(and upload audio for surveys).
-
Click Preview to view the Live Preview pane. Incomplete sections will be highlighted and errors or omissions that are present in your newly created Questionnaire will be highlighted.
You can customize the available options or add additional sections and/or questions at this time.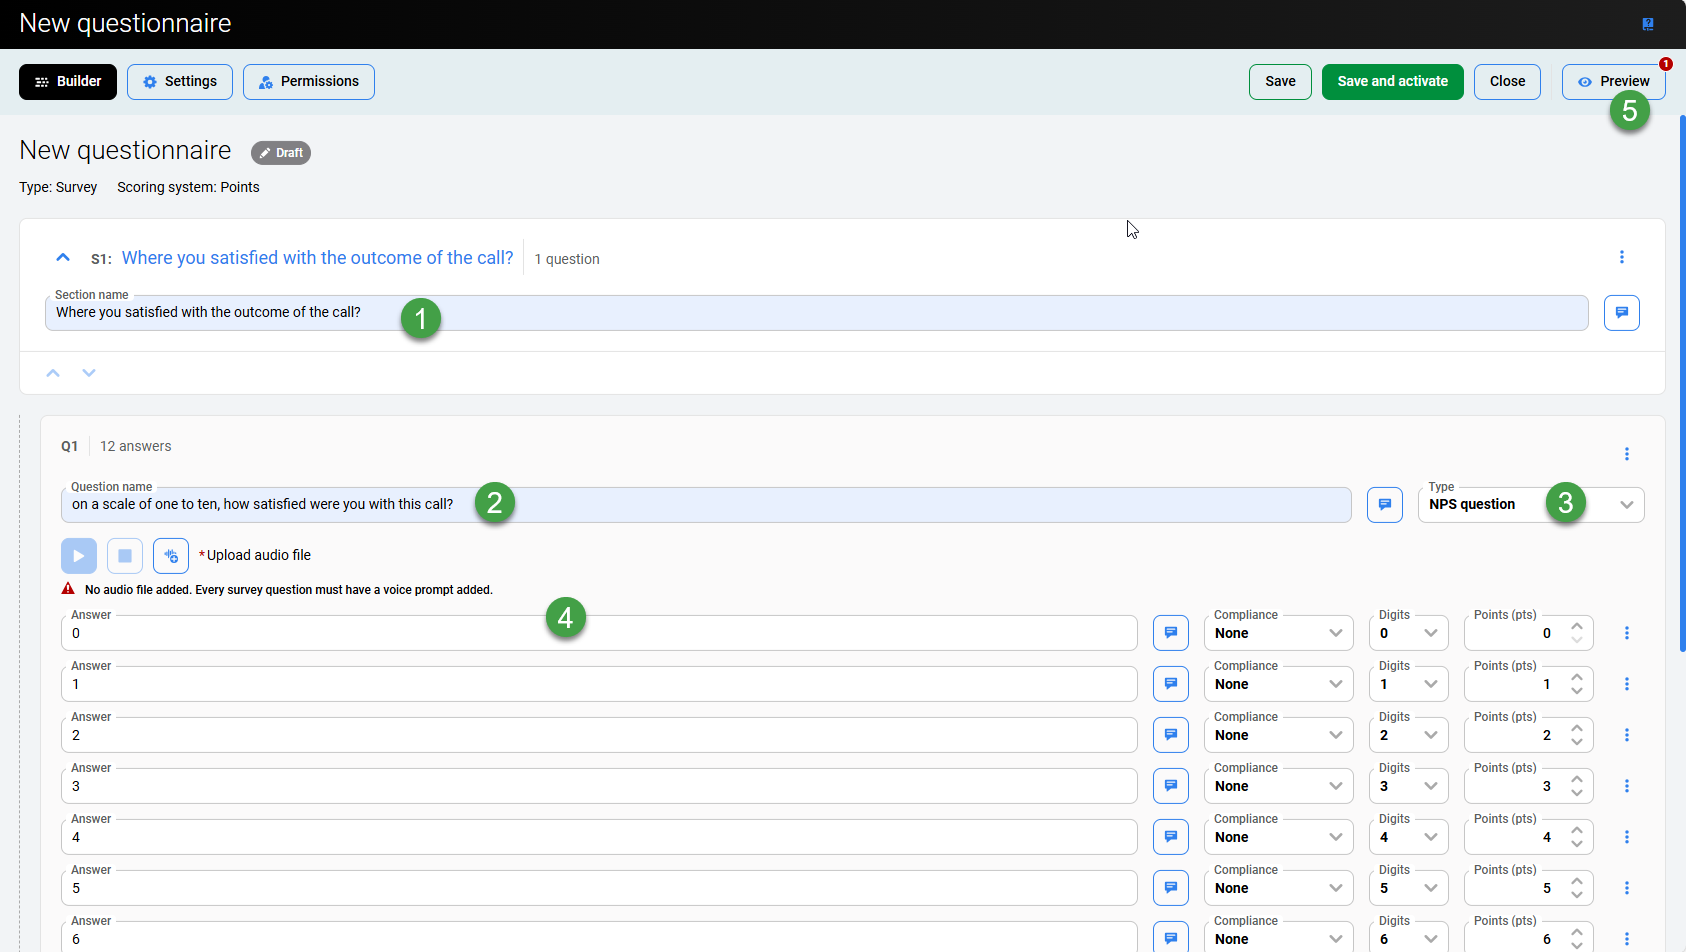
Switch to the Settings or Permissions page.
Add descriptions to any of the items that have a note icon available. After text is entered, the note will be highlighted to visually indicate that a note exists for the item. ![]()
In this example, the comment ‘it’s definitely a question' is highlighted.
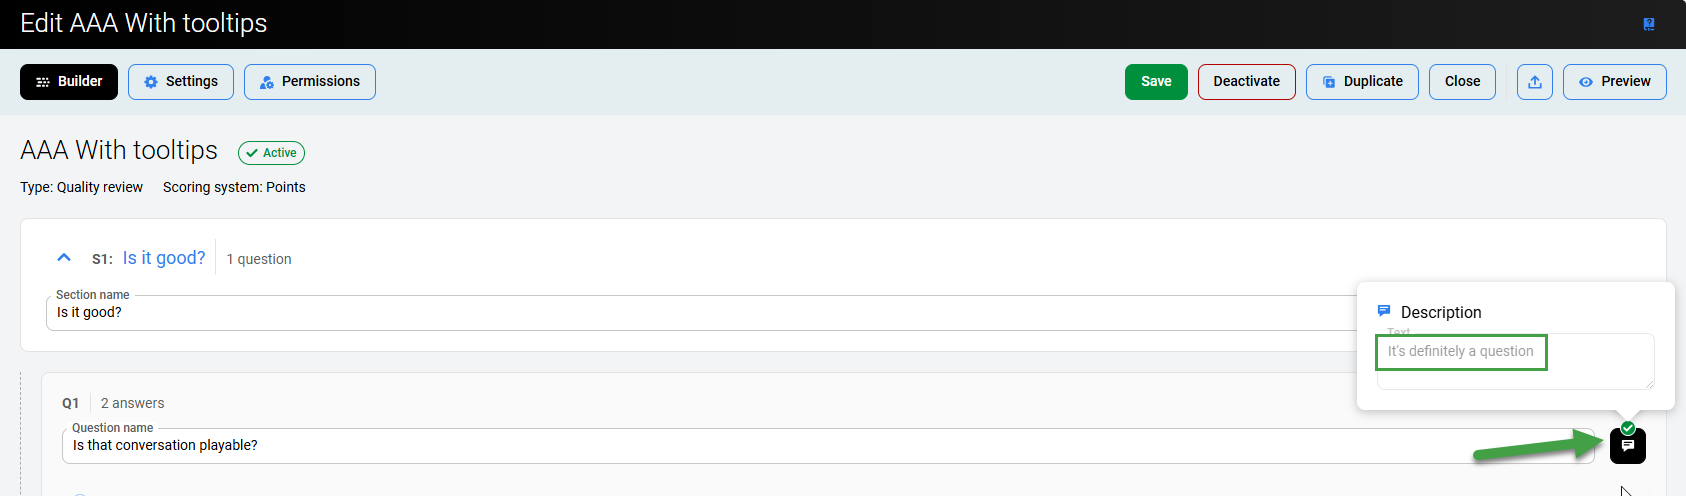
Other users can see this extra information in a tooltip wherever the questionnaire is used.
Such as on the Grading form:

Add, Move or Delete Sections or Questions
For Sections and Questions, there are options to add a new section/question, move up or down, duplicate, and delete. These options simplify repetitive tasks. Use the up (∧) or down (v) arrows to quickly reorder items.

Settings Screen
The properties selected in the questionnaire affect how answers are scored and their order in reviews.

-
Click Settings to switch screens.
-
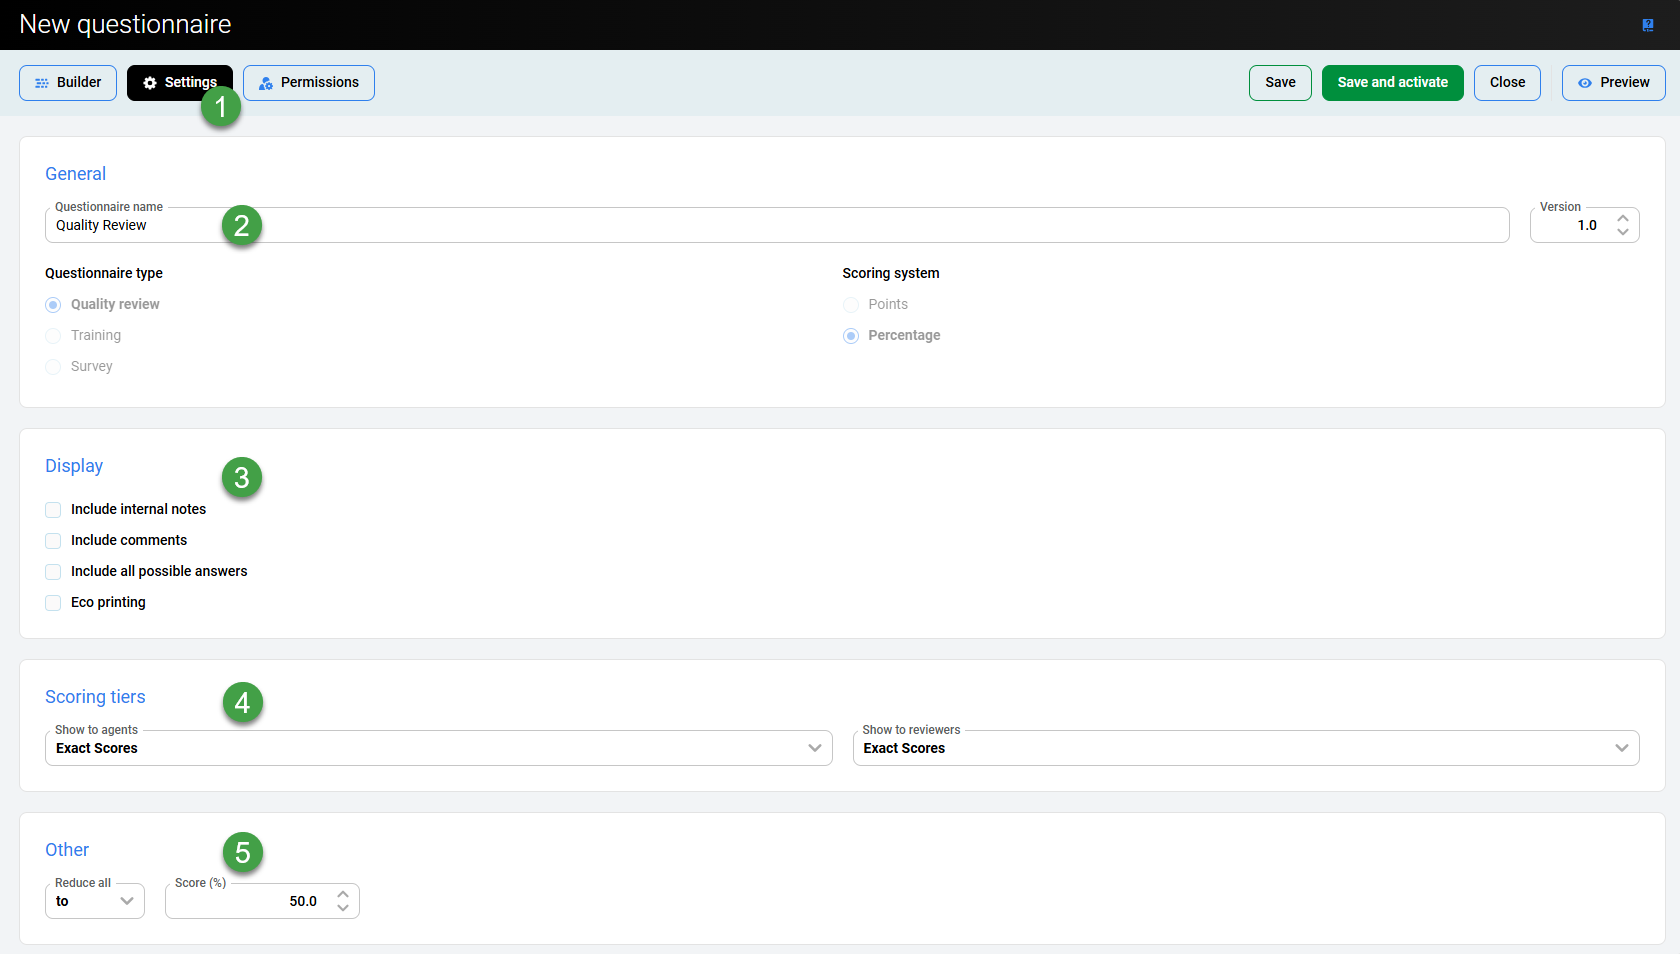
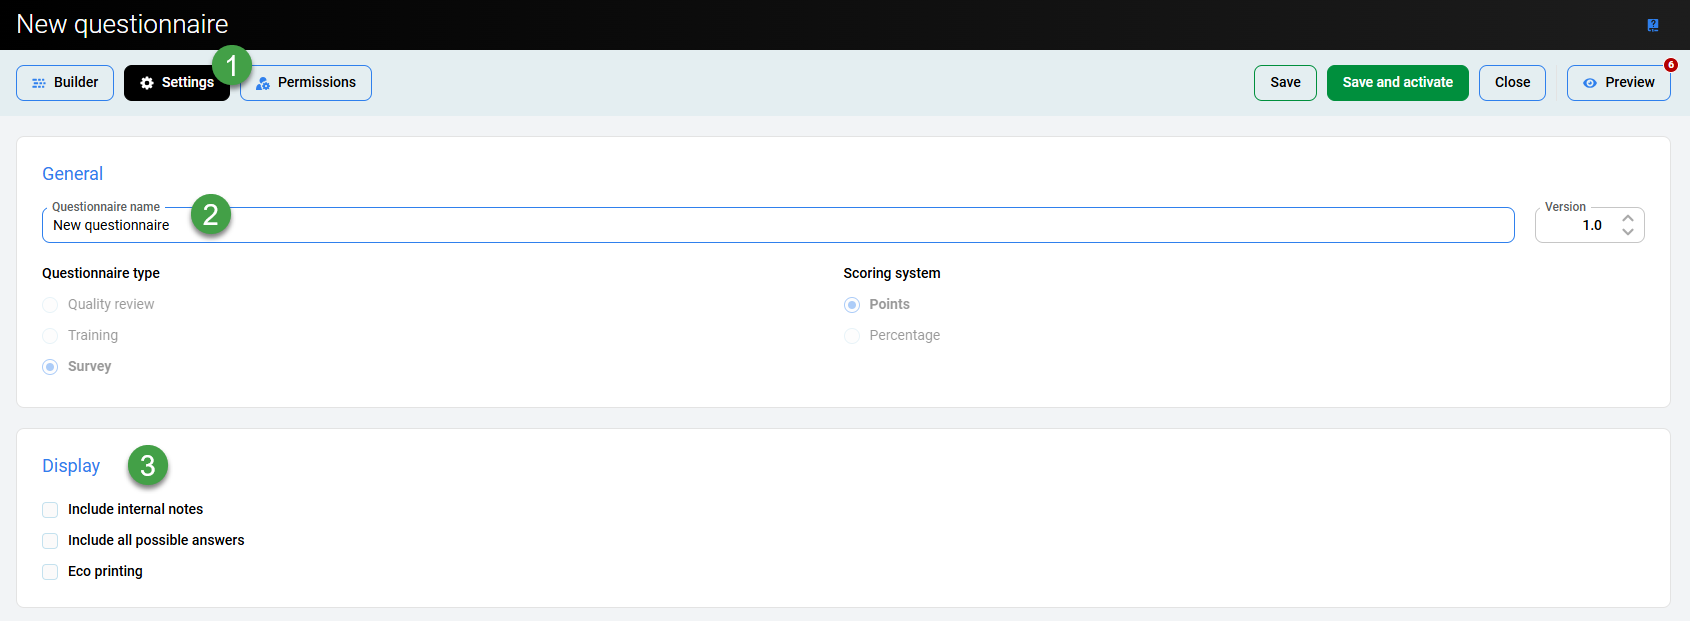
General
Modify or update the Questionnaire name or Version. -
Display
-
Configure what is displayed along with the questionnaire results.
-
Include Internal notes – Check the Include Internal notes checkbox to include the internal comments in the printed/exported file. The comments that you added during the review process, including applied formatting, will be displayed during export or printing. By default, the internal notes are visible to the review author or the delegated user as well as to any user with the
REVIEWS_TEAM_EDITpermission assigned; they are never revealed to agents (not in the application nor in email). -
Include comments – Check/Uncheck the checkbox to make this option visible/invisible in the review Detail Report. This option is only available if the Quality Review was selected as a questionnaire type.
-
The Include All Possible Answers check box displays the answer that was selected, as well as all other possible answers. This can be useful when providing feedback to an agent since knowing what other options the reviewer had to choose from can provide context for the review.
-
Eco Printing – The Eco Printing option creates a slightly compressed version of the review detail report that can be printed on less paper using less ink. It is intended for contact centers that print a large number of reports. Check/Uncheck the checkbox to make this option visible/invisible in the Review Detail Report.
-
-
-
Scoring Tiers
Available options may vary based on what is configured in Scoring Tiers, keep in mind that only percentage based scoring can be used for Scoring Tiers. Define what to display to agents and reviewers:-
Show to Agents – The option you set here will reflect how the scoring tier will be displayed in the Evaluation Detail report. The default option here is Exact Scores. The following scoring tiers are available for use:
-
Exact Scores – Exact score number including decimal places, shown in percentage.
-
No Scores – No score information. No viewing details are available.
-
Color Scores – Instead of percentage, a defined color, and an optional label will be shown.
-
-
Show to Reviewers – This setting influences the scoring appearance in the Review and Conversation Review Forms. Exact Scores are preset by default.
-
Exact Scores – Exact score number including decimal places, shown in percentage. No viewing details are available.
-
No Scores – No score information. No viewing details are available.
-
Color Scores – Instead of percentage, a defined color, and an optional label will be shown.
-
-
-
Other
-
Reduce all: This option (only available for Quality Review type) allows you to set the whole questionnaire score reduction for both scoring systems Points or Percent. This answer can only be used once in a questionnaire and in a dedicated section without any other questions in that section. The percentage/points ratio and type of reduction (TO and BY) will be configurable per questionnaire in the Questionnaire Settings, under the section Other:
-
Reduce all by "x" % - this option will reduce the score of the whole questionnaire by a defined percentage - Example: In team "Sussex", the agent Harry is evaluated by team leader Meghan. He gets 84% or 84 points but fails the compliance question, so Meghan selects the answer that reduces his score by 50%. His final score is now 42% or 42 points respectively.
-
Reduce all to "x" % (if Scoring System is set to Percent) or Reduce all to "x" pts (if Scoring System is set to Points) - this option will set/adjust the score of the whole review to the predefined percentage/points score.
-
Example 1: In team "Cambridge", the agent William is evaluated by the team leader Kate. He gets 84% / 84 pts but fails the compliance question, so Kate selects the answer that reduces his score to 50% / 50 pts. His final score is now 50%/50 pts.
-
Example 2: In team "Danube", the agent Thelma is evaluated by the team leader Wilma. Thelma gets 42% / 42 pts but fails the compliance question, so Wilma selects the answer that changes the score to 50% / 50 pts. The final score is now 50%/50 pts.
When using Reduce all to "x" % – If the agent has a lower score than defined by this setting, it is possible that the final score will be higher as a result. E.g. If the agent has a score of 42 and Reduce all to 'x' is set at 50. The agent will have a final score of 50.
-
-
-
Score – Define by how much to reduce the score to or by.
-
Trainers Tips
-
Anytime you select Reduce All as an option you must meet the following conditions:
-
The section can be weighted however you would like – even 0%
-
Question weighting must be 100% as it is the only question in the section.
If these three conditions are not met, the system will show an error message.
-
Example of settings available for a Quality Review.
Example of the settings available for Surveys and Trainings.
Switch to the Builder or Permissions page.
Permissions Screen
The ability to specify access permissions is an optional feature for questionnaires. This feature controls which reviewers the questionnaires can be assigned to. This is extremely useful for preventing the wrong reviewers from using the wrong questionnaires.

Questionnaire access permissions are applied only in the Reviews module. They are not applied to Reports, for example, or in other use cases.
-
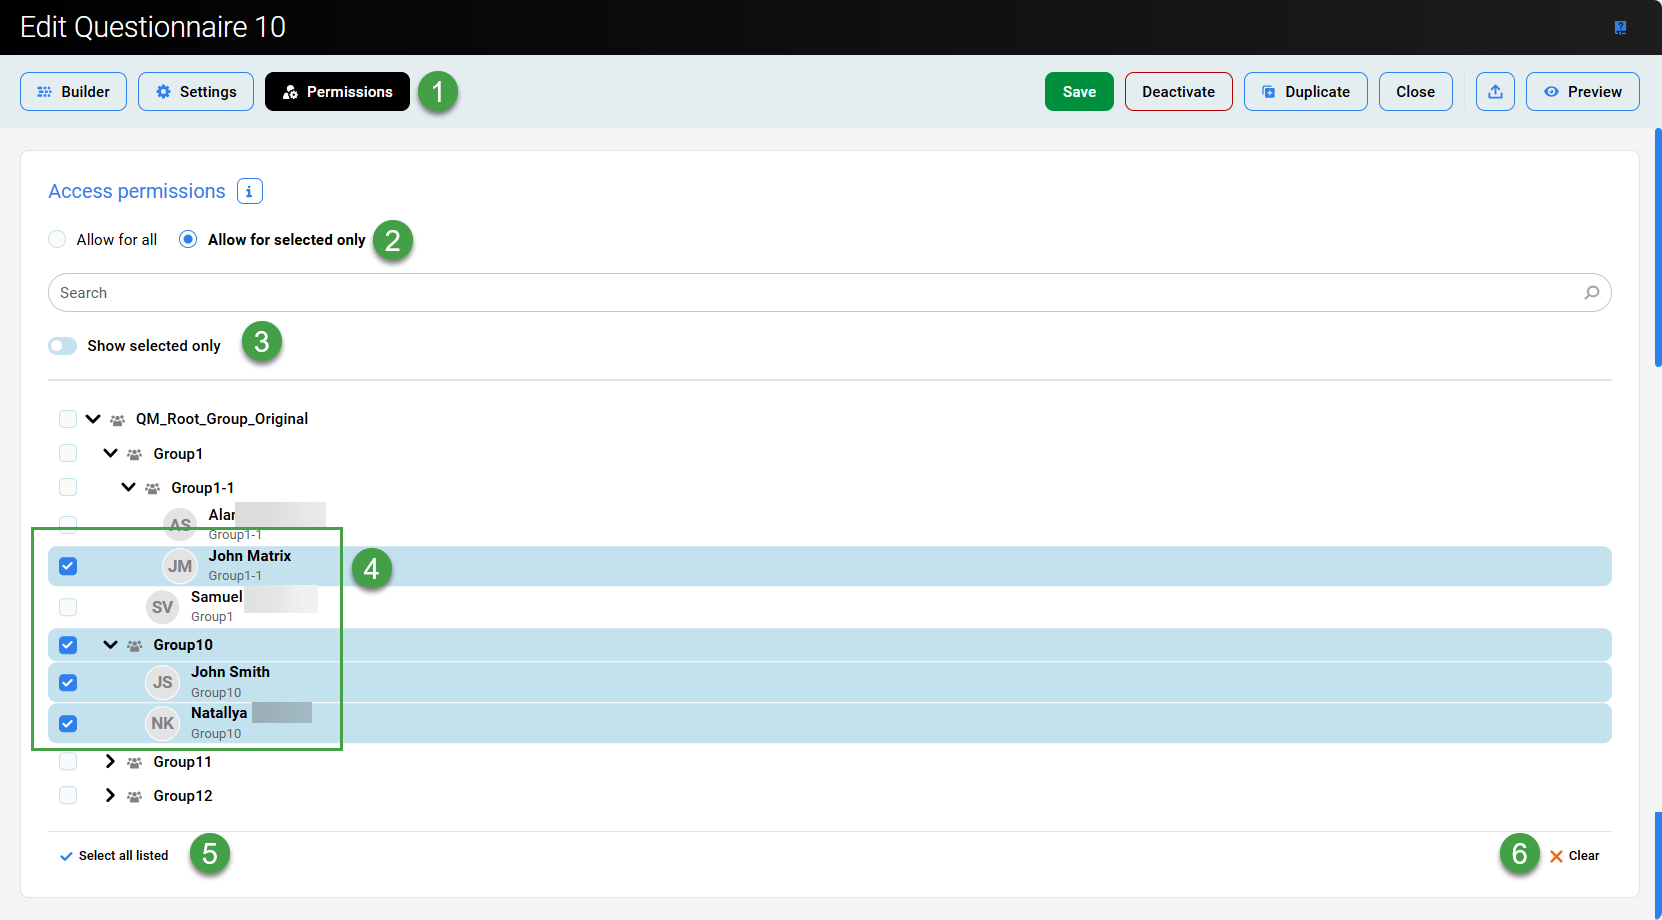
Click Permissions to switch screens.
-
Select which users can view this Survey/Questionnaire.
-
Allow for all – Select this to grant access to all users. This will hide all other options.
-
Allow for selected only – Select this option if you want to limit access to specific users or groups.
-
-
Toggle the switch Show selected only to list only those users already selected (to clearly view those who will be given access).
-
Click the > icon to expand and view all available users and groups.
-
-
Select individuals, or entire groups/sub-groups to grant access.
-
Click Select all listed to Select all users (use with caution).
-
Click Clear to de-select all users. This will effectively reset the list of selected users so no one will have access.
Click Save or Save and activate to complete the creation process (or deactivate if the questionnaire is already active).
Confirmation Dialogue Messages
The system will double-check that all required fields have been completed correctly. If there are any incomplete sections or errors a dialogue popup will display asking if you want to save as a draft or return to editing.
Save changes?
Do you want to save the questionnaire '<name of the current item>' with conflicts? The questionnaire cannot be activated until all conflicts have been resolved.
Activate questionnaire
You cannot activate the questionnaire until you have resolved all conflicts. Follow the instructions in the Live preview window.
Access Permissions can be modified after the questionnaire is saved and used, without the need to change the questionnaire version.
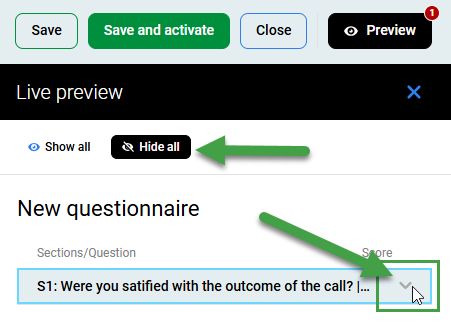
Live Preview Pane
-
Click on Preview to view the Live Preview Pane.
-
Any errors or omissions will be highlighted at this stage.
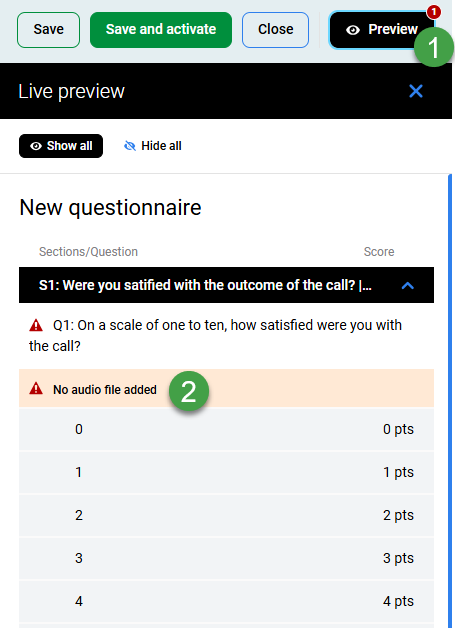
If some items are not visible within the pane, you can toggle their visibility.
You can toggle between Show All/Hide All or expand individual sections to view issues within the various sections.
Adding Survey Questions
Each survey consists of several questions and each question must have several possible answers. Prompt-only questions have no answers and are used to add welcome and goodbye audio messages to the survey. All questions must have a voice-over file linked to each question.
Adding a Question Section
It is not possible to add sections when editing an existing (active) Questionnaire.
To add a section, when creating a Questionnaire:

-
Click Add Section from either the bottom left corner or by expanding the three dots menu to add a new question section.
-
The new section will be added at the bottom of the page. Scroll down to edit.
-
-
Type a suitable (descriptive) name in the Name field of the New Section dialog.
-
Type an optional group description in the Description field for this section of questions. (Add a textual description by clicking on the note icon, Other users can see this extra information in a tooltip when they place the pointer over the question in the Questionnaire).

-
Enter a Section weight (in percent) for this section if you are using a percentage system. Add a percentage weight value to set the percentage that the section contributes to the final questionnaire score. The sum of all weight values for all question sections must be 100 before a questionnaire can be marked complete.
-
-
Click Add section to create a New Section. Or add questions to the current section.
Click Save regularly while creating or editing a questionnaire to avoid losing any data. To edit an existing questionnaire, click on the three-dots menu from the Questionnaires screen at any time, of click on a specific questionnaire to open it in edit mode. It is not recommended that questionnaires with the status Active be edited.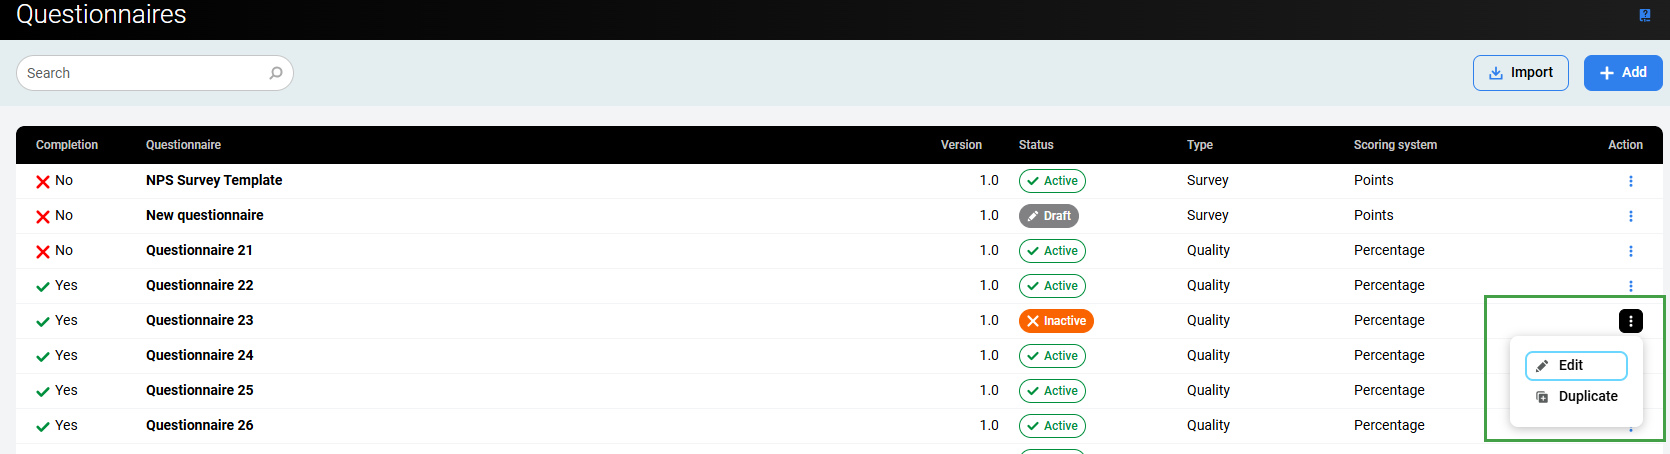
Adding New Questions and Answers – Survey
Each question section must contain at least one question.
-
Section name – Give the section a name: Type an optional section description in the Description field.
-
Question name – Give the question a clear name. This is the text that other users see in Quality Management. Add an optional description of each question. Reviewers can see the description in the grading form if they move their pointers over the blank area next to the question. Add a textual description by clicking on the note icon. Other users can see this extra information in a tooltip when they place the pointer over the question in the survey.
-
Type – Select the Type of question:
-
Regular question – Select this to create a simple question and manually create answer(s) for the question. Contains one or more answers. The answers are selected by pressing the associated digit on the phone keypad. The last option for these types of questions is always a N/A answer without an associated digit in the event that the caller hangs up without completing the survey.
-
NPS® Question – Select this to quickly create a question with answers ranging from 0 to 10. This type allows for the creation of an NPS (Net Promoter ScoreSM) Survey. It contains 12 options with values ranging from 0 to 10, plus the N/A (not applicable) option. You may add only one NPS Question to a questionnaire. (This question type is only available when Scoring System is set to "Points". Read more on the Adding a New Survey page).
-
Prompt only – Select if an audio prompt will be played back, but no answer is expected. This question doesn't contain any answers. The prompt is played and the survey automatically proceeds to the next question. No scoring is available for this type of question.
-
Customer feedback – Select this to create a question and manually create answer(s) for the question.
-
These types of questions are used so that customers can provide verbal feedback, which is recorded and attached to the survey results. These questions require a N/A option for two reasons:
-
In case the customer disconnects the call. N/A answer without an associated digit is used as it can not be scored.
-
The client provides feedback and the voice recording is attached as a media file. A N/A answer is attached as the response is not scored but used for internal purposes.
-
-
-
-
Upload an audio file. When creating surveys, every question requires that an audio prompt be uploaded.
-
Add an Answer
-
Not all question types support the editing of answers. For example, if the type NPS Question is selected, the answers are created automatically to allow numerical answers to be provided.
-
-
Compliance – Select if this is a Compliance question (mandatory with a points value) or n/a.
-
For Surveys only two options are available:
-
None: This is the default compliance setting and is used for most answers. This option requires that a numerical score be entered into the Percentage column. Type the answer's Percentage or Points to set this question's scoring.
-
n/a (not applicable): This option can be used in situations where a question shouldn't be used to evaluate an agent. For example, if the question isn't relevant to the telephone conversation. Use n/a to set a score that in the end will have no statistical effect on the result of the review. Four calculating methods are possible for n/a answers. Set the method in Administration > Preferences. See the Preferences page for further information.
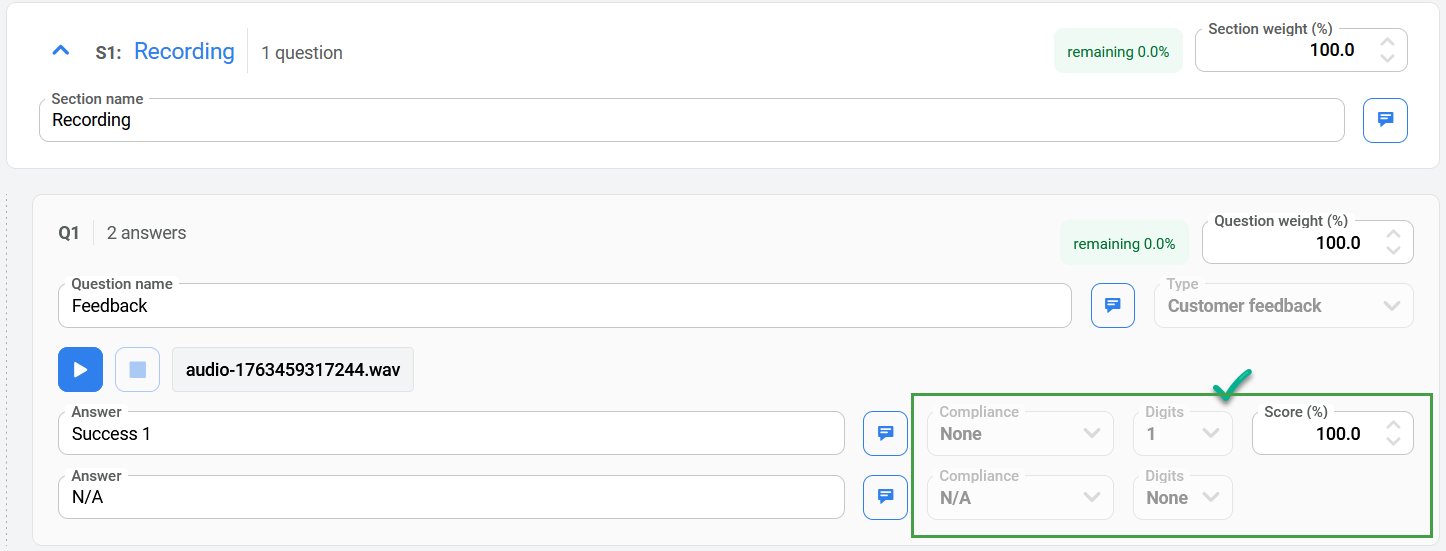
Important: Each survey question should contain a non-applicable (N/A) answer as a final option. A digit for this type of answer should be set to None. This answer is used as a default option in case a customer suddenly hangs up.
-
-
-
Digits – Identify which numerical value will correspond with this answer (for answers entered via telephone dial pad). MANDATORY to ensure that the response is saved to the server.
-
0-9 for regular question
-
0-10 for NPS type question
-
-
Points – Define the ‘weight/value’ to be assigned to this answer.
-
Enter the number of points this answer will be awarded using the Points Scoring system.
or -
Enter a value for this item if you are using a Percentage Scoring system. Add a percentage weight value to all questions labeled as regular questions to set the percentage that the question contributes to the final question-group score.
-
-
Add additional answers as required.
-
The sum of all values for all questions must be 100 before the system will accept the question section as complete.
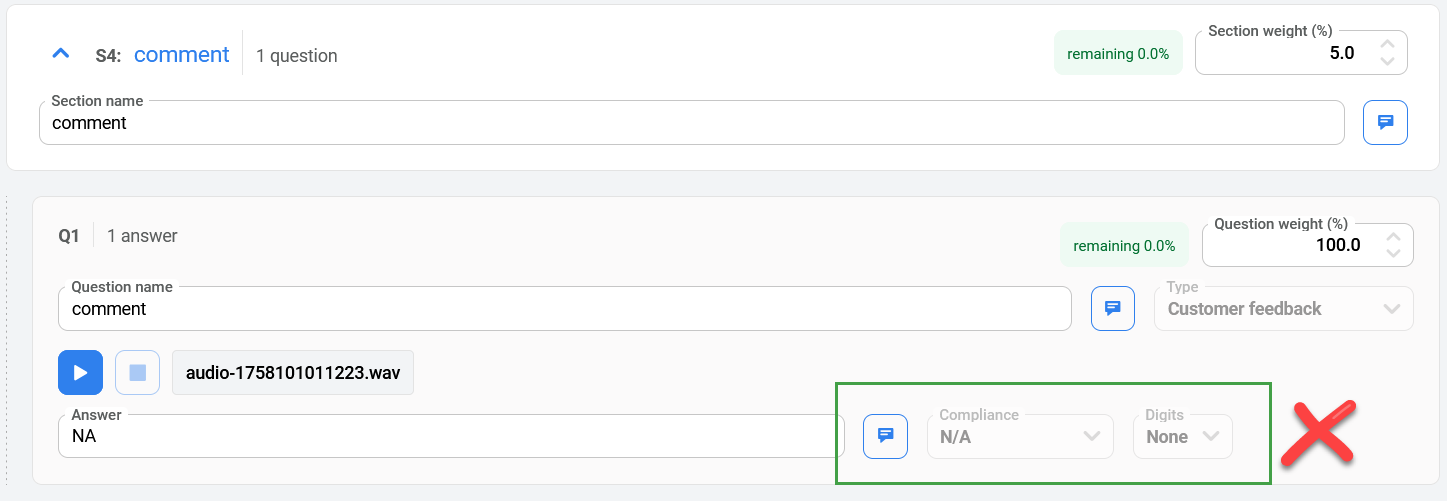
The system will visually display the questions/sections that do not meet this requirement. In this example, you can see that the system has highlighted that there is 12 % remaining. This indicates that it is necessary to increase the Question weight to 100% in order to proceed.
-
When complete, click the Save button. Use the Preview button to validate your newly configured Questionnaire.
Questions in surveys remain in the order they are created. If you wish to reorder how the questions appear within each question section, click on a question to select it and drag it to where you want it to appear. You can also click on a question to drag it to another section.
Important: Quality Management requires that a valid response (in the form of a key being pressed by the customer) for the result to be saved.
A valid survey configuration will include (as an example) a request for the customer to press “1” to record, and any other key to skip recording. If there is no ‘digit' defined in the survey then the results will never be recorded by the system.
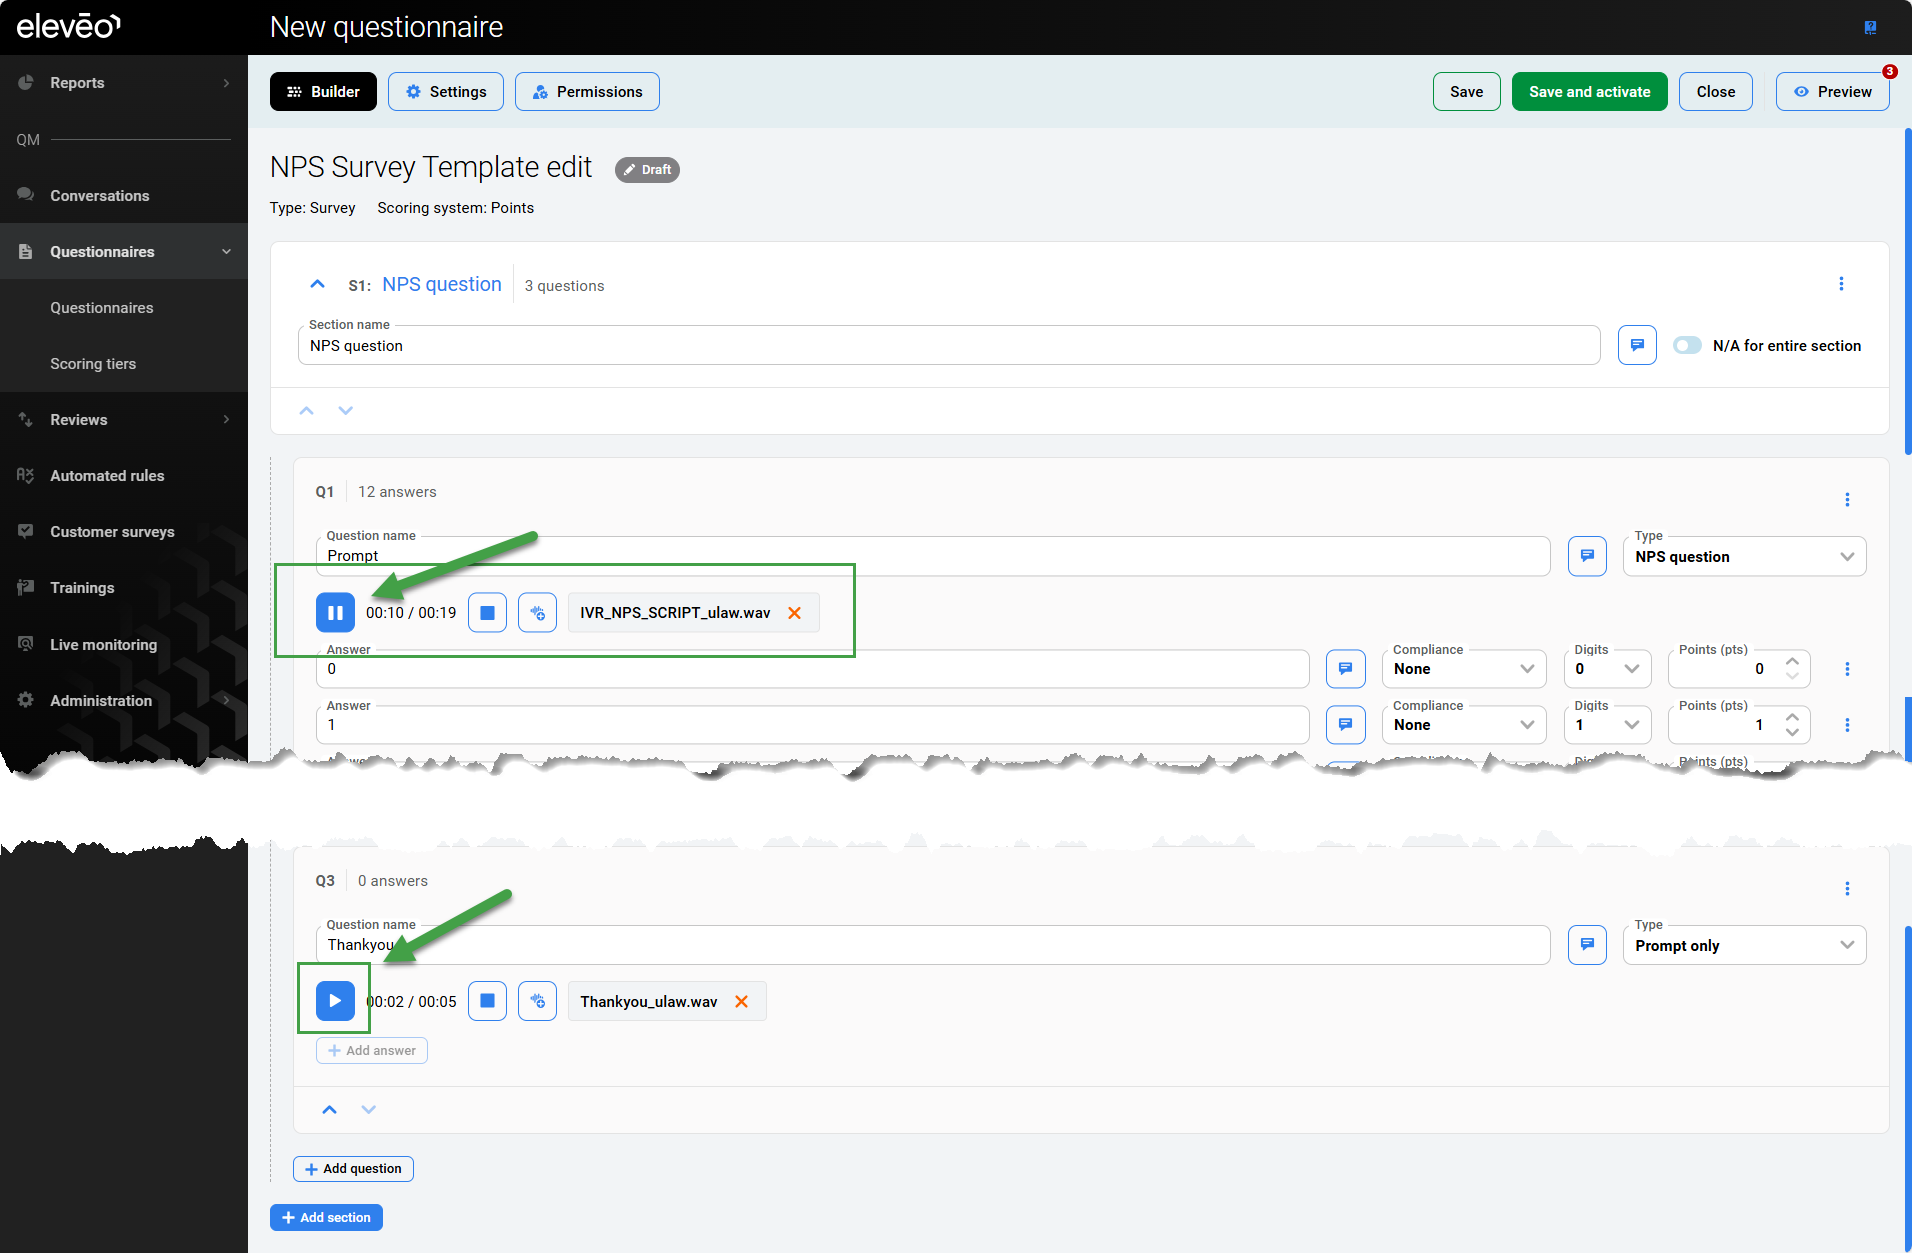
Example valid configuration:
Example Invalid configuration example:
Uploading an Audio Prompt for a Question
-
Select a question.
-
In the Type dropdown menu click Prompt only.
-
Upload an audio file (must be a WAV file) that is to be used for this question.

NOTE
The name of the audio file should contain only letters A-Z and/or digits 0-9. Any special character will be replaced with an underscore ("_").
The following .WAV file format is supported: CCITT u-Law, 8 kHz, 8 Bit, Mono 7 kb/sec
Use the SoX tool to convert .WAV files to the u-Law format:
sox <source.wav> -e mu-law -c 1 -r 8000 <destination.wav>
Media file size limitation – Uploaded WAV files are limited to 50MBs in size.
In case the audio files need to be replaced after the questionnaire is saved and used, create a new questionnaire. It is not possible to replace audio files and save a new questionnaire version.
Replaying Voice Prompt Files
Once the survey is ready and it has all the questions and voice prompt files there is an option to replay the files to make sure that correct files are uploaded. You can delete (x) and re-upload audio files.
Important: The survey should be saved before you can play voice prompt files.
To play a voice prompt file:
-
In the Questionnaires open/edit the survey you want to check.
-
Click the Play icon next to the audio file you want to listen to.
Additional Functionality
Click on the three-dot menu to view options.
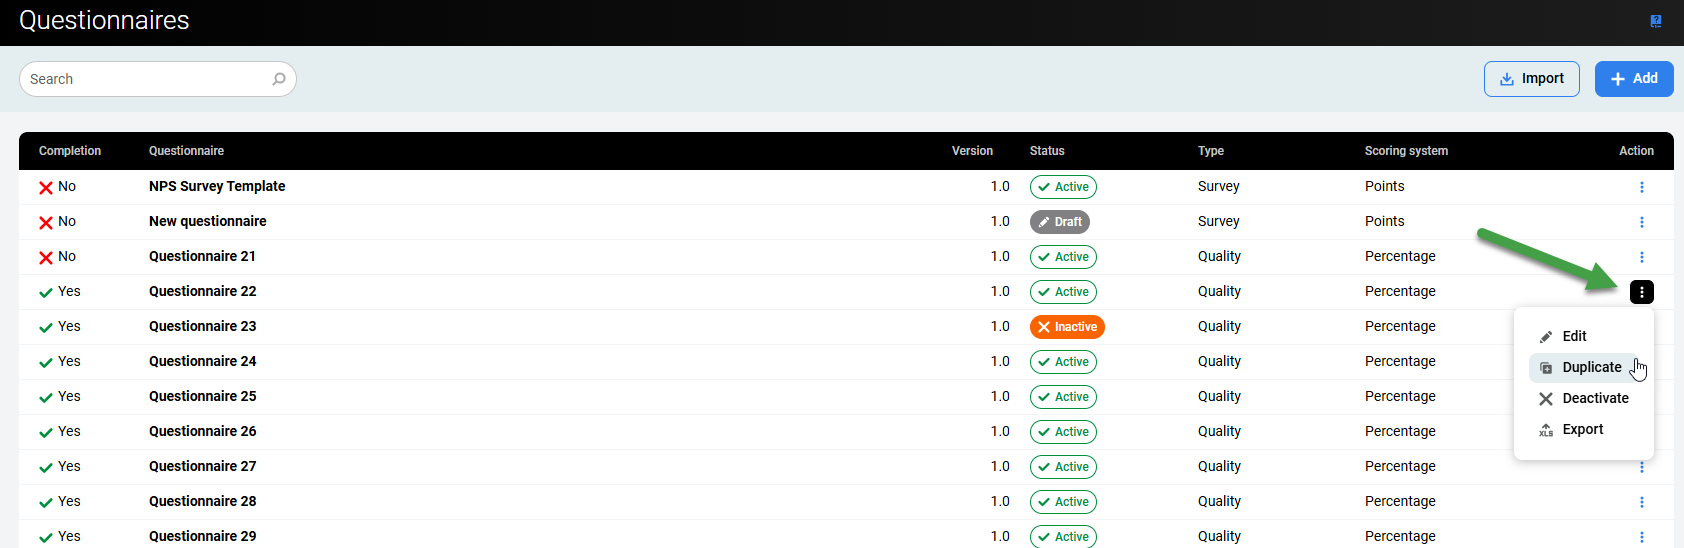
From the Questionnaires page
Click on the three-dot menu to gain access to:
-
Edit – Switch to the Builder to edit the current Questionnaire/Survey.
-
Duplicate – Create a copy of the current Questionnaire/Survey and switch to the Builder.
-
Deactivate – Deactivate the selected Questionnaire/Survey.
-
Export – Export the item in XML format for safekeeping (they can be re-imported in the future if required)
For Sections or Questions
For Sections and Questions, there are options to add a new section/question, move up or down, duplicate, and delete. These options simplify repetitive tasks. You can also click the up (∧) or down (v) arrows immediately below each item on the screen.

Status of Questionnaires and Surveys
Surveys and Questionnaires will be highlighted with one of the following status flags.
Active/Inactive/Draft

Deletion of Questionnaires and Surveys is not supported.
“Net Promoter, NPS, and the NPS-related emoticons are registered U.S. trademarks, and Net Promoter Score and Net Promoter System are service marks, of Bain & Company, Inc., NICE Systems, Inc. and Fred Reichheld.”