
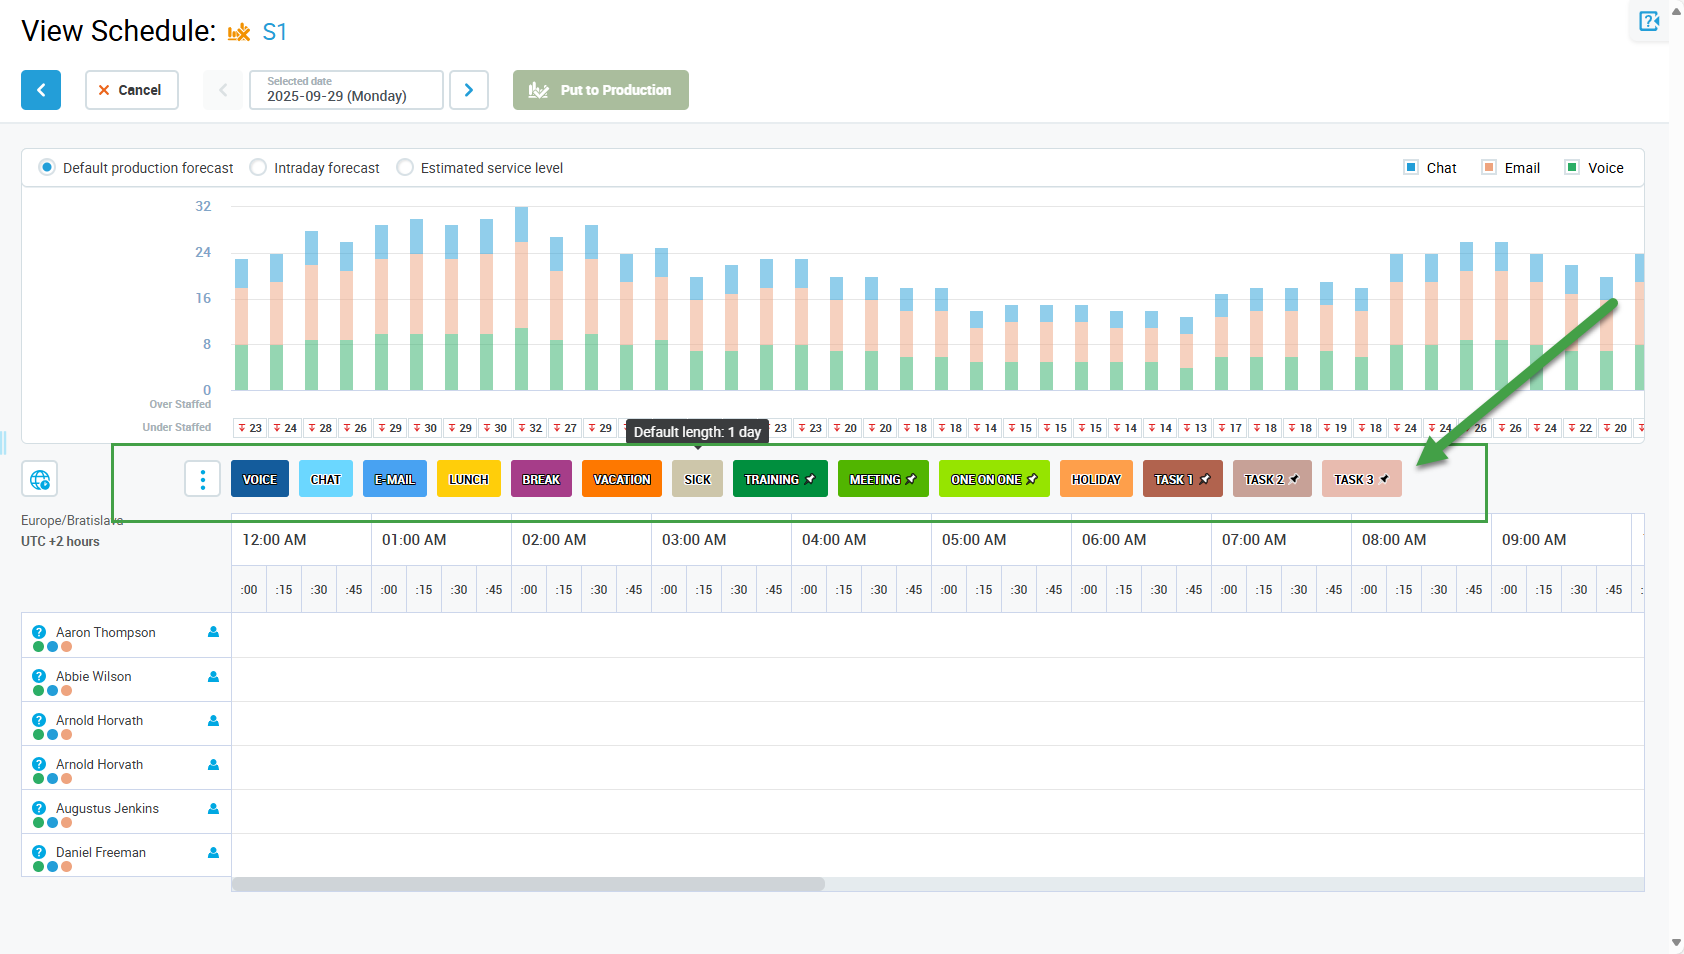
Overview
Schedule elements represent work, activities or non-working times, for example: lunch, break, training, meeting or sick.
Users with access to Administration > Schedule Elements can either view or view and edit schedule elements.
-
Default elements cannot be edited.
-
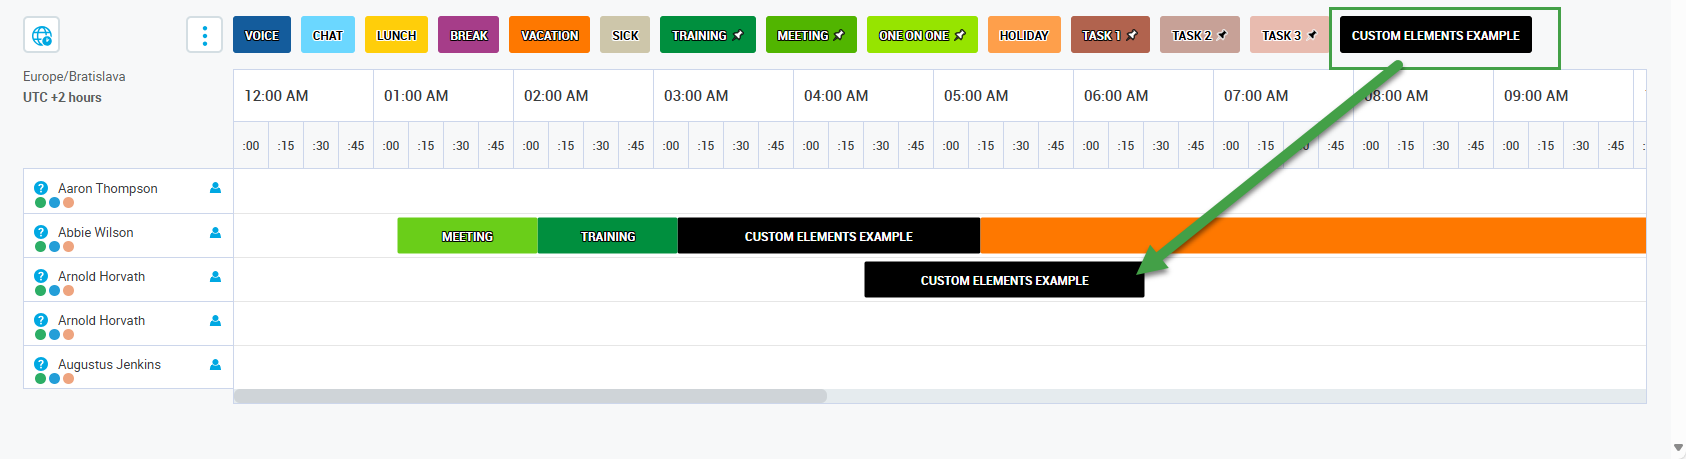
Custom elements (manually created) behave the same way as other elements and can be used to:
-
Build schedules tailored to your business needs.
-
Differentiate between channels of the same type (sub-channels).
-
Note: Tags assigned to elements will also appear in the Schedule Builder and the Production Schedule.
Why create custom elements?
Eleveo default schedule elements may not suit your business. Creating custom elements allow for your business to have default activities that fit your specific business needs. Create elements such as administrative tie or federal holiday, for example, or create Lunch 1 hour if the default lunch 30 minutesdoes not suit your needs.
Eleveo Default Elements explained - Click to view. . . .
The elements represent work, other activities or non-working times, for example: lunch, break, training, meeting or sick. Each element has a default length assigned (for example: Voice - 2 hours, Lunch - 30 minutes etc.).
Hover the mouse cursor over elements to see their default duration.
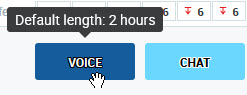
Each schedule element has the following parameters assigned: default length, type, and if paid or unpaid. Length can be easily modified, whereas type and if paid/unpaid are fixed values.
Elements can be one of the following types:
-
productive – time spent working (for example, being available for incoming calls), only the Voice, Chat and Email elements have this type assigned
-
non-productive – all other work-related activities, when a person is not performing their primary task (for example, is not available for incoming calls due to a meeting, training or break)
Additionally, the Lunch element is marked as an unpaid activity (as many employers do not count lunch as work time), all other elements are paid. This information is used for shift length calculation.
The table below contains information about all available schedule elements:
|
Name |
Description |
Default length |
Type |
Paid? |
Pinnable?* |
|---|---|---|---|---|---|
|
Voice |
Basic work element representing time spent answering calls (channel type: voice). |
2 hours |
Productive |
Yes |
No |
|
Chat |
Basic work element representing time spent answering chats (channel type: chat). |
2 hours |
Productive |
Yes |
No |
|
|
Basic work element representing time spent answering emails (channel type: email). |
2 hours |
Productive |
Yes |
No |
|
Lunch |
Unpaid lunch break. |
30 minutes |
Non-Productive |
No |
No |
|
Break |
Any work break which is paid. |
15 minutes |
Non-Productive |
Yes |
No |
|
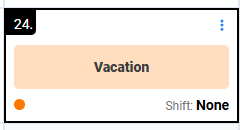
Vacation |
An element representing paid time off requested by a person. |
24 hours |
Non-Productive |
Yes |
Pinned by default |
|
Sick |
An element representing a day off due to illness. |
24 hours |
Non-Productive |
Yes |
Pinned by default |
|
Training |
Time spent on training. |
1 hour |
Non-Productive |
Yes |
Yes |
|
Meeting |
Time spent in a meeting. |
1 hour |
Non-Productive |
Yes |
Yes |
|
One on One |
Time spent in an individual meeting with a supervisor/leader. |
30 minutes |
Non-Productive |
Yes |
Yes |
|
Holiday |
An element representing all non-working days, like public/national holidays, Christmas etc. (not a user's paid time off). |
24 hours |
Non-Productive |
Yes |
Pinned by default |
|
Task 1 |
An element representing any other custom activity |
1 hour |
Productive |
Yes |
Yes |
|
Task 2 |
An element representing any other custom activity |
1 hour |
Productive |
Yes |
Yes |
|
Task 3 |
An element representing any other custom activity |
1 hour |
Productive |
Yes |
Yes |
*Read more about the pinning functionality in the Pinning and Unpinning Elements section.
Note that by default the Vacation element is set to one day:
-
If a person has no elements assigned for a given day, the Vacation will automatically extend to cover the whole day.
-
If another element is already assigned to a person and then vacation is assigned for the same day, the Vacation element will start from the end of the previous element until the end of the day.
Note that only users with the following roles assigned are able to access or edit this screen:
-
View only –
WFM_VIEW_SCHEDULE_ELEMENTis assigned to WFM_SCHEDULER by default. -
Edit –
WFM_EDIT_SCHEDULE_ELEMENTSassigned to WFM_ANALYST by default.
Default View
Go to Administration > Schedule Elements to create custom schedule elements for use in schedules.
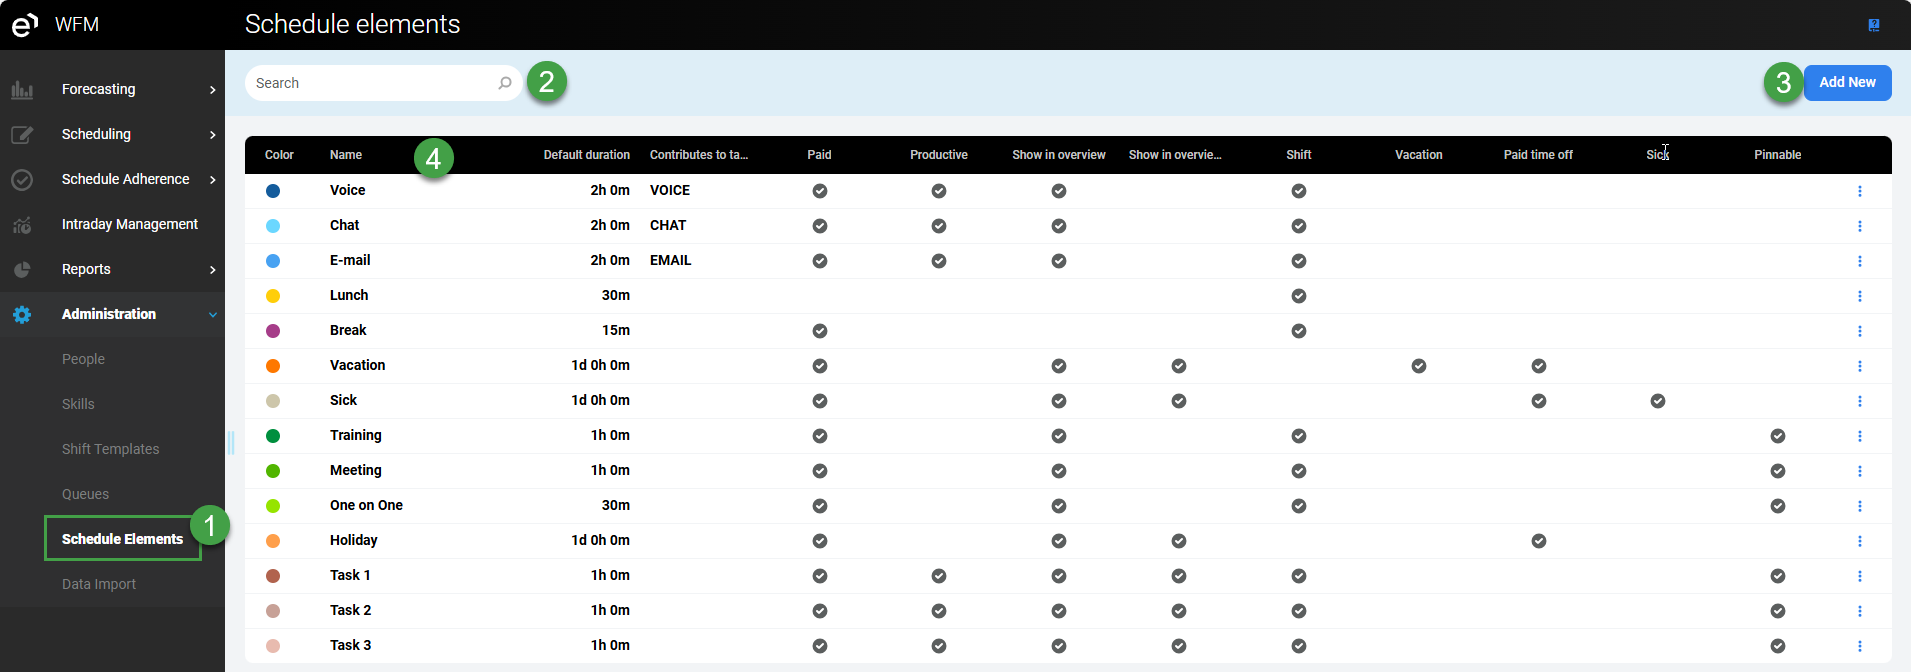
-
To display elements that already exist in the system, expand the Administration module from within the navigation tree and click Schedule Elements. The screen will display.
-
Search for an existing element by name.
-
Add new – Create a custom Element (described in the section below).
-
Information about each element is displayed in the following columns:
-
Color – Visible in the schedule, used to differentiate items.
-
Name – Name of the element, must be unique.
-
Default duration – Default length of time, modifiable when manually creating a schedule.
-
Contributes to tags – Productive items require a tag.
-
Paid – Indicates if the element is considered as paid time, by default ‘Lunch’ is not considered as paid time. Custom elements can be paid or unpaid.
-
Productive – Indicates if the element is considered as productive or not, if productive is selected then additional options will be available (tags can be added to the element).
-
Show in overview – Items are displayed as a list of items on the user’s calendar.
-
Show in overview big – The element is displayed prominently on the agents calendar. Commonly used for full or half day activities, such as Vacation or Sick days.
-
Shift – Indicates if the element is part of a shift, used by the backend when creating schedules.
-
Vacation – Indicates if the element is time off (used in reports).
-
Paid time off – Indicates if the element is paid time off.
-
Sick – Indicates if the element is considered as Sick time, and therefore non-productive (used in reports).
-
Pinnable – If selected the element can be pinned. If not selected the element will not be pinnable.
View Details/Reorder the List of Elements
Click on the three dots menu to the right side of each listed item to reorder, edit or remove an item.
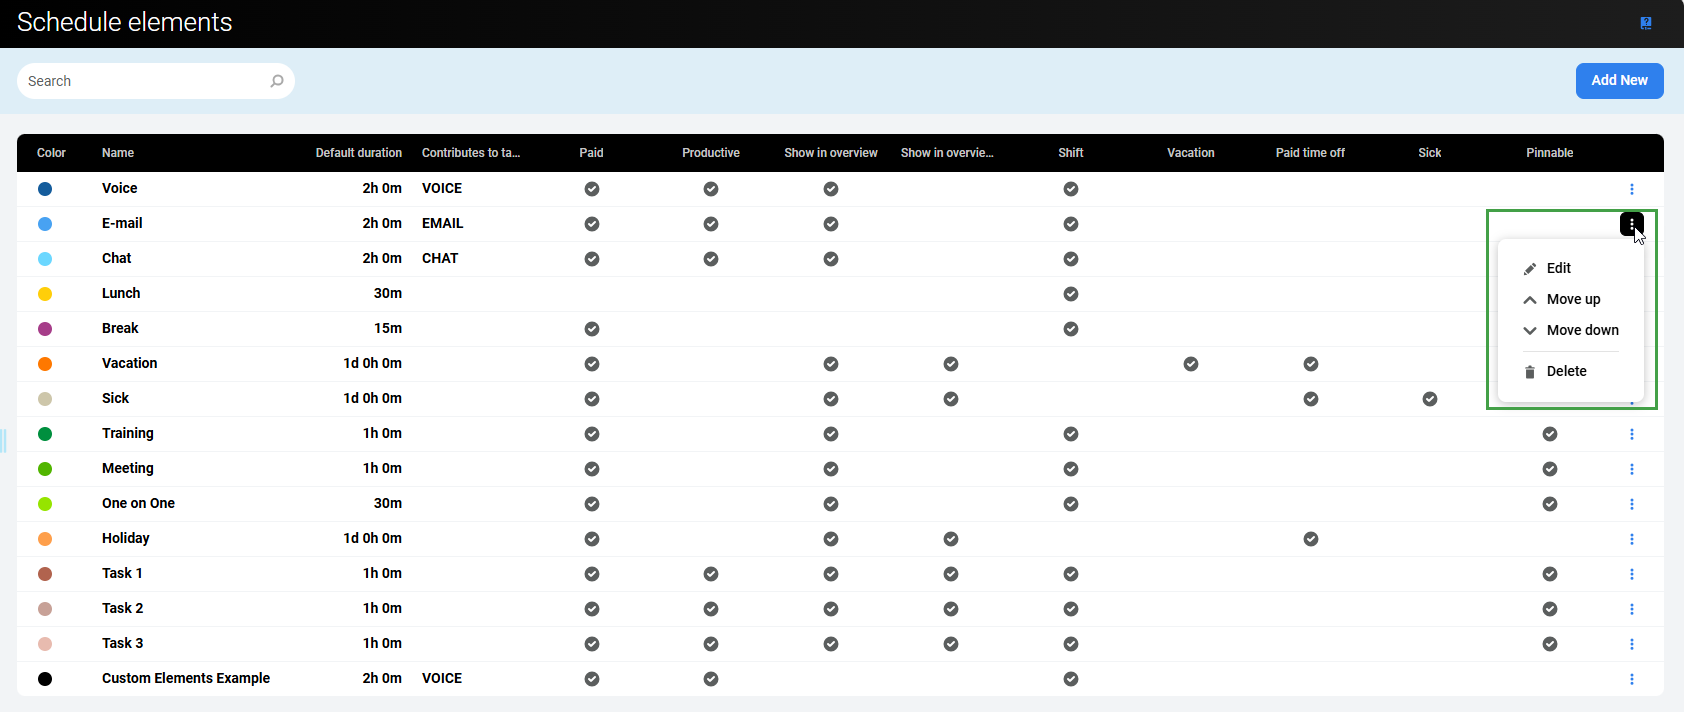
The following options are available:
-
Detail – View details about the item.
-
Move up – Move the item one line higher.
-
Move down – Move the item one line lower.
-
Delete – Delete the item. It is only possible to delete items if they are not currently in use in a schedule or adherence setting.
Moving elements up or down in the list also changes the order Elements are displayed in the Scheduling studio.
Creating New Elements
To add a new element click Add New.
The Add element pane will open.
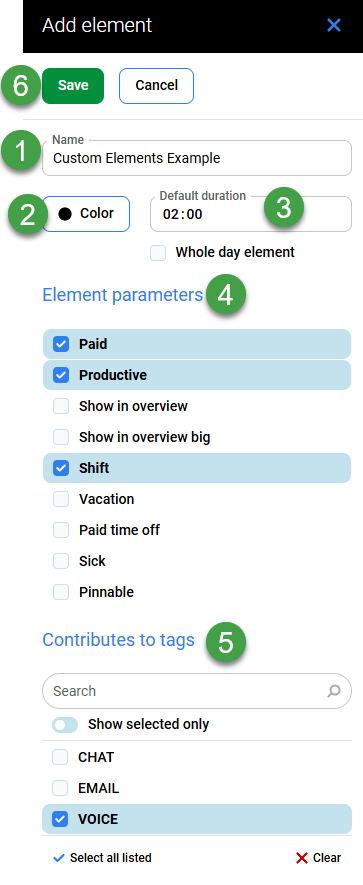
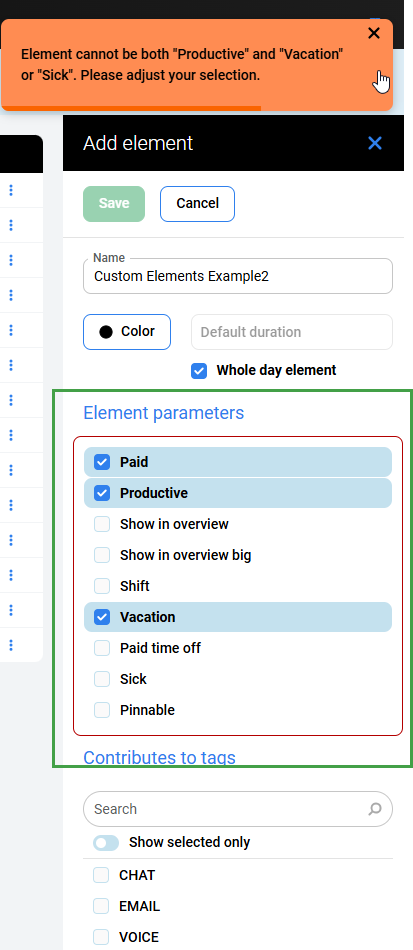
Fill in the following details:
-
Name – Give the new element a unique name.
-
Color – Select a color to associated with the element.
-
Default duration – Select the time period to associate with the element. Use 15 minute intervals ranging from 0:15 to 23:45.
-
Or use the checkbox to indicate a 24h interval (Whole day element).
-
-
Element parameters – Click to select from the list of existing parameters.
-
Contributes to tags – Select which tags to link to the element (tags available will depend on what has been configured; refer to the page Managing Queues for more details).
-
Save/Cancel – Save or cancel your changes.
The new item will be visible in the list of elements.
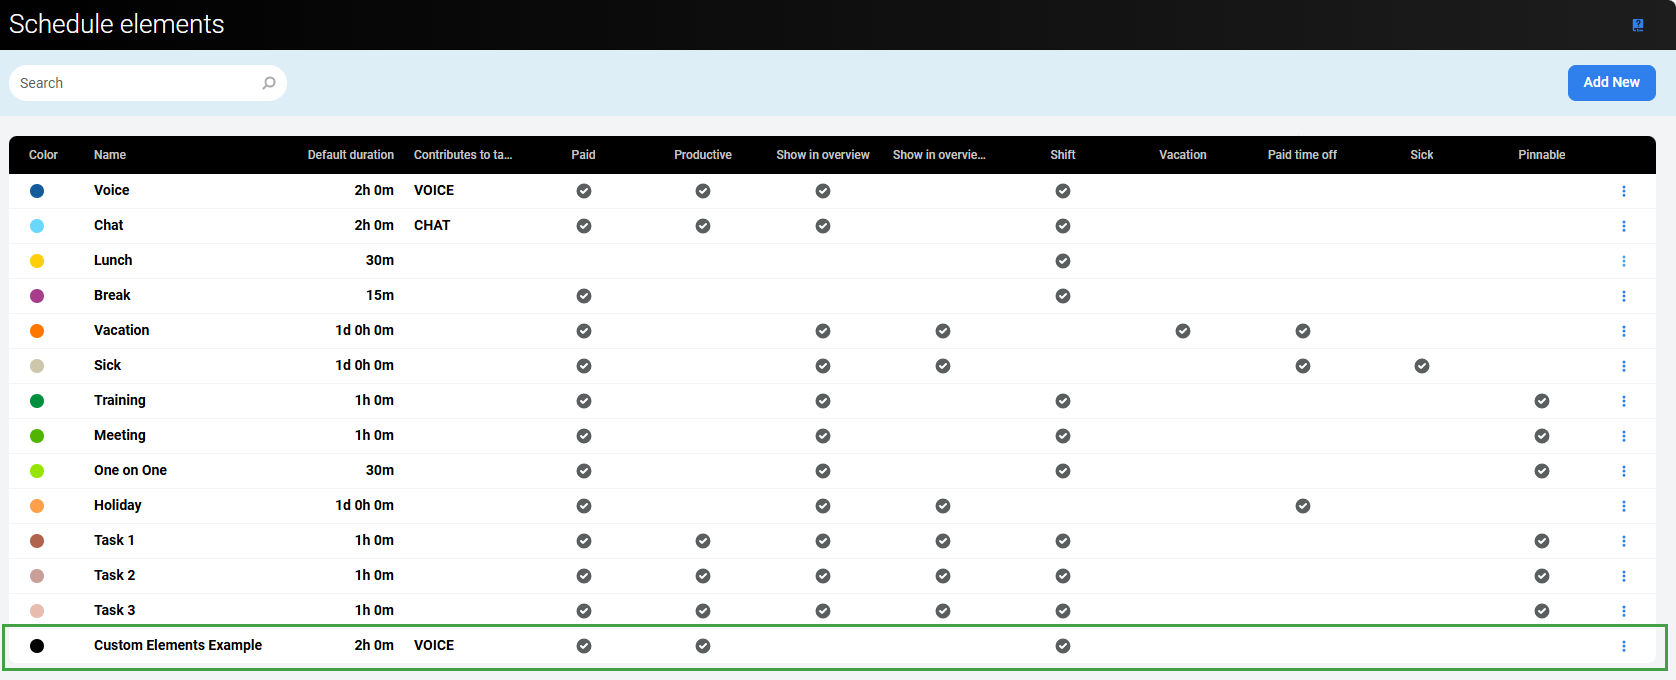
And it will be available for use when creating a schedule.
Limitations/Restrictions
The following combinations/options are not supported. An error message will display if they are selected/combined.
-
An element marked as
VacationorSickcannot be a shift. -
An element cannot be marked as both
VacationandSick. Select only one. -
An element cannot have both
ShiftandShowin the Show in overview big parameters checked. -
Productivecannot be checked along withVacation/Sick. -
Productivecannot be checked together withPaid time off(these options are mutually exclusive). -
Shiftcannot be checked together withPaid time off. -
Contributes to tags is applicable only for productive elements
-
Tag section is disabled, if productive is not checked.
-
-
Shiftelements cannot be marked asShow in overview big.
Additionally:
-
Existing Default schedule elements are not editable nor deletable.
-
Only one tag can be assigned to a schedule element to correctly calculate the work contribution
Error?
After filling in all relevant details click Save. If any errors are present, the system will highlight them. It is not possible to save an element with errors.
Editing Items
Items can be edited only if they are not used in any schedule or adherence settings. Items that can not be edited will be greyed out if the element is in use.
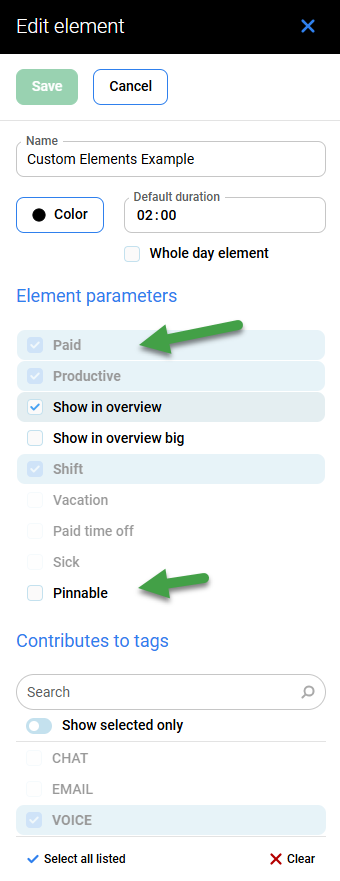
The following can be modified even if the element is part of schedule or adherence settings:
-
Name – Name of the element must be unique.
-
Default duration – Use 15 minute intervals ranging from 0:15 to 23:45.
-
checkbox for 24h interval (since it's not possible to choose this in time field)
-
-
Color
-
Show in overview
-
Show in overview big
-
Pinnable.