
Understanding the Reviews Screen
New reviews can be created in the Conversation Explorer or scheduled using the Plan Manager.
-
To schedule reviews immediately, use the Schedule review button on the Reviews screen.
The Reviews screen contains the following controls and columns:
-
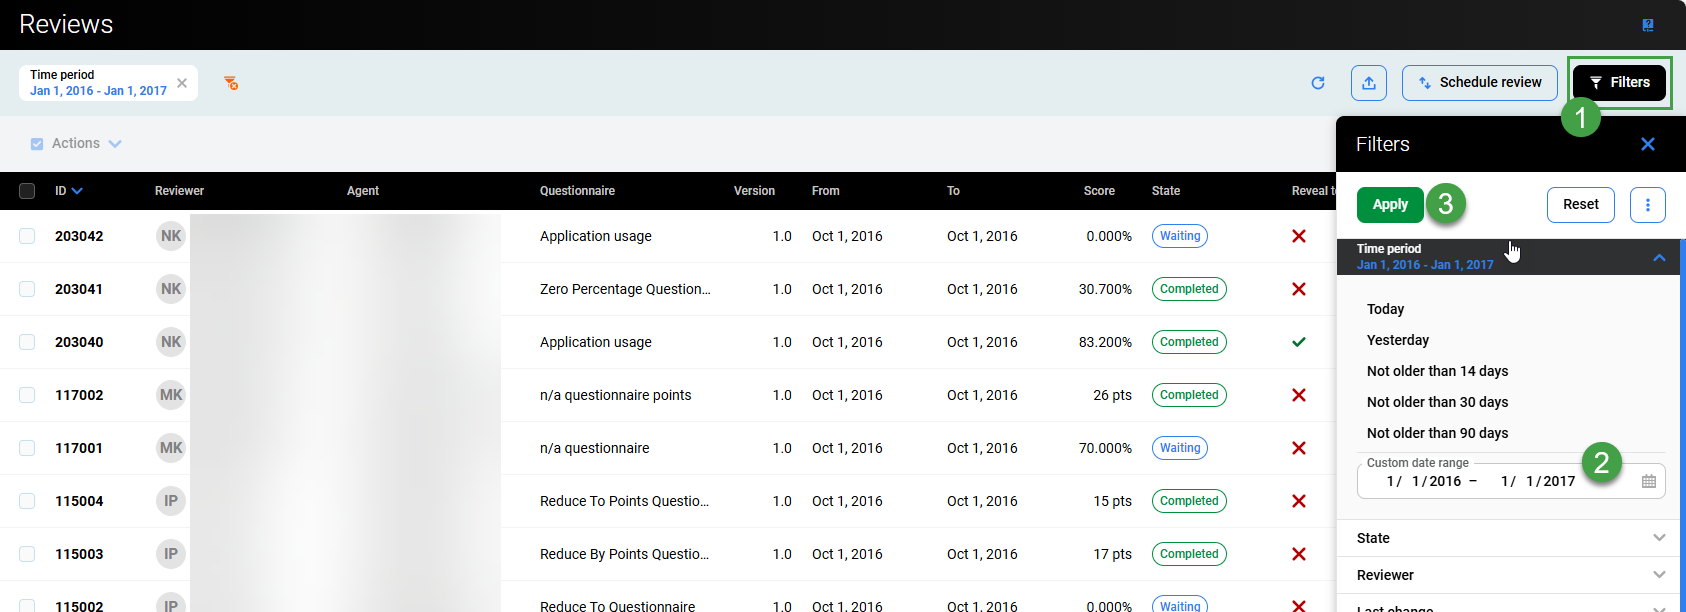
Active filters – Filters restrict what items are listed on the screen. By default, only items from the last 90 days display.
-
Click the x on a filter label to remove it, or click Clear all filters to remove all filters.
-
-
Refresh – Click to refresh the page or update the list of visible items.
-
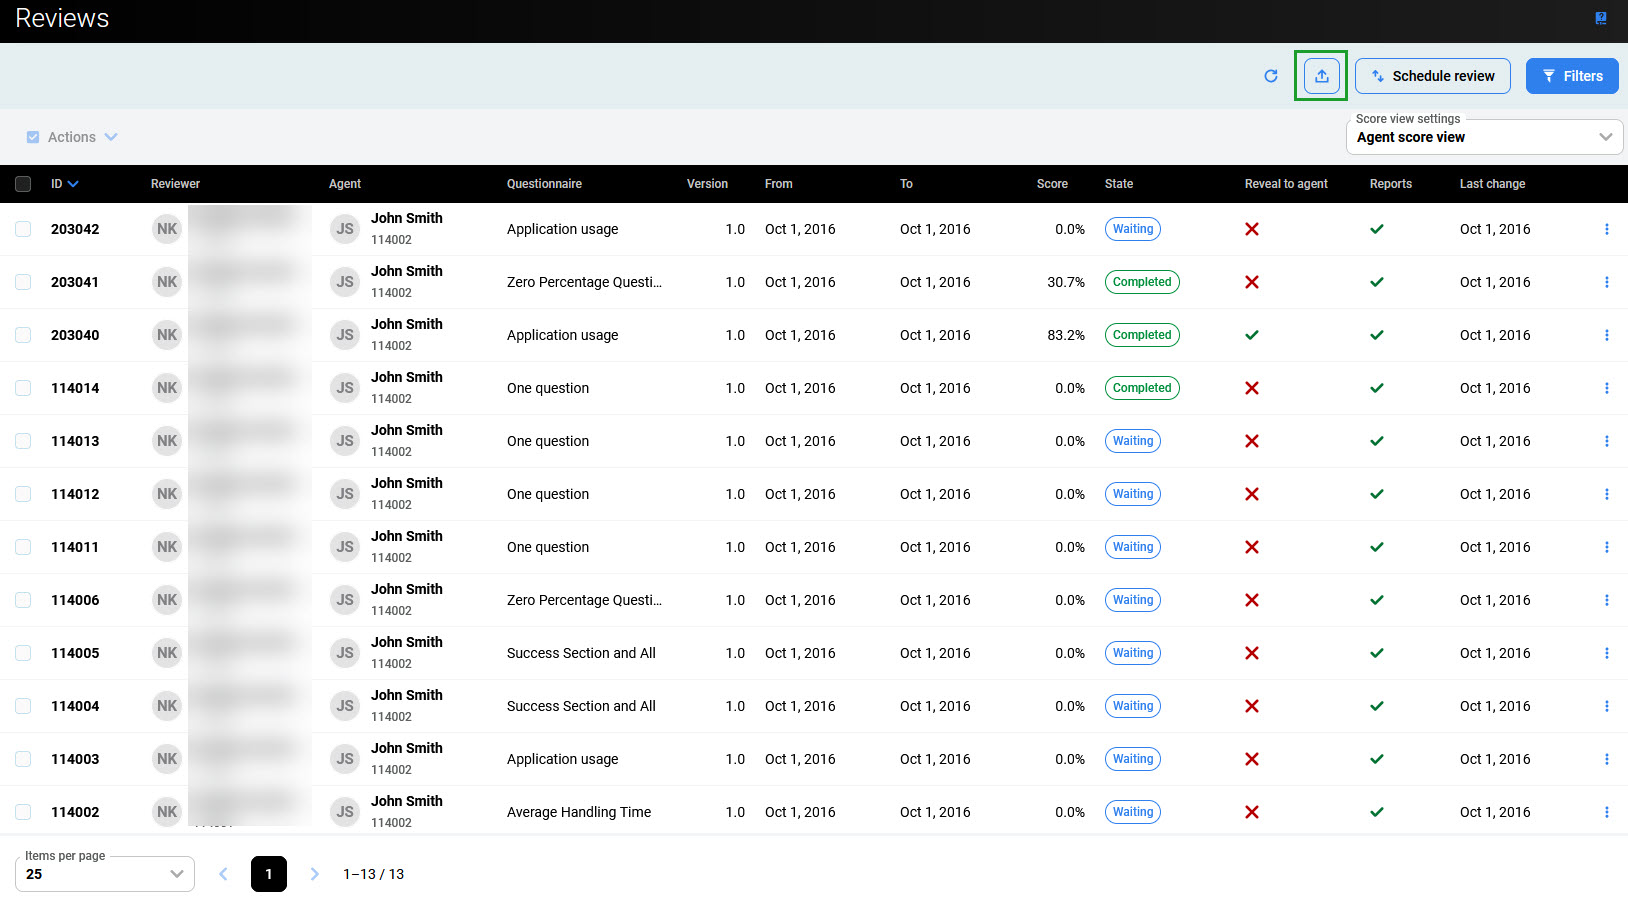
Export – Export data from this screen. For more details, see Exporting Reviews.
-
Schedule review – Click to open the interactive form to create a scheduled review.
-
Filter – Click to open the list of available filters to limit what items will display on the main list of Reviews.
-
List of reviews – Displays all available reviews. Filters and user permissions limit what will be available to view.
Viewing Existing Reviews
Existing reviews can be viewed from the Reviews screen. By default, the results display content from the last 90 days.
-
Click Filters to modify what will display. For example, use filters to display all reviews that used a specific Questionnaire, or for a specific Agent.
-
In this example, filtering by Time period.
-
Click Apply to ensure that the newly selected filters are active.
Visible Columns
Key information about completed reviews is displayed on the Reviews screen.
-
ID – Review ID.
-
Reviewer – Name of the reviewer.
-
Agent – Name of the agent/user who was reviewed.
-
Questionnaire – Which questionnaire is used for the review.
-
Version – The review's version information is listed.
-
From – Start date of the period to be included.
-
To – Date to be included.
-
Score – Final score for the review.
-
State – Indicates the current status: Waiting, In Progress, or Completed.
-
Reveal to agents – Indicates whether the review is visible to the assigned agent.
-
Reports – Indicates if the results will be included in reports.
-
Last change – Indicates when the review was last modified.
Sort the columns. Click a column header to sort the list by that column. The active sort column is indicated by a small blue arrow.

Agent View
Agents with access to the Reviews screen can view only the reviews where they are assigned as agents, and Reveal Results to Agent is enabled. A review with Reveal Results to Agent disabled is not listed, and no score, detail, or indication that the review exists is shown to the agent, regardless of the review state. Reviewers, supervisors, and managers viewing reviews through their own permissions are not affected. The default state of Reveal Results to Agent for new reviews is set by the Default value for Reveal Results to Agent option in Preferences (Preferences) and can be changed when performing the review or from the actions menu on the Reviews screen. For a revealed review, how the score is presented follows the questionnaire Show to Agents scoring tier.
Only agents Enabled in User Management with the permission REVIEWS_AGENT_ENABLED can be reviewed.
If unlicensed, no Review be created for the agent.
Scheduling/Planning a Review
It is possible to quickly create a Scheduled review. The interactive form speeds up the process and validates progress.
To schedule/plan a review:
Step 1
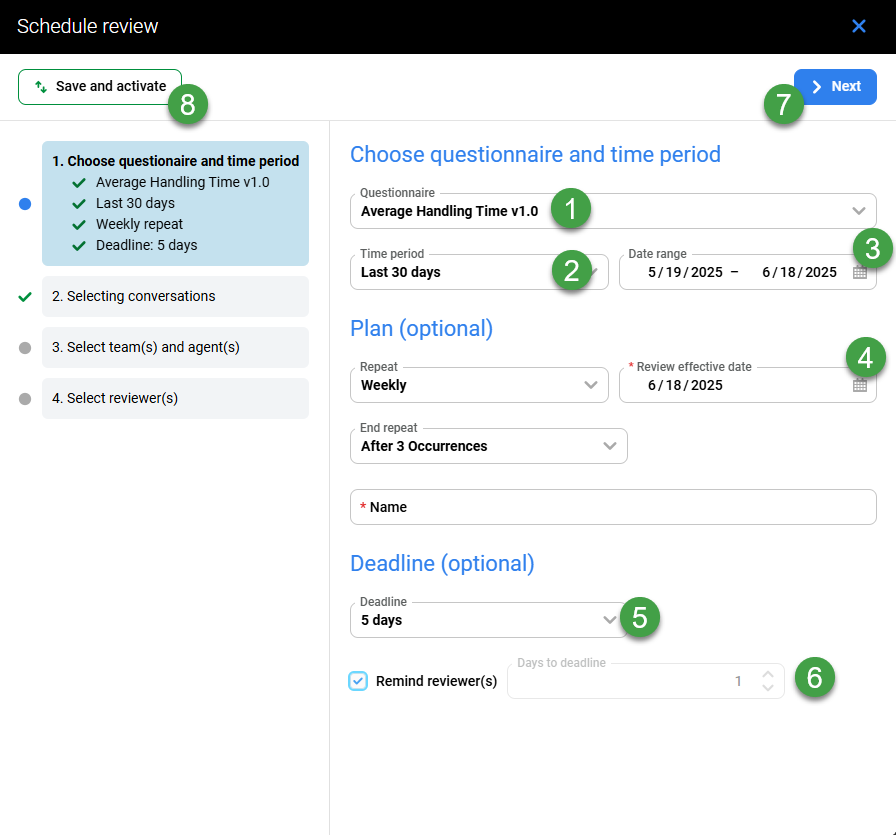
Click Schedule review/Add new at the top of the screen. The Schedule review pane opens.
-
Questionnaire – Select from the list of available Questionnaires.
-
Time Period – Choose the time period to include.
-
Date range – Specify the range to include for review(this option is automatically filled in by the system based on the Time period- it can be modified)
-
Repeat – Define how often the scheduled review should occur.
-
Select never to trigger this only once.
-
If the Repeat option is set to Never (by default) there are as many review instances as many combinations of agents and reviewers. However, they will only be generated one time. If the Repeat option is set to a recurring interval, the initial date can also be set for the first review to happen. Use the Review Effective Date field and its calendar to set the date. If a review repetition is set without an effective date, the system marks the item in red.
-
-
Select from the other available options to create a regularly scheduled review. Custom intervals are adjusted based on your preferences on the Preferences page where you can adjust e.g. the beginning of the week, month or year. The end date can be set in the following option "End repeat".
Additional options display-
Review effective date – Sets when the scheduled review is first triggered. This also determines the day of the week the schedule recurs.
-
End repeat – Set the number of recurrences, or select Never to repeat indefinitely.
-
Name – Mandatory field. Name this regularly scheduled review for clarity.
-
-
-
Deadline – Define the deadline for when the review should be completed(optional).
-
Click the select box to Remind reviewers(s). (This option is available only if a deadline is defined). If desired, define how many days before the deadline a reminder email notification will be sent to the users email address. Enter a number in the box named Days to deadline.
-
Click Next to proceed to the next step.
or -
Generate / Save and Activate.
Step 2
-
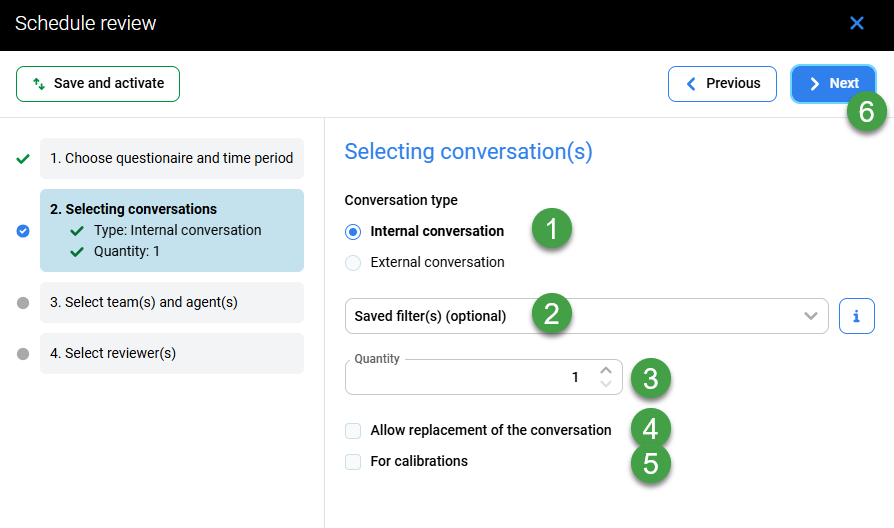
Conversation – Select the conversation type to include. Select between:
-
Internal conversation – Any interaction visible in the Conversation Explorer.
-
External conversation – Any interaction stored outside of the Eleveo Suite.
-
-
Saved Filter(s) – Choose the filters to apply. Select from the available Saved Filters. If none of the available filters are suitable, go to the page Searching for Conversations in the Conversation Explorer and create a new Saved Filter, then schedule a review.
Note –-
When selecting "Random Conversations," the saved filter's criteria will influence the conversations available. However, the agent and time period are defined when creating the Scheduled review, and are not influenced by the saved filter.
-
When choosing "Specific Conversations", the saved filter is not taken into account. Users are instead provided with default filters and the ability to apply their own criteria for selection
-
Keep in mind that Saved filters may be shared by/from other users, and may be modified in the future.
-
-
Quantity – Define how many conversations should be reviewed(a maximum of 10 can be added).
-
A review remains In Progress until all conversations defined by the Quantity value have been evaluated. Only fully completed reviews appear in reports and are available for agent feedback. If evaluators need to complete and submit individual conversations independently, set the Quantity to 1 and increase the review frequency.
-
-
Allow replacement of the conversation – If selected, users with the required role (
REVIEWS_CONV_EDIT) will be able to change the conversation that is to be reviewed. -
For calibrations – indicate if this review should be used for calibration purposes.
-
The For Calibrations option assures that all reviewers completing reviews for the same agent(s), will receive the same set of conversations after the first reviewer clicks the Add Random Conversations button in the review form. When the For Calibrations checkbox is selected, the options to Allow Replacement of Conversations and to Add Specific Conversations in the review form are not available. The For Calibrations checkbox is not selected by default.
-
-
Click Next to proceed with the interactive builder.
Step 3
-
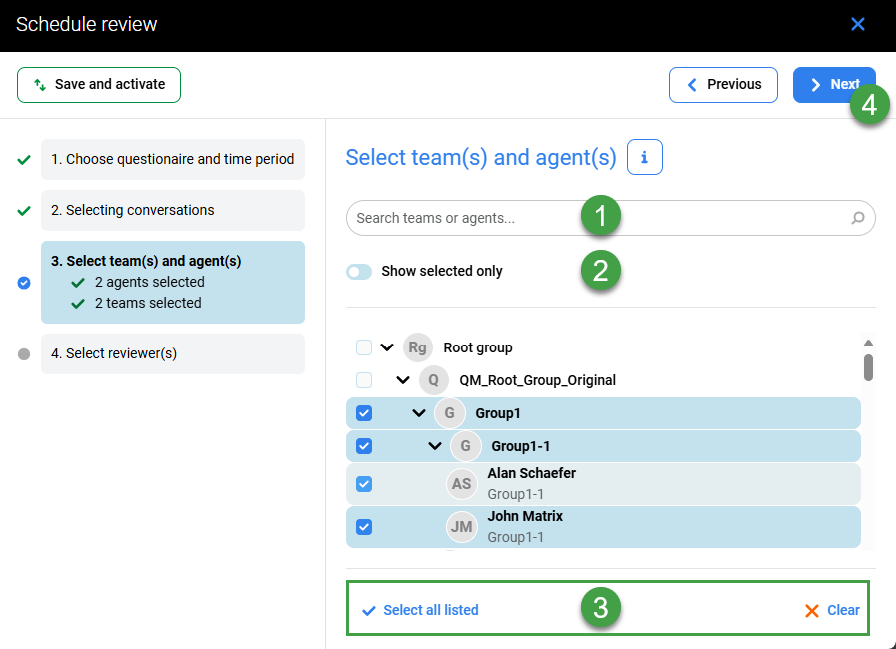
Teams or agents – Search for, or Select which team or agent(s) will be included in the review. When you select the whole team, all agents assigned to the team are included at the moment the schedule is created. Agents added to the team after this schedule is created are not included.
-
Toggle this switch to view only those selected, or all users and groups available.
-
Quickly assign or remove to all users/groups using the option Select all listed, or Clear
-
Click Next to proceed with the interactive builder.
Step 4
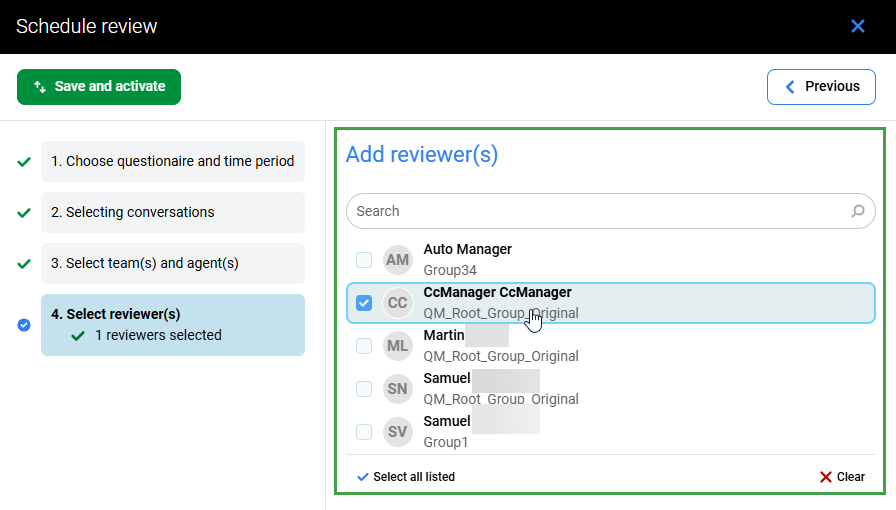
Add reviewer(s)
Select reviewers from the list of available users.
Quickly assign or remove all users/groups using the option Select all listed, or Clear. Only reviewers permitted to evaluate all of the agents defined in the previous step are visible.
Confirmation
Click Previous to go back and make changes or Generate / Save and activate to trigger the one-time creation of review(s).
The interactive form does not allow proceeding if there are serious errors or omissions in the newly scheduled review(s). An error displays, prompting corrections before proceeding.
What is the difference between “Generate” and “Save and activate”
-
Use the option Generate for a one-time review.
-
Use the option Save and activate for periodic reviews.
Reviews Screen Functionality/Options
Additional functionality is available directly from the Reviews screen.
-
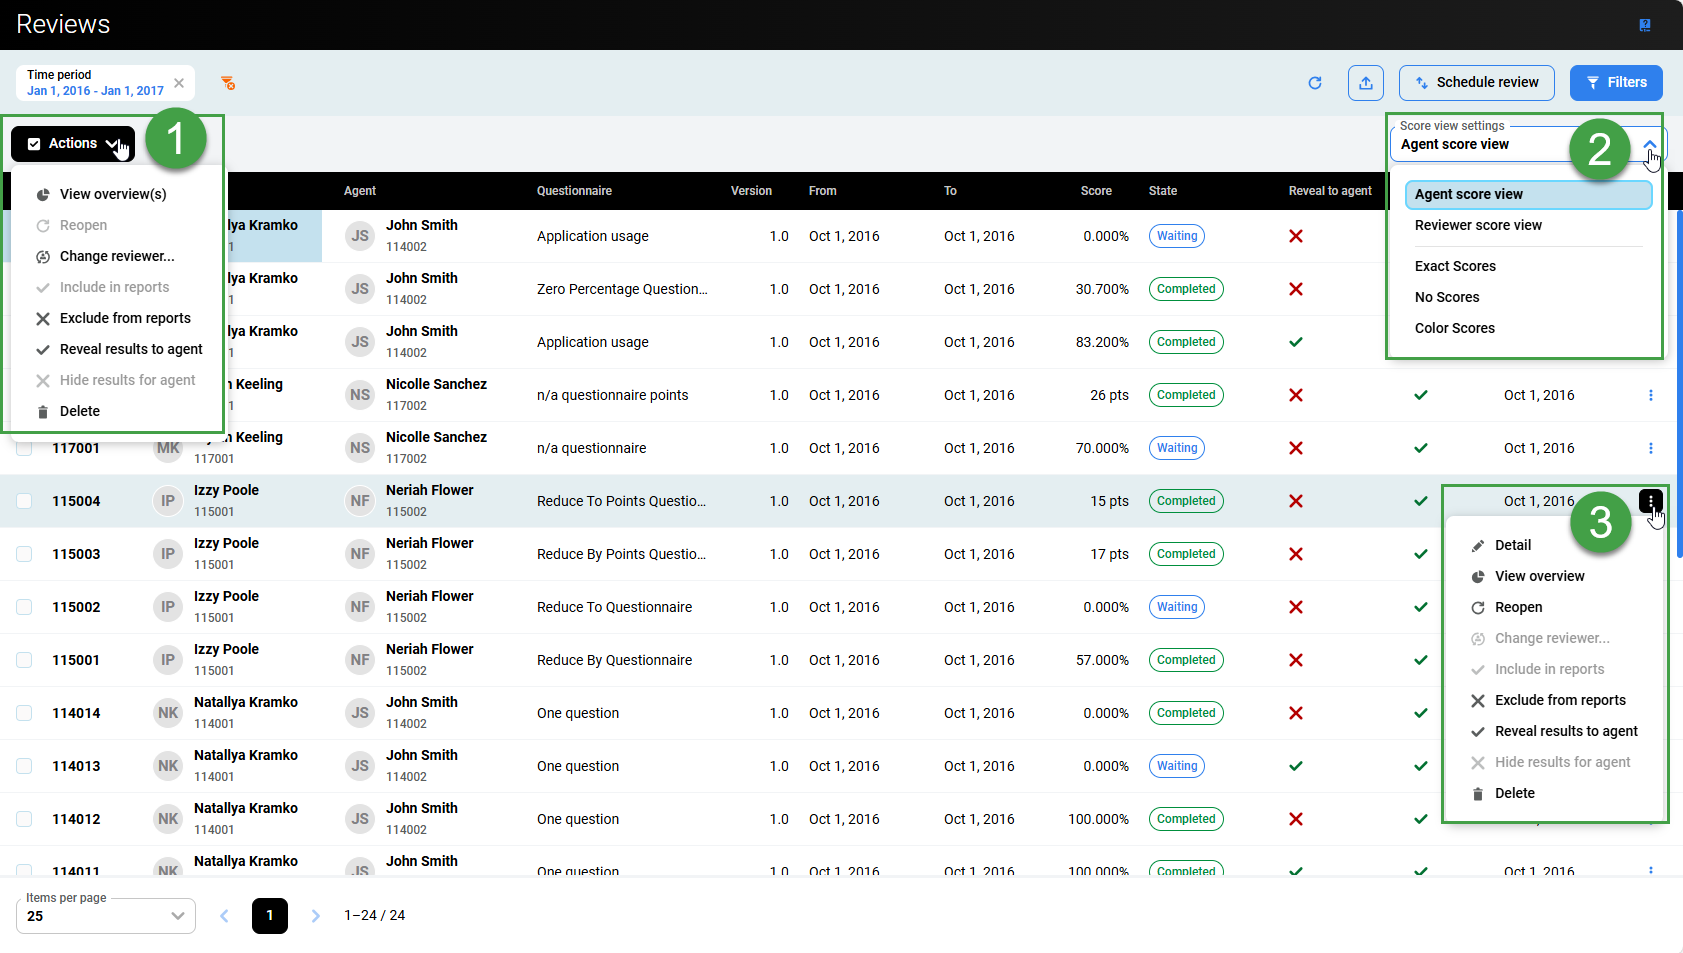
Actions – Select one or more items in the list to enable the Actions menu dropdown.
Actions available include:-
View Overview – Displays the Review overview screen. Toggle the option Show internal notes, to view notes. Click Print to print a hard copy of the results, or click Export to generate an
.xlsxfile for download to the local desktop.
Click Close to go back. -
Reopen – Allows the current user to reopen a review they previously completed. Two conditions must be met:
-
The user must have the required permissions to view (
REVIEWS_VIEW). -
The user must have permission to reopen reviews (
REVIEWS_REOPEN).
-
-
Change reviewer – Change Reviewer from one Reviewer to another Reviewer for all the selected and unfinished reviews. You must have the
REVIEWS_EDIT_REVIEWERpermission assigned to have the Change Reviewer option available to you. Only reviewers with permissions applicable to each review will be listed. -
Include in reports – Dictates whether a review is included in the statistical reports. Regarding the compare reviewers report, all reviews are included in this report regardless of whether the check box is selected.
-
Exclude from reports – Dictates whether a review is included in the statistical reports. Regarding the compare reviewers report, all reviews are included in this report regardless of whether the check box is selected.
-
Reveal results to agent – Gives the assigned agent access to the whole review. Once enabled, the agent can view the review and submit feedback, even if the review is not yet completed or is ongoing. Score presentation follows the questionnaire Show to Agents scoring tier.
-
Hide results for agent – Removes the review from the agent entirely. The agent can no longer see the review, its score, its details, or that it exists, and cannot submit feedback for it.
-
Delete – Delete reviews will remove the selected entries (requires the role
REVIEWS_REMOVE) .
-
-
Score view settings – reorders or changes what is displayed on the screen.
Change How The Score Is RepresentedChoose from any of the available scoring tiers(users/agents with the role
REVIEWS_SELF_VIEWwill not see this option). Your selection will be reflected within the Score column on the Reviews screen.Actions available include:
-
Agent score view – Select this option to enable the Show To Agent questionnaire option.
-
Reviewer score view – Select this option to enable the Scoring Tier defined for the Show to Reviewer questionnaire option.
-
Exact Scores – Exact score number, including decimal places, shown as a percentage.
-
No Scores – Select this option to hide the scores.
-
Color Scores – Select this option to hide results and use Color scores instead. The score will be replaced by a colored dot representing the score. These colors can be modified from the page Scoring Tiers.
Review Score can be represented in various ways if the Scoring System is set to Percent (default), as described on the page Adding a New Questionnaire. Users can modify the score representation on the Scoring Tiers page if the user has the permission
SCORING_TIERS_MANAGE(see the Roles and Permissions page for further information on permissions). -
-
Three dots/More actions menu – To view additional options for individual items, click the three dots icon to the right of the item.
Actions available include:-
Detail – View the Review form for the particular item.
-
View overview – View the Review overview for the specific item. Described below in this article.
-
Reopen – Reopen a review that the current user personally completed. This function depends on two conditions – the user must have the required permissions to view (
REVIEWS_VIEW) and must have permission to reopen reviews (REVIEWS_REOPEN). -
Change reviewer – Change Reviewer from one Reviewer to another Reviewer for all the selected and unfinished reviews. Users must have the
REVIEWS_EDIT_REVIEWERpermission assigned to have the Change Reviewer option available . Only reviewers with permissions applicable to each review will be listed. -
Include in reports – Dictates whether a review is included in the statistical reports. Regarding the compare reviewers report, all reviews are included in this report regardless of whether the check box is selected.
-
Exclude from reports – Dictates whether a review is included in the statistical reports. Regarding the compare reviewers report, all reviews are included in this report regardless of whether the check box is selected.
-
Reveal results to agent – Gives the assigned agent access to the whole review. Once enabled, the agent can view the review and submit feedback, even if the review is not yet completed or is ongoing. Score presentation follows the questionnaire Show to Agents scoring tier.
-
Hide results for agent – Removes the review from the agent entirely. The agent can no longer see the review, its score, its details, or that it exists, and cannot submit feedback for it.
-
Delete – Delete reviews will remove the selected entries.
-
Deleting Reviews
Only users with the permission REVIEWS_REMOVE have the right to delete reviews. Users without the required permission will not be able to delete reviews.
Include/Exclude Reviews from Reports
Reviews can be excluded from reports. Use filters to narrow the list of reviews before choosing to exclude them.
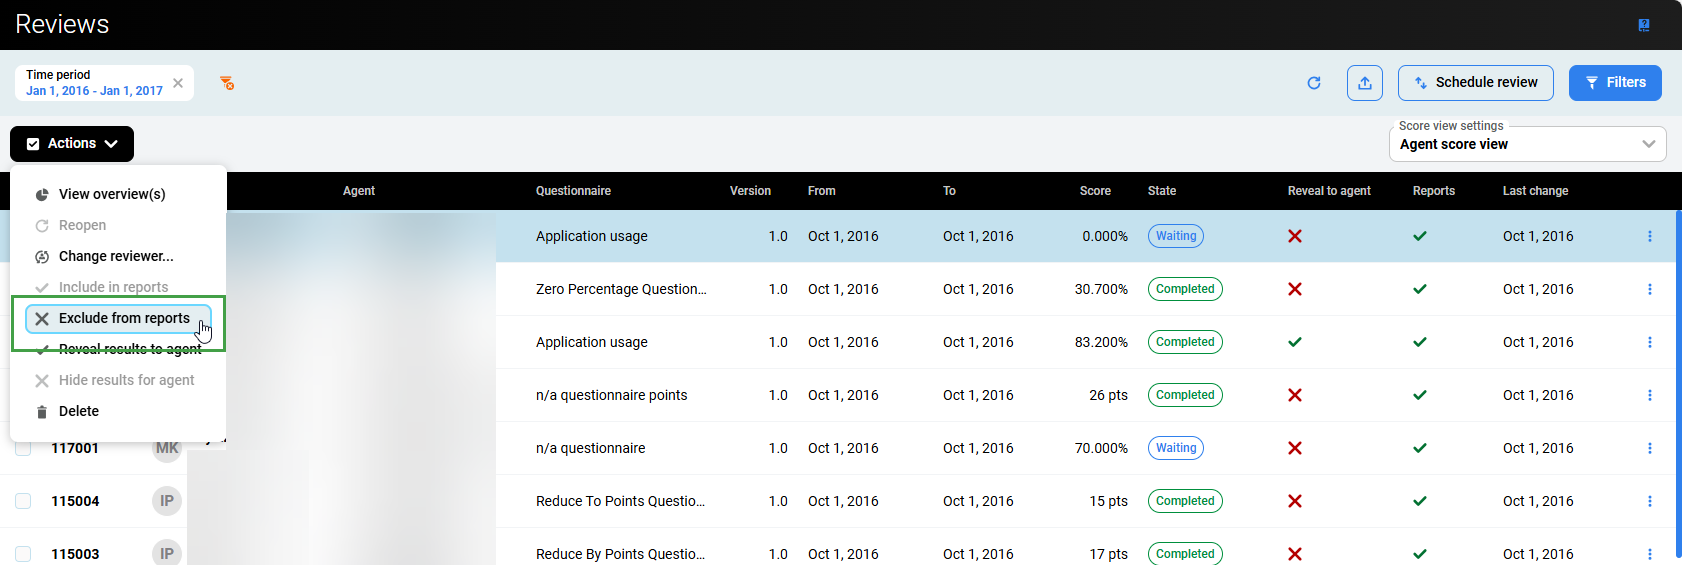
To exclude reviews from reports:
-
Optionally, apply a Search filter.
-
Select one or more items.
-
Click on the Actions (or the three dots menu) dropdown menu.
-
Click on the Include in/Exclude from Reports option.
NOTE
By default, all reviews are included in reports. This means that the reviews are used in Quality Management's built-in reports.
Viewing Completed Reviews
After the review is completed, use the Review Form page to see detailed information about the review. Go to the Reviews screen, then click the completed review or select the box next to the review name and click Detail.The Review Form screen opens and display the results of the review:
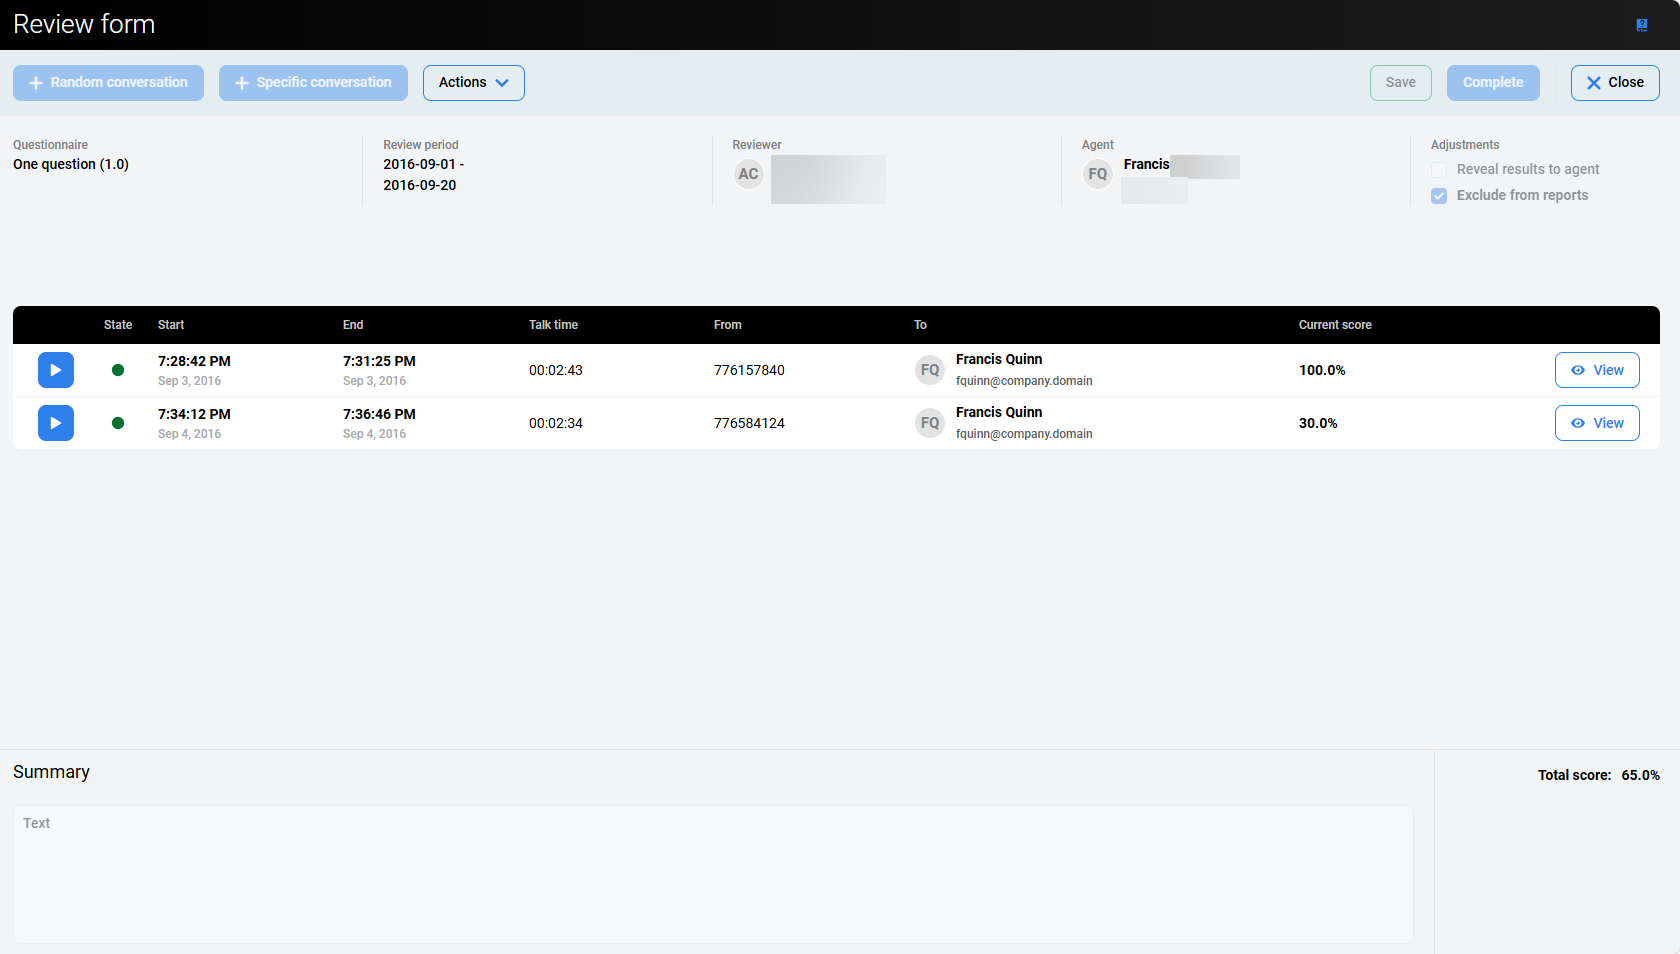
Key information on this page includes the current scores for sub-reviews and the total score. Click the View button to view the Grading Form for the individual items.
Review Overview
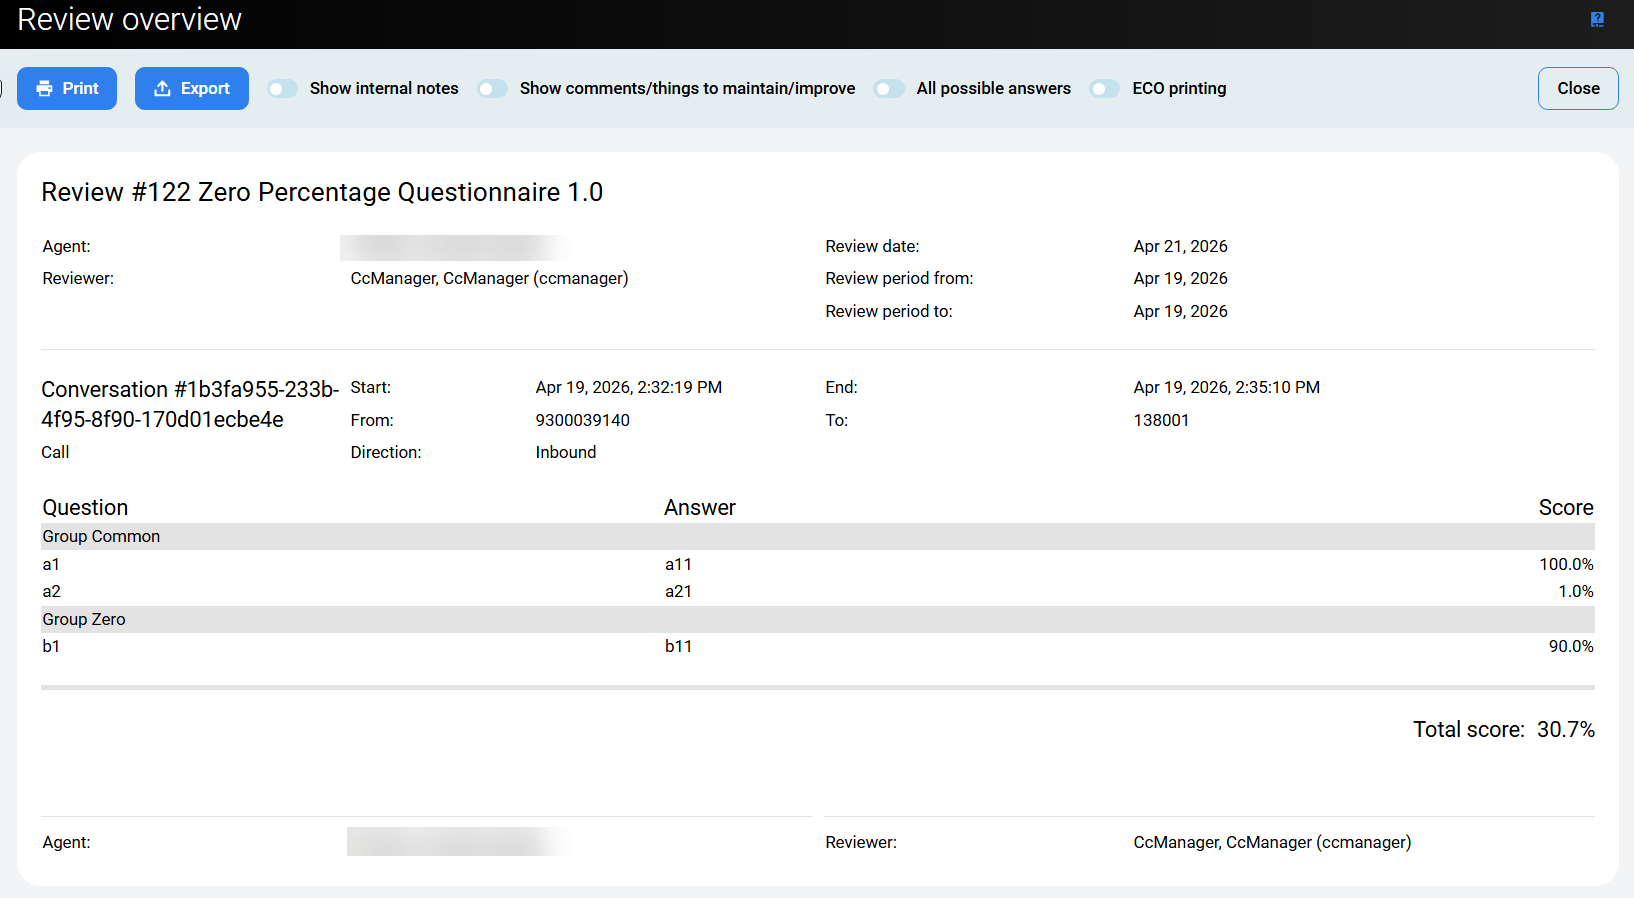
To access the Review Overview screen, click Actions and select View Overview. Then select View Overviews.
The Review overview screen displays the printable/exportable results.
Additional toggle options will be available if they were enabled for the questionnaire:
-
Show internal notes, to view notes.
-
Show comments/things to maintain/improve
-
All possible answers (this field is not exported)
-
ECO printing
Click Print to print a hard copy of the results, or click Export to generate an .xlsx file for download to your local desktop.
Click Close to go back.
Review Form
Click to learn more about the Review form
Interactive Demo
Using the Review Form
The Review Form displays all sub-reviews and their associated conversations. From here, reviewers can add, replace, or remove specific conversations after listening to them.
Only agents enabled in User Management with the REVIEWS_AGENT_ENABLED permission can be reviewed
Accessing the Review Form
From the list of reviews on the Reviews screen, click on a review with the State of Awaiting Review or In Progress.
The Review Form opens.
Display and Access Information
The Review Form displays the review with any associated conversation if one was previously selected. If multiple call segments are available for a conversation, the connected segments can be viewed and played back. Reviewing connected segments is not supported.
Typically, reviewers must use one of the buttons to add a conversation for review. These buttons are enabled only if these privileges were granted when the review was created (see the Creating New Reviews page).
Understanding the Review Form
The Review form contains several sections/components:
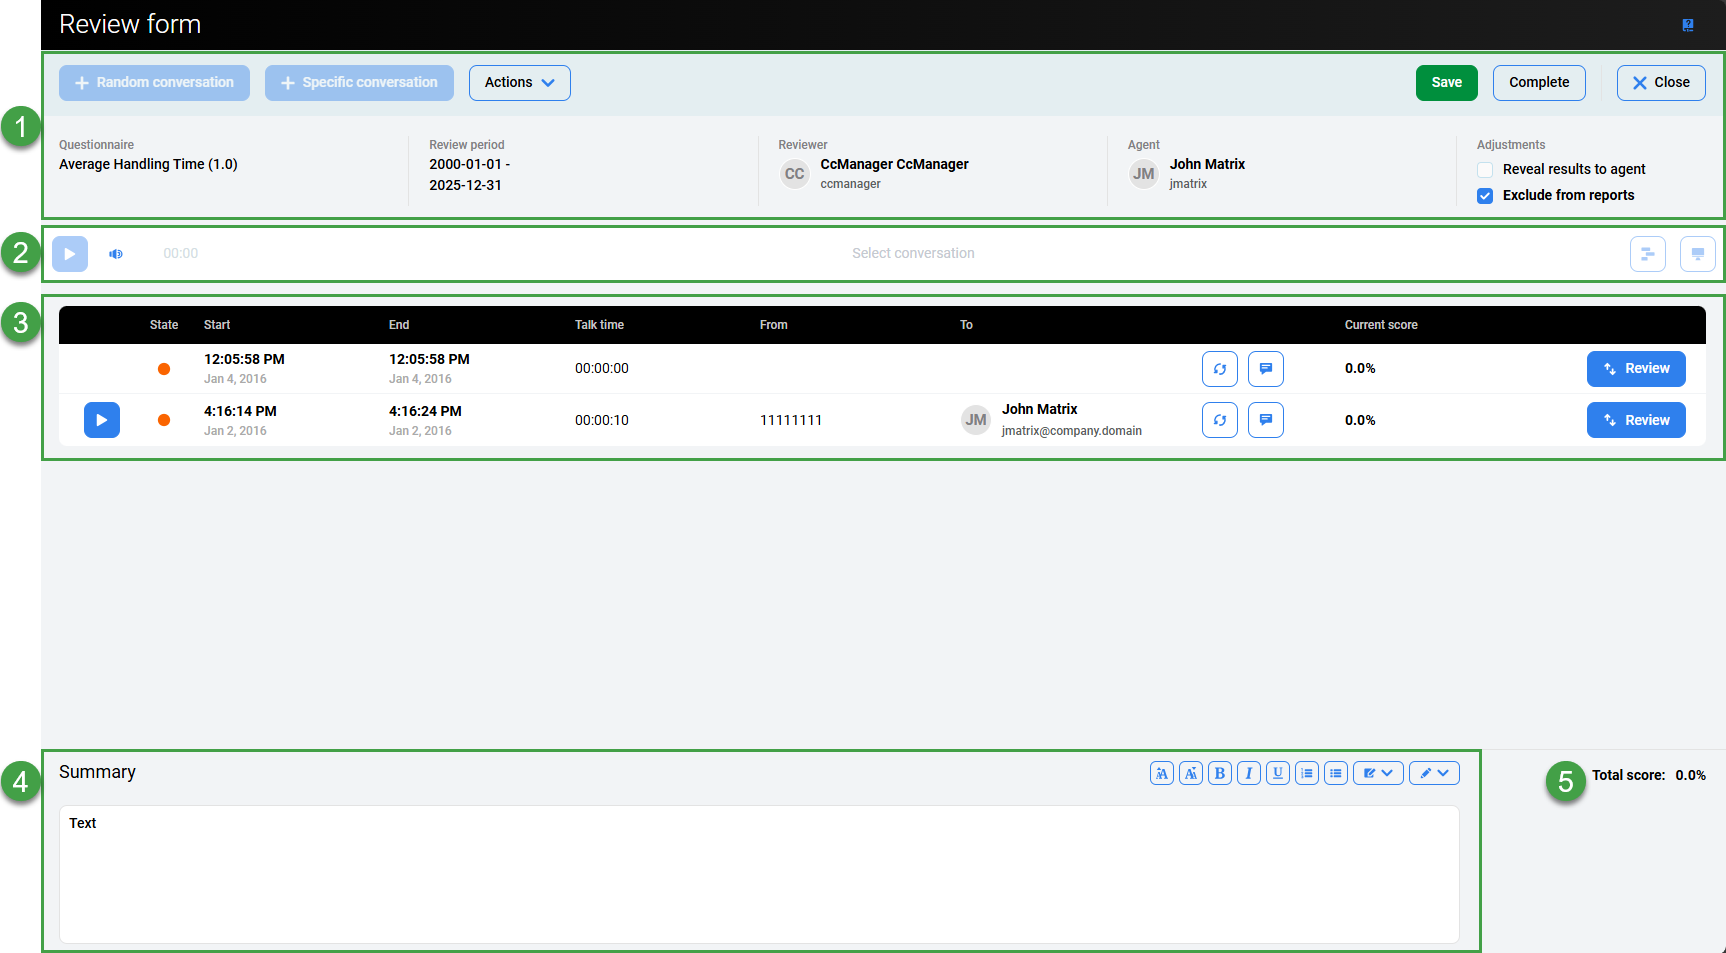
1. Header Section
The following options are available at the top of the screen:
-
Random Conversation – Click Random Conversations to have Quality Management select the conversation. If no conversations are found, a warning message displays. Only available if the Review was created from the Review Scheduler.
-
Specific Conversation – Click Specific Conversations to select a particular interaction. See the Adding a Specific Conversation section for further details.
These options are only enabled if the option to Allow replacement of the conversation was enabled when creating/scheduling the review. Only available if the Review was created from the Review Scheduler.
If enabled it is possible to:-
Replace the conversation/media recording .
-
-
Actions:
-
Send Feedback allows reviewers to send feedback to the reviewed agent. In order to send feedback the review must be in the state of “In Progress” or “Completed”. If multiple conversations (sub-reviews) are included in the Review Form then all feedback (things to improve, things to maintain) is sorted from newest to oldest (in the same order as displayed within the Review Form).
-
Feedback History allows reviewers to analyze and export all feedback that was created by different reviewers in the past for each agent. This feature provides reviewers with detailed information about an agent's review history. It can be printed or exported with or without internal notes. Click Feedback History to view and export feedback from earlier reviews for the same agent. It is possible to print or export previous feedback with or without internal notes. The comments that are added during the review process, including applied formatting, will also be displayed on the review report. By default, the internal notes are visible to the review author or the delegated user as well as to any user with permission to review a group belonging to the same hierarchy. This can be restricted to show only to the review author and the delegated user on the Preferences page.

-
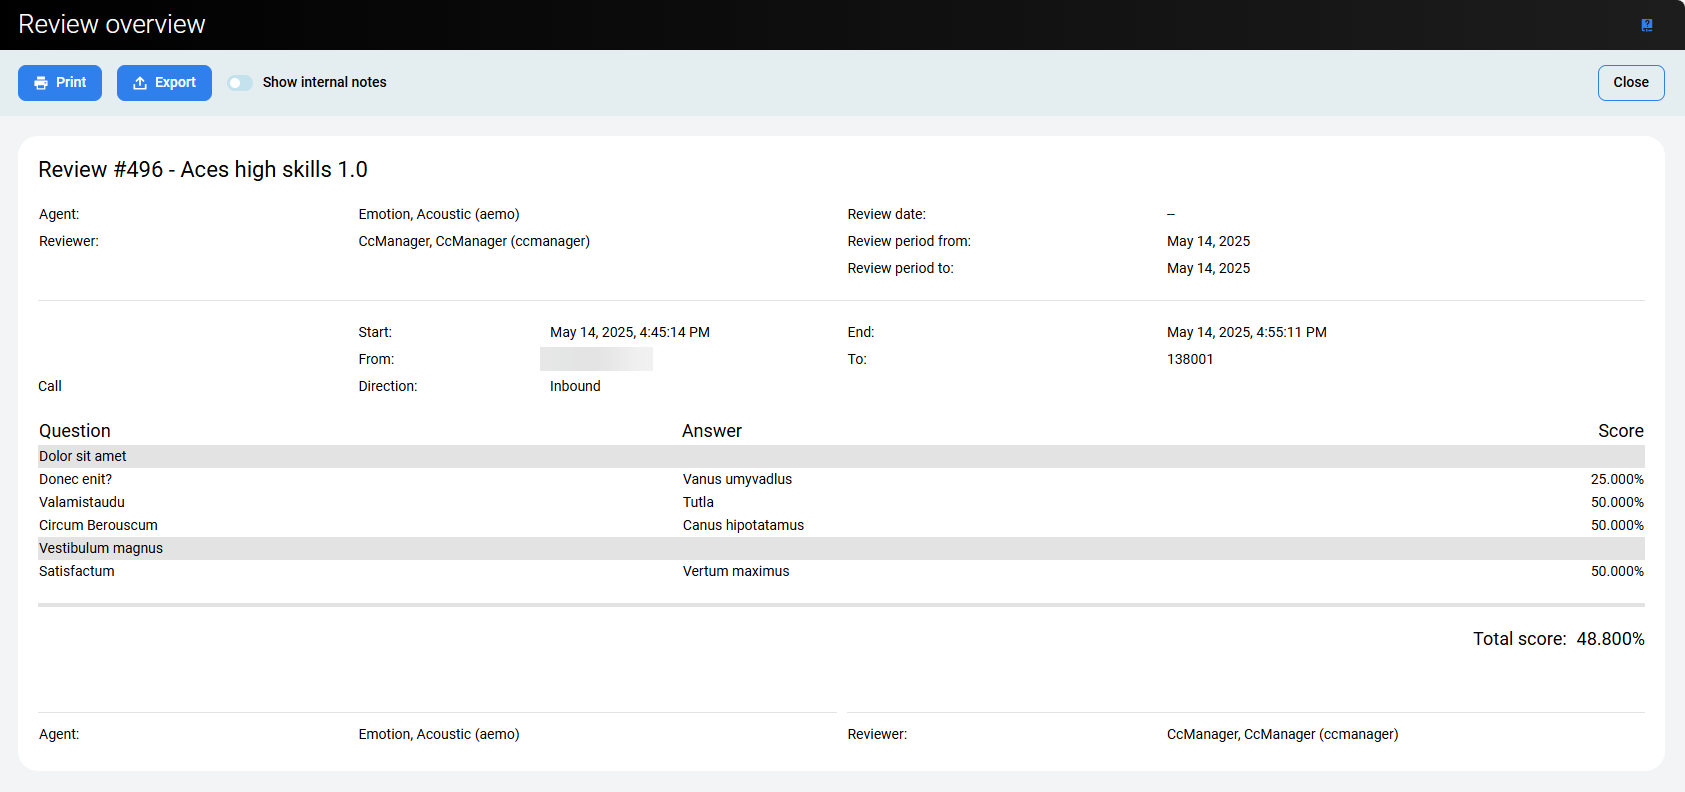
Overview – Opens the Review Overview screen. Toggle Show internal notes to view internal notes. Click Print to print the results, or click Export to download an .xlsx file.
-
-
Save – Click Save at the top of the grading form to keep all modifications made within the form fields. The current grading session will be saved and can be further edited later.
-
Complete – Click Complete to close the completed Review Form.
-
Close – Click Close to close the grading form.
-
A dialog may appear. This alert informs the reviewer that parts of the form have been left incomplete (for example, no feedback was added, or a required answer is missing). However, progress can still be saved and the form closed.
-
-
Questionnaire – Name of the questionnaire used for this review
-
Review Period – Indicates the time period used for the Review.
-
Reviewer – Name of the user who completed the review.
-
Agent – Name of the agent whose conversation was reviewed.
-
Adjustments:
-
Reveal results to agent – Gives the assigned agent access to the whole review. When deselected, the review is hidden from the agent entirely.
-
Exclude from reports – Dictates whether a review is included in the statistical reports. Regarding the compare reviewers report, all reviews are included in this report regardless of whether the check box is selected.
-
Quality Management selects only conversations that have not been reviewed yet when applying the Add Random Conversations feature in reviews that have not yet been completed. In addition, the Add Specific Conversations button used for adding conversations that meet specific criteria is unavailable when planning group reviews.
A conversation is excluded from random selection if it has already been reviewed for the evaluated agent — regardless of which evaluator performed the review or which questionnaire was used. A conversation included in any completed review for that agent is unavailable for random selection.
The time displayed in the output corresponds to the timezone of the current user. Not necessarily the server timezone.
2. Player
Playback – Click Play to play the call or video within the Player.
The interaction player can be expanded to display all available channels / or media that is available.
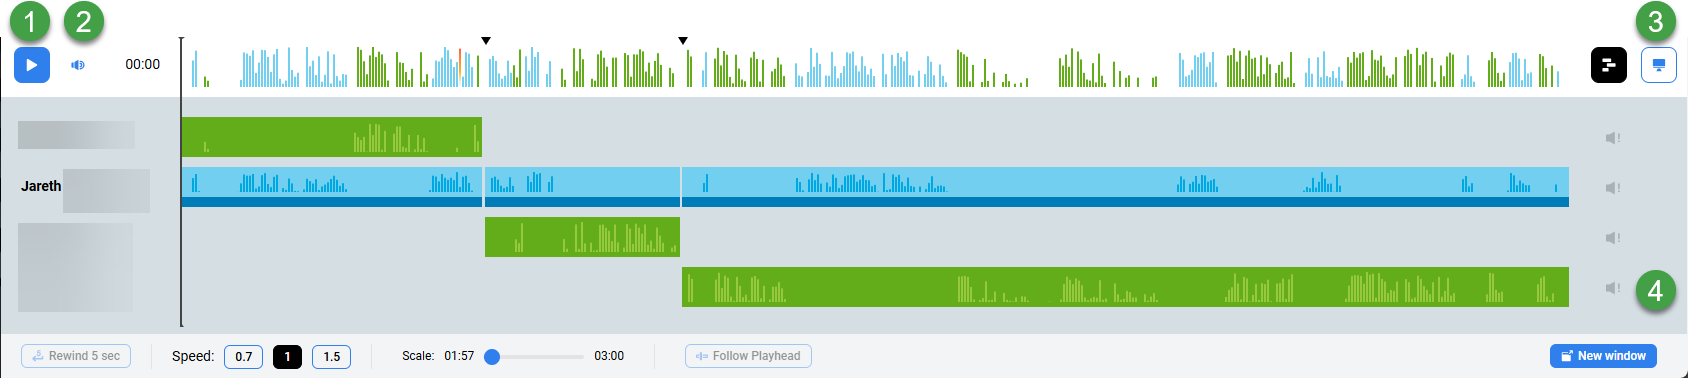
The Interaction Player and Its Functionality
The various parties in the conversation are displayed below the primary waveform separately. Click the waveform button to view or hide the individual segments. Each individual waveform is color-coded: green for customers, blue for agents (if the ID or DN for the specific agent is available to be paired with the conversation or segment).
-
Click the Play or Pause button to control the conversation playback(long recordings may take some time to load before they are playable).
-
Hover over the volume icon and click to adjust the audio volume or click the speaker icon to mute the sound.
-
If media files are present, the following options may be visible:
-
Screen Recording – If the conversation you are playing contains a screen recording (record is marked with the Screen button). Click the button to open the playback window. If no screen recording is available, the button is greyed out.
During playback, the button is highlighted. Screen recordings are not loaded until you expand the playback window. Audio is playable at any time.
-
Video Recording – If the conversation you are playing contains a video recording (record ismarked with the Video recording button). Click the button to open the playback window. If no video recording is available, the button is grayed out.
-
-
The scroll bar (on the right-hand side) is only visible in the case that there are more than four media streams.
Video – When video is attached to recordings, the conversation plays from the beginning to the end without the ability to skip throughout the recording (seeking is not supported for video and conference video recordings). This is due to the way encryption and decryption work on the server side.
Webex Recordings – When multiple agents are part of a conversation their audio track may appear as part of a single waveform. This is a technological limitation of the recording solution.
3. List of Sub-Reviews
Visible columns – The following information/options related to the conversation for review are available:
-
Play icon – Allows playback of the conversation.
-
State – Status/state flags indicate if the review is Waiting to be performed, In Progress or Completed.
-
State time / End time – Indicate when the conversation occurred.
-
Talk time – Indicates the length of the call
-
From/To – Provides information about the calling party.
-
Notes– If any note/comments are available, they can be viewed conveniently from this screen.
-
Current score – The current score for this particular sub-item is displayed.
-
Review or View button – The options take you to the Grading form to view or complete the review.
If no existing conversations are specified when the review is created, the new review will not contain any conversations.
4. Summary
-
Summary – Contains notes for the review.
The content of the field can be copied for use elsewhere. To copy the text, right-click inside the field, then select and copy using Ctrl+C.
5. Total Score
The total score for all sub-reviews appears at the bottom of the Review Form and on the Reviews screen. This is also displayed on the Reviews screen.
Adding Notes
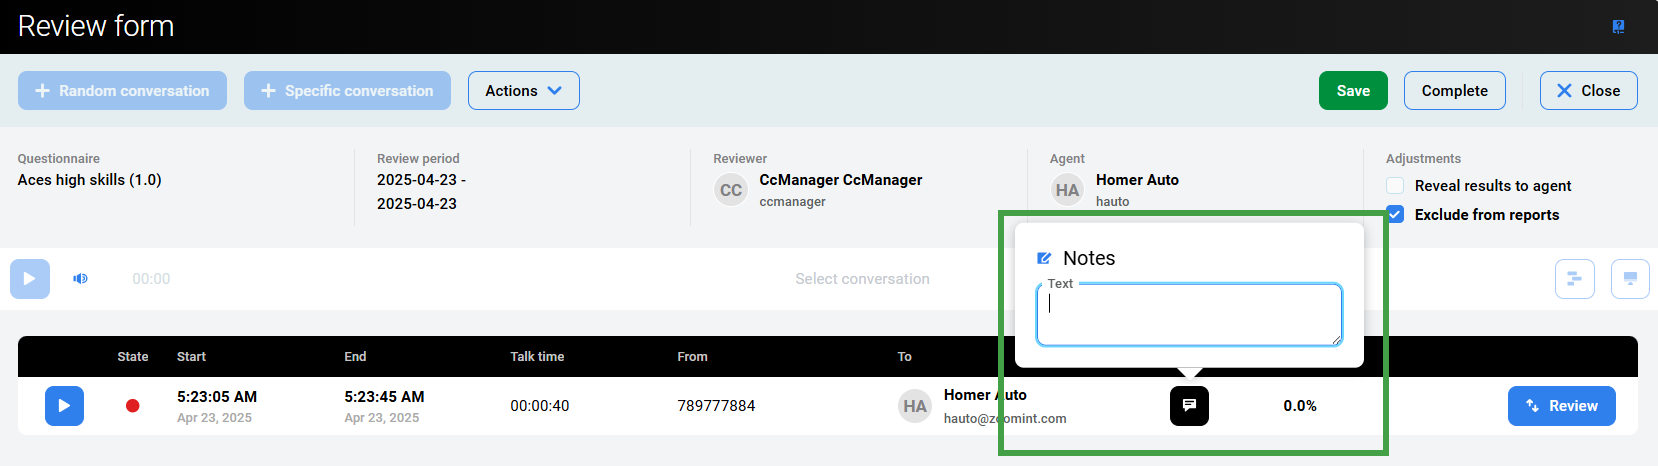
You may also wish to associate a comment or note with a conversation by clicking on the Notes icon.
A dialog opens. You can add an additional comment or observation related to the conversation. Notes are editable and visible only while the sub-review is in progress. Once the review is complete, notes are no longer visible on the form..
Grading Form – Reviewing a Call
Click to learn more about the Grading form
Understanding the Grading Form
Reviewers use the Grading Form to evaluate a specific call made by an agent
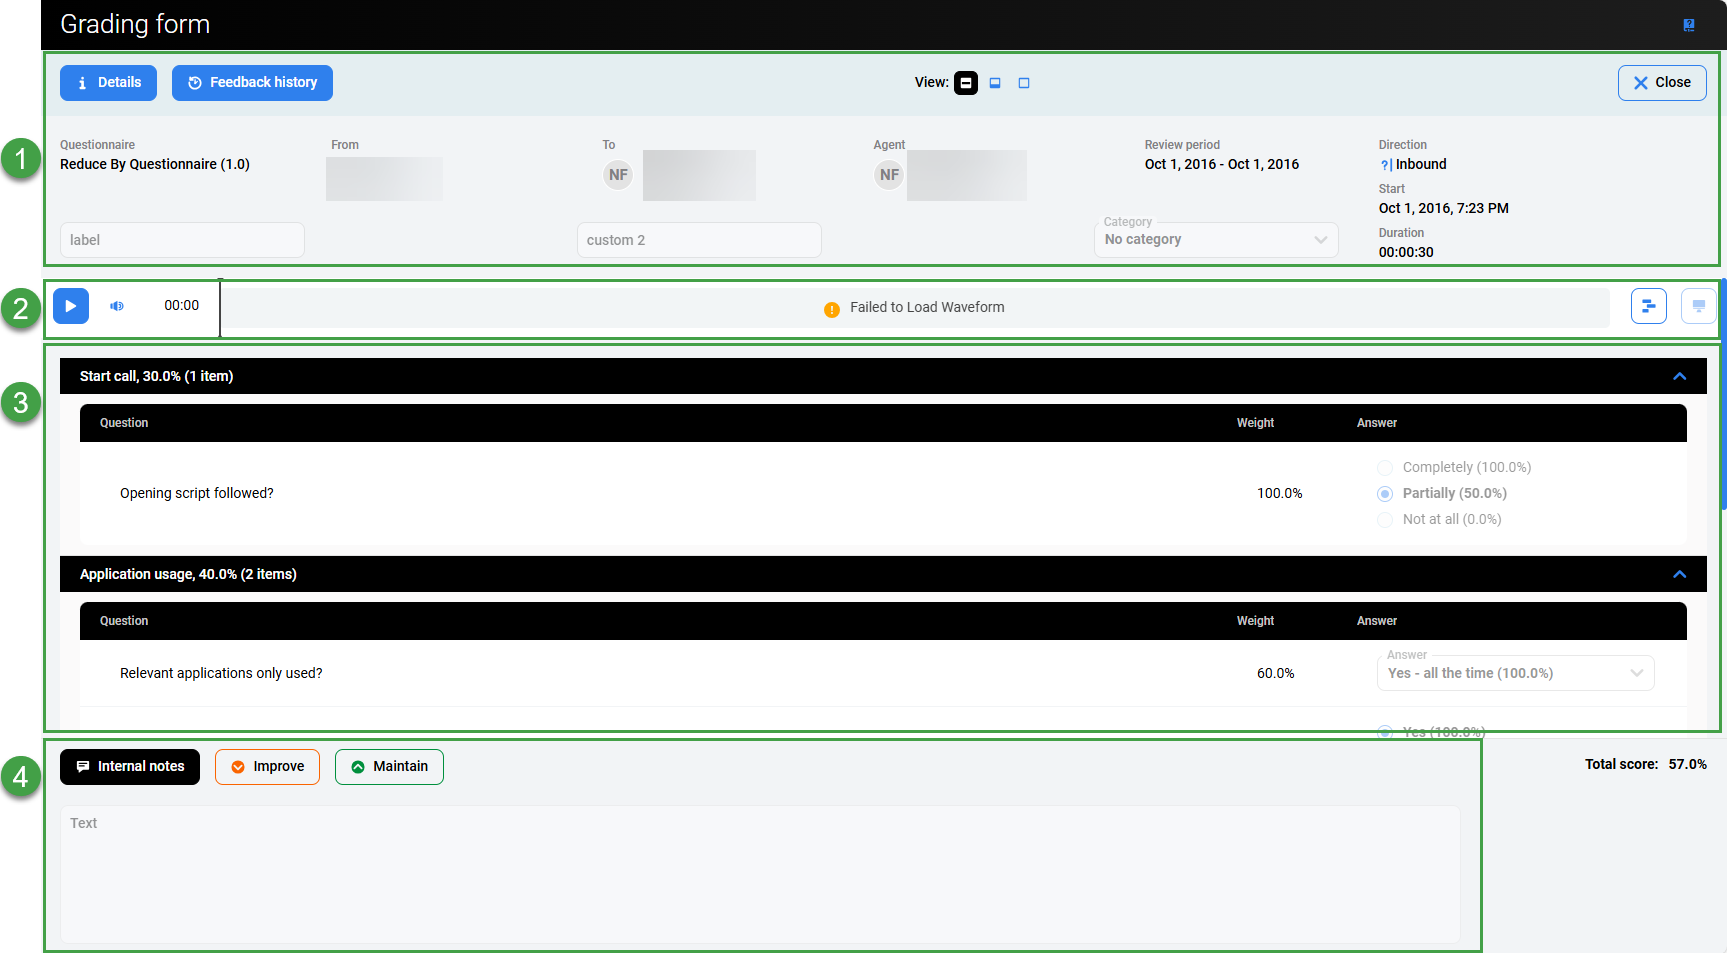
In the Grading Form, users can listen to a call and grade it simultaneously. Related calls may also appear in the Grading Form but are displayed in grey to indicate they are not the subject of the review. Displaying related calls gives reviewers additional context to better understand the conversation being graded.
Interactive Demo
Available options on the grading form include:
1. Header Section
-
Details – Opens a popup with details about the conversation used in the review. Click Close to return.
-
Feedback history – Displays all past feedback for this review. Export or print as needed. Click the toggle switch to include internal notes or not.

-
View – Select what level of detail should display on the screen. Switch between three available options to minimize or expand the panels at the top and/or bottom of the screen. Click on the icons in the center of the screen.

The questionnaire displays the relevant information at the top of the form, including which questionnaire is used, calling parties, review period and direction of the conversation(if known).
The Tracking Number, Ticket Number, and Category can be updated as required. They are saved when you click Save or Complete. (Field names may vary based on the configuration in system Preferences).
2. Player
Playback – Click Play to begin playing the call or video.
The interaction player can be expanded to display all available media channels.
3. Questions and Comments Section
Scroll down to view all questions. Individual items can be expanded or collapsed using the arrows in each section or question header. If not all options are visible, adjust the browser zoom level or try a different browser.
Select an appropriate answer for each question (options may vary based on the configured Scoring Tiers), stopping and replaying the media as necessary. All questions must be answered for all media records present in the review before the review can be marked as complete.
Note – If an answer was marked as ‘default’ when creating the questionnaire, it will be preselected in the grading form.
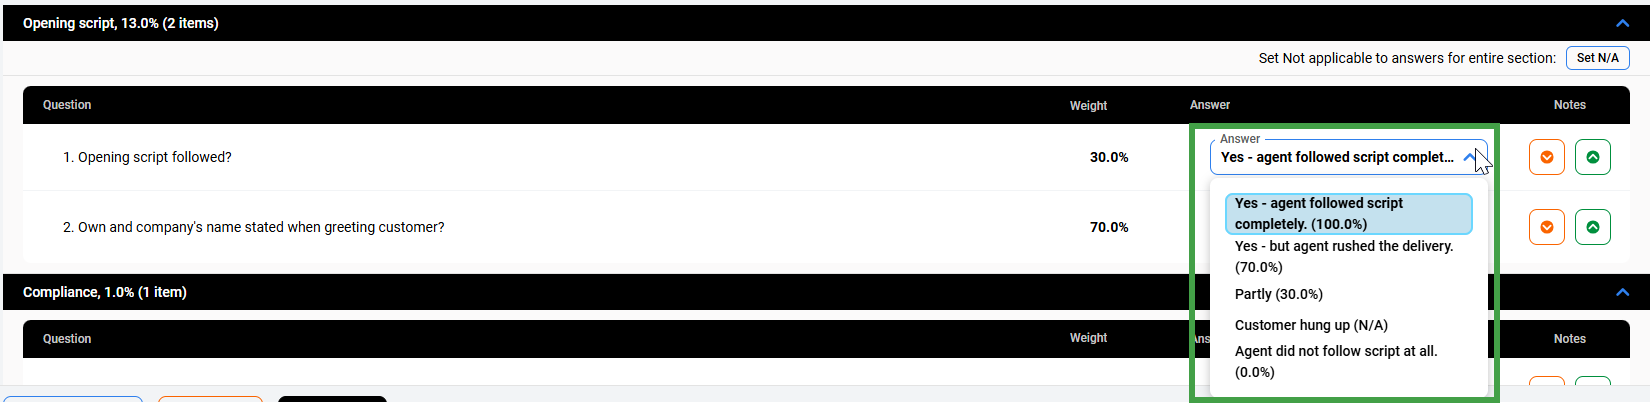
Quickly Selecting Answers
For questions with two or three options you can quickly select the correct answer. For questions with four or more options use the dropdown, and select the most suitable answer.
Quick select:

Or, Select from the dropdown menu:

Comments – Comments can be added to the Things To Improve and Things To Maintain sections only after selecting an answer for the relevant question The text is saved automatically and can be viewed, formatted, or edited in the Notes section.

4. Notes Section
The Grading Form allows reviewers to add positive or negative feedback to individual questions. All individual inputs are shown together in the Improve and Maintain feedback panel. This is useful for recording context when marking a question poorly, or for writing notes to reference when providing feedback to the agentThe system labels each note with the question it relates to, for clarity.
Click one of the three icons to view or edit the text. Rich-text controls for enhanced text formatting are available as well.

The purpose of the Internal Note field is for reviewers to be able to write notes that are never visible to the reviewed agent. Supervisors and higher roles are able to see internal notes in the review form, in the printed file, and in the exported file.
The following two feedback fields Improve and Maintain are visible to the reviewed agent and help in communication between a supervisor and an agent.
These feedback fields are cumulatively filled based on input during the review process (when adding positive or negative feedback). Additionally, you can write and edit text directly within these feedback fields. For example, Things To Maintain can be used to keep a list of points illustrating areas of good performance by the agent, whereas any areas for improvement should be noted in the Things To Improve field.
The content of the Internal Note/Things to Improve/Things to Maintain fields from the completed Grading Form can also be copied for use elsewhere. In order to copy the text, it is necessary to first click inside the field. Select the text and then copy the text using CTRL+C.
Post-Upgrade Changes
Legacy content may not display as expected. Note that customized formatting may be lost after an upgrade, text from multiple lines will be shown on a single line as a result.
Completing the Form
The Grading Form must be completed as part of the review process.
-
Click Save at the top of the grading form to keep all modifications made within the form fields. The current grading session will be saved and can be further edited later.
-
Click Close to close the grading form.
-
A dialog may appear, informing the reviewer that parts of the form have been left incomplete (for example, no feedback was added, or a required answer is missing). However, progress can still be saved and the form closed.
-
-
Click Complete to close the completed Form.
The Review Form where the Current Rating of the specific call and the Total Rating of all reviewed conversations are displayed.
Viewing Conversation Information and External Data in the Grading Form
To see information and external data associated with the call click Details.
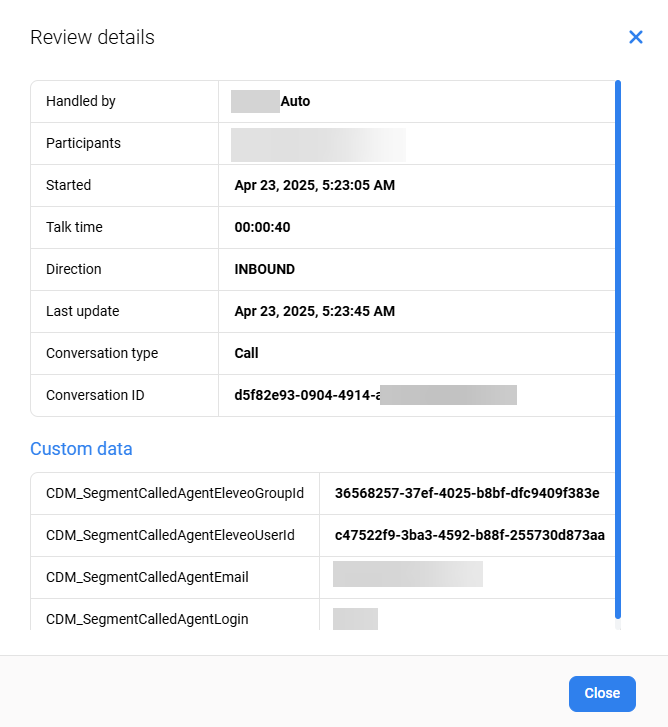
A Conversation Information dialog displays all the information and external data available for that segment of the call.
To close the dialog box click OK.
The time displayed corresponds to the timezone of the current user. Not necessarily the server timezone.
Customizing Fields
Labels on the form can be modified by editing the option in the Quality Management Preferences tab.
If the fields Label of custom tracking number 1: and Label of custom tracking number 2: have been filled in on the Preferences tab then the Grading form will appear slightly different as the default labels "Mail Tracking Number" and "Ticket Number" will change.
Exporting Reviews
To export reviews, click the Export button in the top right corner of the Reviews screen.
The export pane opens. It displays the number of active filters that are currently applied and the resulting number of items available to export.
Select the option to Include conversation custom data. Additional Custom data can be selected for export.
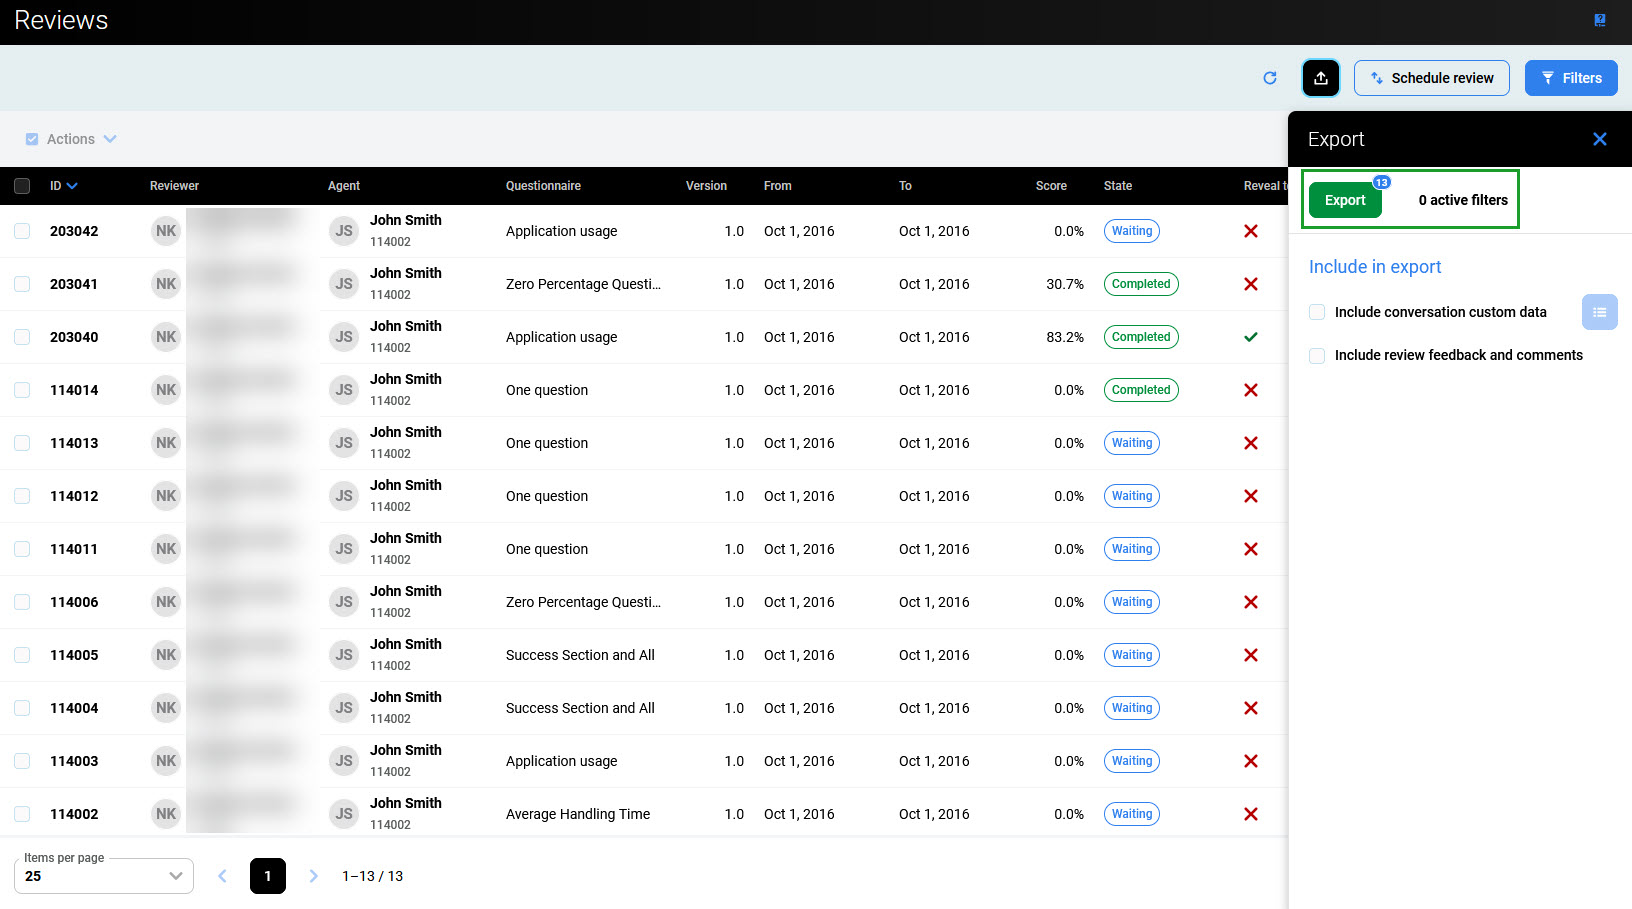
Click Export to export the list of reviews' details in the xlsx file.
To export only specific review(s), click the Filters button and apply filters as described below. Additionally, use checkboxes to select which reviews need to be exported. Then re-export the desired content.
Applying Filters
Use Filters to limit what is displayed on the screen or locate a specific review. Depending on assigned permissions, reviews of an entire team or agent group are visible of an entire team or agent group. For more information on permissions, see the section related to Quality Management Roles on the page Roles and Permissions.
To filter the results, click the Filters button in the top right corner of the screen. The Filters pane opens.
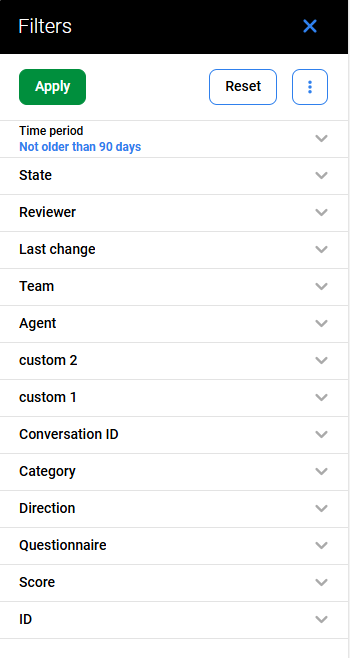
To search for a particular review, use one of the following fields(additional options may be available based on the deployment):
-
Time period – Select a preset date period (for example, Today, Last 14 days, …) or provide a custom date range.
-
State – Select a state: Awaiting review, In progress, Completed.
-
Reviewer – Select the reviewer
-
Last change – Define the range to include for recent changes. (Options include: Today, Yesterday, Not older than 14 days etc.)
-
Team – Select a team for which the reviews were planned.
-
Agent – Select the agent being reviewed
-
Custom field – Customized labels configured in Preferences will be visible here. By default"Mail Tracking Number" or "Ticket Number" are visible.
-
Custom field – Customized labels configured in Preferences will be visible here. By default "Mail Tracking Number" or "Ticket Number" are visible.
-
Conversation ID – Filter by a specific ID
-
Category – Filter by a category/type of call. Options available are dependent on the configuration of Categories)
-
Direction – Limit the search to a defined type of call. (Inbound, outbound, internal, unknown etc.)
-
Questionnaire – Select a questionnaire that has been used(selectable from the list of available questionnaires).
-
Score – Provide a specific range of scores (in points or percentages).
-
ID – Select the specific IDs of a Review (provide From and To ID numbers).
Then click Apply to apply the filter, or Reset to clear the search fields.
Alternatively, click the More options icon (three dots) to display the possibilities:
-
Reset filters to default – set all search fields to their default values,
-
Reset all filters – clears all the search fields.
Trainers Tips
You can create reviews based on other interactions that are not conversations. Use the workaround below to perform a review on an interaction not visible in the Eleveo system (a physical form, fax or email in a separate system).
Go to the Review Screen.
-
Create a schedule
-
Select Questionnaire
-
Time period – select anything
-
Select an agent (or agents) to review
-
Enter a reviewer
-
Conversation Type: select External conversation
-
Enter quantity
-
Click "schedule review."
The reviewer should now see a review that needs to be completed on the review tab.
When clicking "Add Random Conversation," the review option will be available, but it will not have a conversation associated with it.