
Overview
Work plans define the scheduling rules that the autoscheduler applies when generating schedules. A work plan combines global limits, shift definitions, weekly rotation mapping, and people’s assignments.
The WFM_VIEW_WORK_PLAN role is required to view work plans. This role is included by default in the WFM_ANALYST and WFM_SCHEDULER composite roles. The WFM_EDIT_WORK_PLAN role is required to add or edit work plans. The WFM_DELETE_WORK_PLAN role is required to delete work plans. Both roles are included by default in the WFM_ANALYST composite role. Read more about Workforce Management Roles.
Displaying Existing Work Plans
To display existing work plans, go to Administration > Work Plans. The Work plans screen lists all configured work plans.
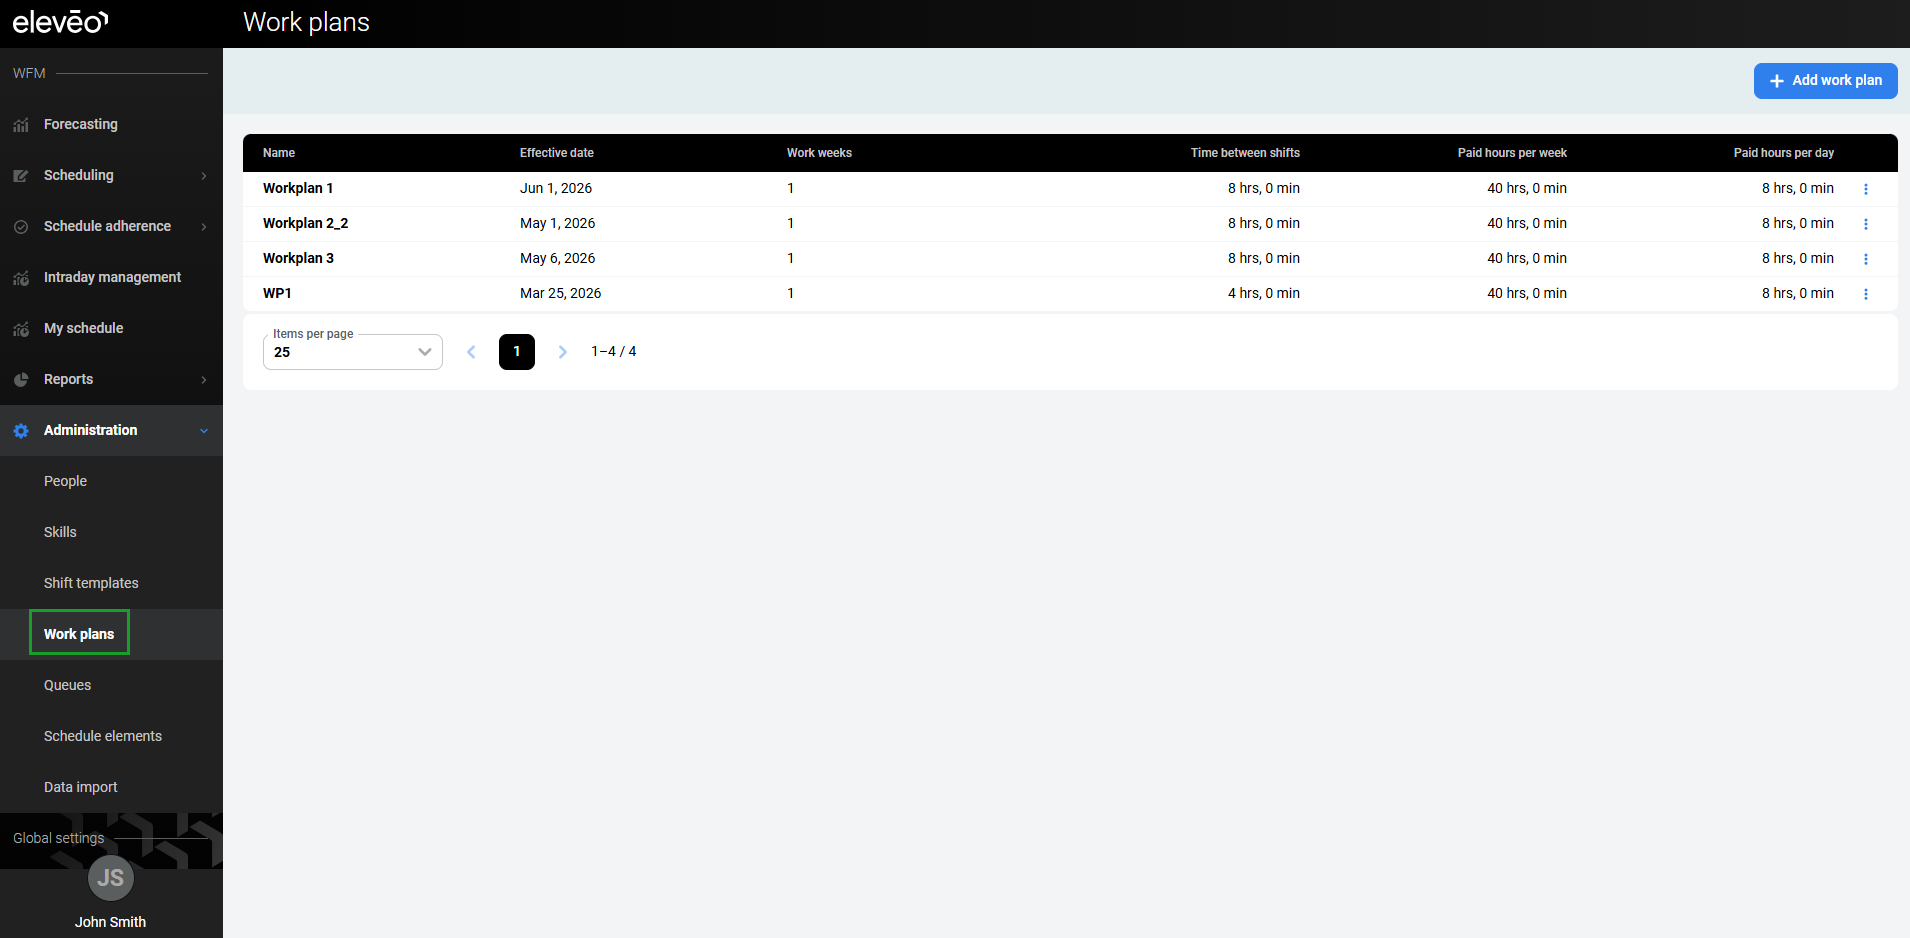
The following columns display basic information about each work plan:
-
Name – The name of the work plan.
-
Effective date – Date from which the work plan is applicable.
-
Work weeks – Number of weeks in rotation.
-
Time between shifts – The minimum duration required between the end of one shift and the beginning of the next shift.
-
Paid hours per week – The contracted number of paid hours that must be scheduled for each person per week.
-
Paid hours per day – The contracted number of paid hours that must be scheduled for each person per day.
The Actions menu for each row provides the following options:
-
Edit – Opens the work plan in the sidebar for modification.
-
Delete – Removes the work plan after confirmation.
The Add work plan button is available to users with the WFM_EDIT_WORK_PLAN permission.
Adding a New Work Plan
To add a new work plan, click the Add work plan button.
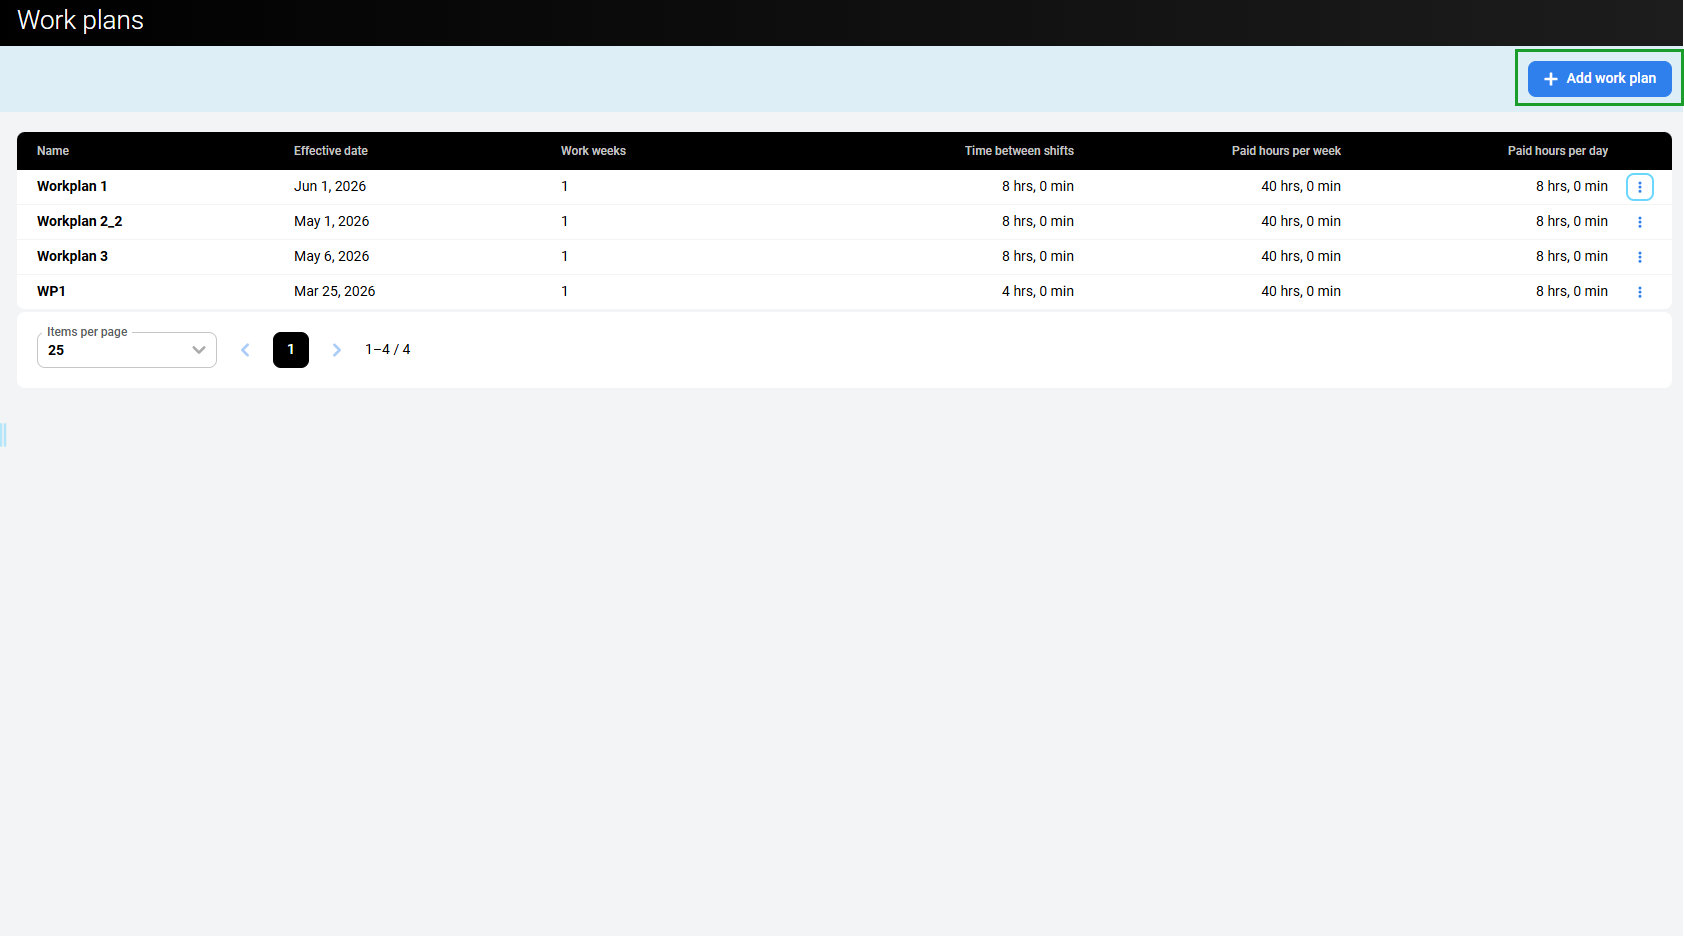
The New work plan sidebar opens.
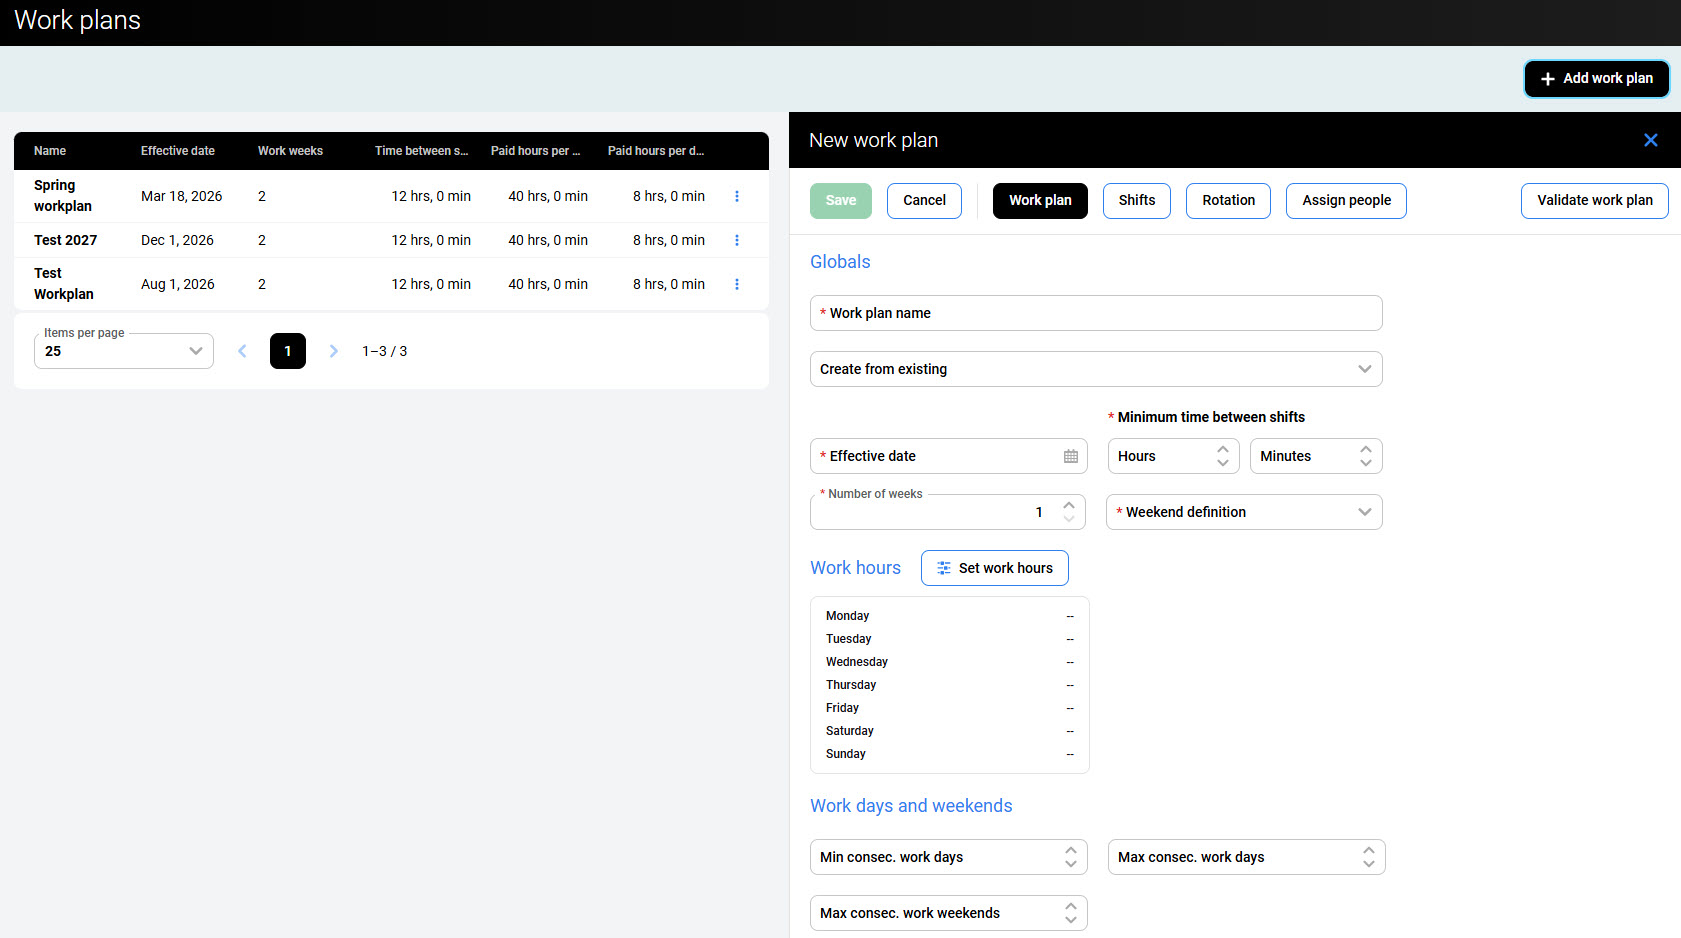
The sidebar organizes configuration into four tabs:
-
Work plan – Global limits and paid-hour constraints.
-
Shifts – Shift type definitions.
-
Rotation – Day-to-shift mapping per week.
-
Assign people – Agent assignments.
Save is unavailable until all required fields across all tabs are valid. Configure all four tabs as described in the following sections, then save.
Configuring the Work Plan Tab
The Work plan tab contains the global settings that apply to the entire work plan. It is divided into three sections.
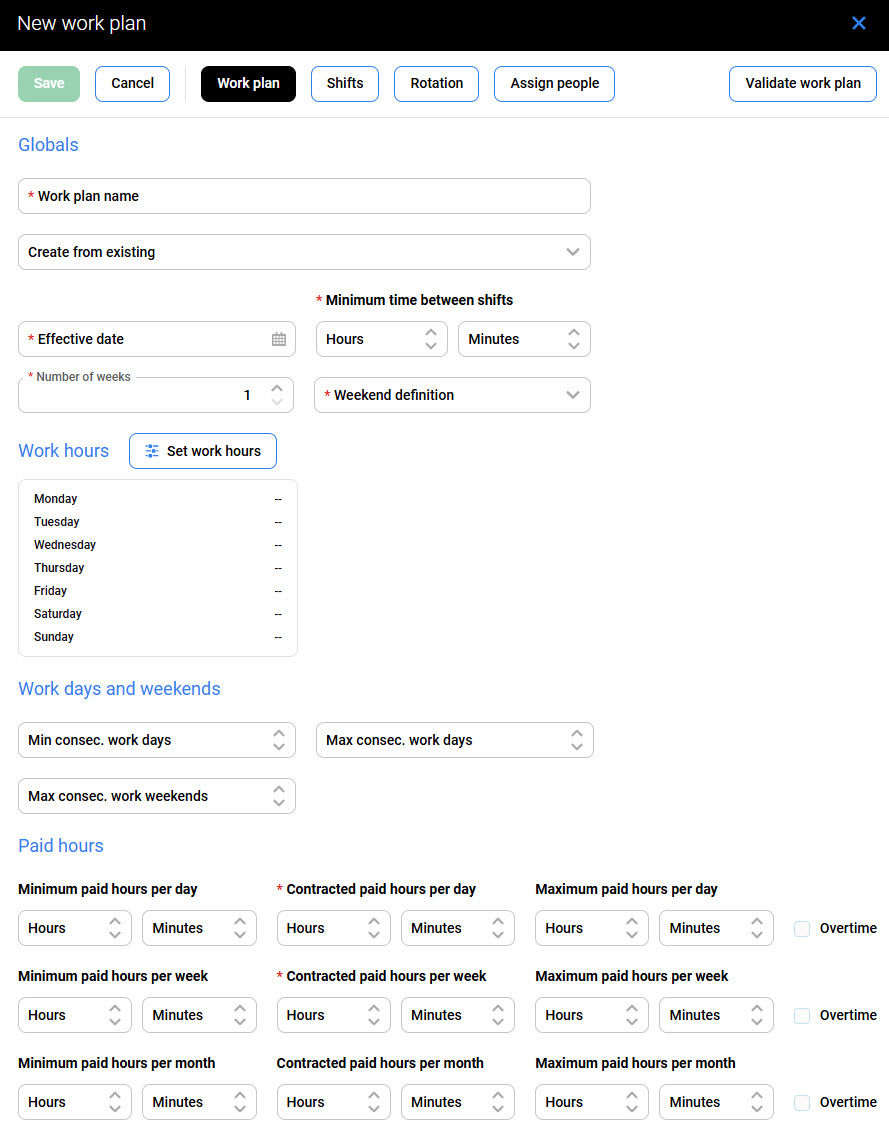
General Settings
Fill in the following fields:
-
Work plan name – A unique name for the work plan. If the name already exists, the form displays a validation error on save. The name must contain non-whitespace characters and can be up to 100 characters long.
-
Create from existing (optional) – Prefills all settings from an existing work plan. Available only when creating a new work plan.
-
Effective date – The date from which the work plan becomes active. If the selected date conflicts with another work plan assigned to a selected agent, the system displays an error notification.
-
Minimum time between shifts – The minimum duration required between the end of one shift and the beginning of the next shift. Note that each shift template also has its own Mandatory Rest Time After Shift setting, which defines the minimum rest period specific to that shift type. When two consecutive shifts are of different types, the Minimum rest time after shift value (if configured in the shift template) takes precedence. For more information, see Managing Shift Templates.
-
Number of weeks – The number of weeks in the rotation cycle (values ranging from 1 to 12 are accepted). Changing this value updates the Rotation tab automatically and removes invalid week assignments from shifts.
-
Weekend definition – The days of the week treated as weekend days.
Note the following parameters:
Effective Date – the following rules apply to the date from which the work plan is applicable:
-
One person can have multiple work plans assigned, but those plans always have to have different effective dates.
-
When a schedule is created automatically, a work plan with the latest effective date is used for each person, and it is verified daily. It may happen that within one schedule range, one person has two or more work plans assigned, each with a different effective date.
Work Hours
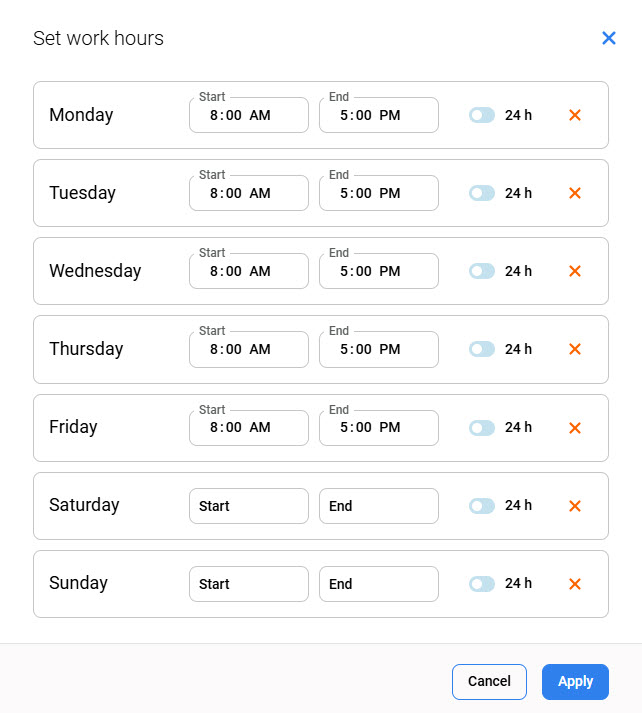
The Work Hours section defines the hours during which the contact center operates for each day of the week. The autoscheduler uses this configuration to generate shifts only within valid business windows.
The section lists all seven days of the week (Monday through Sunday). Click Set work hours to configure the following for each day:
-
Start time – The time the contact center opens on that day. Time values are set in 15-minute intervals.
-
End time – The time the contact center closes on that day. Time values are set in 15-minute intervals.
-
All day – Select this checkbox if the contact center operates 24 hours on that day. When selected, the Start time and End time pickers are disabled.
Click Apply to confirm the settings.
Note the following:
-
All time pickers are empty by default. A day with no hours entered is treated as a non-working day.
-
A day with hours entered is automatically treated as a working day. There is no separate working-day toggle.
-
Overnight hours are supported. Enter them on the day they start – for example, Monday 17:00–06:00 means the contact center is open from Monday at 17:00 until Tuesday at 06:00.
-
Work hours must not overlap across consecutive days.
To review the configured work hours without editing the work plan, open the work plan in read-only view. The Work Hours table shows the configured time range for each day. Days with no hours configured display --.
Work Days and Weekends
Fill in the following fields (optional):
-
Min consec. work days – The minimum number of consecutive working days for the flexible setup.
-
Max consec. work days – The maximum number of consecutive working days for the flexible setup.
-
Max consec. work weekends – The maximum number of consecutive working weekends for the flexible setup.
A sequence of consecutive working days ends only when a day off occurs. Working different shift types on consecutive days does not break the sequence.
When evaluating consecutive work days and weekend constraints, the scheduling engine looks at both the previous scheduling period and the current one. If a person worked several consecutive days at the end of the previous period, those days count toward the maximum consecutive limit at the start of the new period. This means the engine may not schedule the maximum allowed consecutive days for an agent at the beginning of a period – it is respecting the carryover from the prior period.
Paid Hours
Fill in the following fields for each period (day, week, or calendar month*):
-
Minimum paid hours (optional) – The minimum number of paid hours that must be scheduled for each person for the period.
-
Contracted paid hours (mandatory for day and week) – The contracted number of paid hours for the period.
-
Maximum paid hours (optional) – The maximum number of paid hours that can be scheduled for each person for the period.
-
Overtime (optional) – If selected, paid hours exceeding the contracted paid hours are calculated as overtime.
*Month refers to a calendar month (for example, January 1–31), not a rolling four-week period.
Only one Overtime checkbox defines the total overtime budget: the checkbox next to the highest-level Maximum Paid Hours field that has overtime enabled. For example, if Maximum Paid Hours is set for day, week, and month, the month-level Overtime checkbox sets the overall budget. Enabling overtime at a lower level (day or week) without enabling it at the highest configured level has no effect on the total budget.
Configuring the Shifts Tab
The Shifts tab defines the shift types included in the work plan.
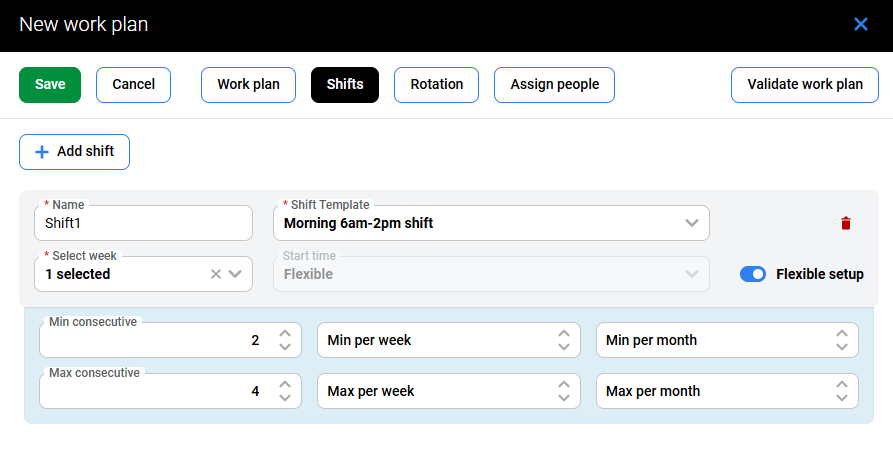
Each shift contains the following fields:
-
Name – A unique name for the shift within the work plan. The name must contain non-whitespace characters and can be up to 30 characters long.
-
Shift template – The shift template to apply. Each template can be selected only once per work plan.
-
Select week – The rotation weeks in which this shift is active. All weeks are preselected when a shift is added. Removing a week also clears the corresponding rotation assignments.
-
Start time – The start-time type. Available options (Flexible or Preferred) depend on the selected shift template.
-
Flexible setup – Enables additional options for controlling how often and how many times this shift can occur.
-
When enabled, the shift is treated as flexible – it can be manually assigned to a specific day, but this is not required. If no manual assignment is made, the system will automatically assign the shift based on the rotation.
-
When disabled, the shift is treated as fixed and must be manually assigned to a specific day in the Rotation tab.
-
When Flexible setup is enabled, the following fields appear:
-
Min consecutive – The minimum number of consecutive days on which this shift type is scheduled. The sequence counts only days with this shift type and continues across any day off in between. It ends only when a different shift type is scheduled.
-
Max consecutive – The maximum number of consecutive days on which this shift type is scheduled. The same counting rule applies as for Min consecutive: a day off does not end the sequence, only a different shift type does.
-
Min per week – The minimum number of times this shift occurs per week.
-
Max per week – The maximum number of times this shift occurs per week.
-
Min per month – The minimum number of times this shift occurs per calendar month.
-
Max per month – The maximum number of times this shift occurs per calendar month.
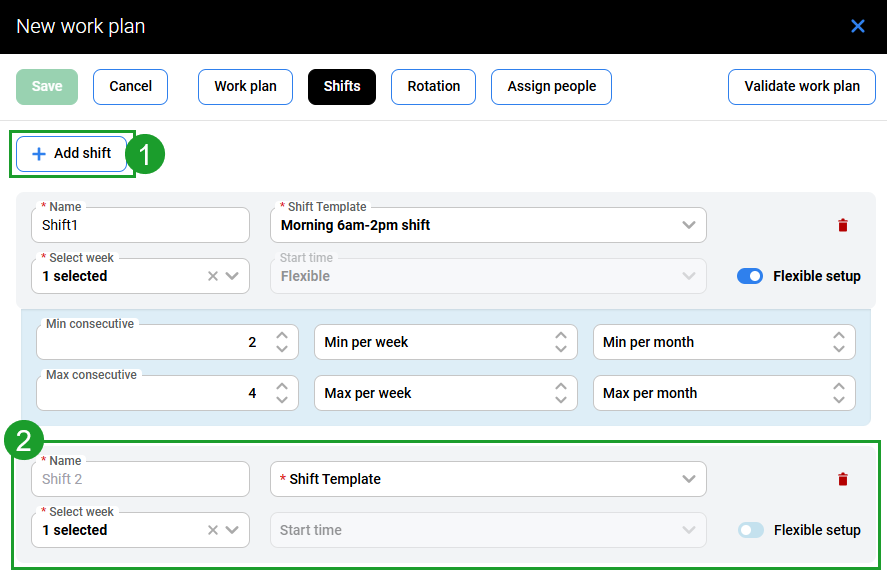
A work plan can include multiple shifts. To add an additional shift:
-
Click Add shift.
-
Fill in the required fields.
-
Repeat for each shift needed in the work plan.
To remove a shift, click the delete icon on the shift card. Removing a shift also clears all its assignments in the Rotation tab.
Configuring the Rotation Tab
The Rotation tab displays one section per week, based on the Number of weeks value on the Work plan tab. Assign shifts to days for each week. In a fixed setup, days with no shift assigned are treated as unscheduled by default. The engine does not automatically plan anything for days with no events.
Rotation mode is determined by how shifts are configured on the Shifts tab, not by a separate setting:
-
Fixed – All shifts in the work plan have Flexible setup disabled. The engine assigns each person exactly the days mapped in the Rotation tab. Days with no shift assigned are treated as unscheduled.
-
Flexible – All shifts have Flexible setup enabled. Manual day-to-shift assignments can be made in the Rotation tab, but this is not required. If no manual assignment is made, the engine freely selects which days to assign each shift, respecting the Min/Max consecutive and per-week/month limits.
-
Hybrid – Some shifts have Flexible setup enabled and others do not. Fixed shifts are pinned to the days you assign; flexible shifts are placed by the engine around them. This mode requires careful configuration to avoid conflicts between pinned and engine-placed shifts.
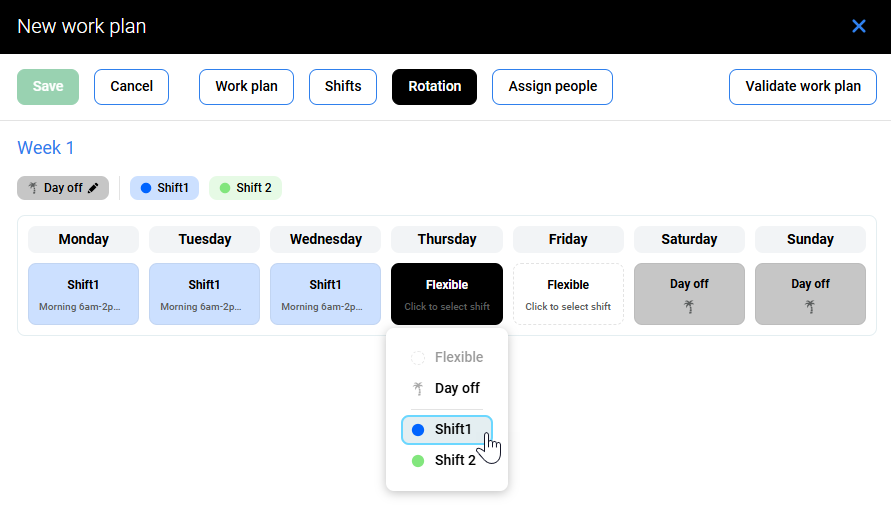
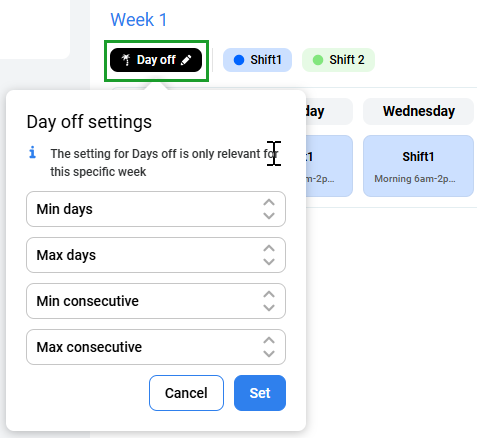
To configure day-off settings for a specific week:
-
Click the Day off button.
-
Fill in the following fields:
-
Min days – The minimum number of days off per week.
-
Max days – The maximum number of days off per week.
-
Min consecutive – The minimum number of consecutive days off.
-
Max consecutive – The maximum number of consecutive days off.
-
-
Click Set.
Day-off settings apply only to the specific week for which they are configured.
The following constraints apply to days off:
-
Min days must be less than or equal to Max days.
-
Min consecutive must be less than or equal to Max consecutive.
-
Min consecutive must be less than or equal to Max days.
Assigning People
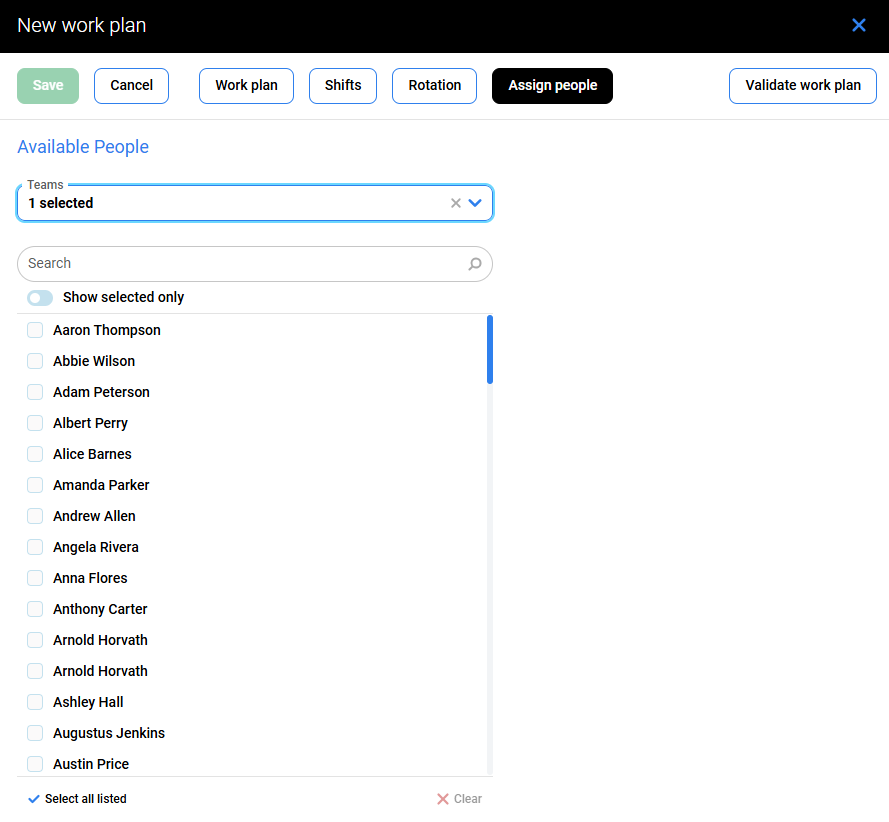
The Assign people tab lists all supervised people available for assignment. Use the Teams filter to narrow the list by one or more teams.
People who already have another work plan with the same effective date are greyed out in the list and cannot be selected. If the effective date is changed after people are already assigned and a conflict arises, affected people are highlighted in red with a warning indicator.
To hide unselected people, enable the Show selected only switch.
Validating and Saving the Work Plan
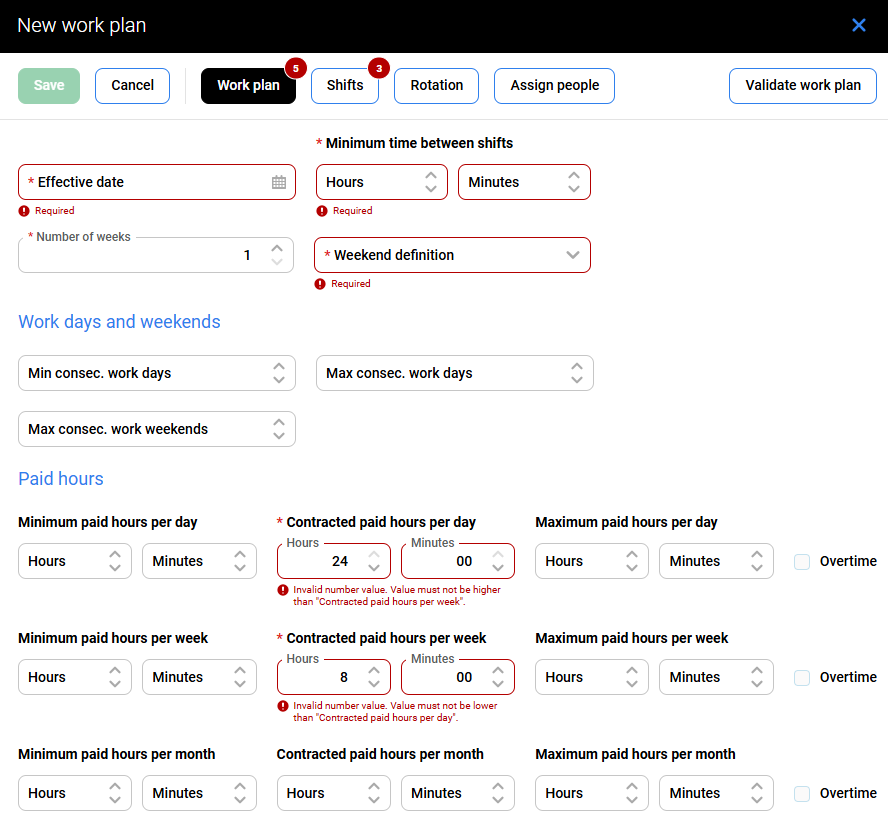
Click the Validate work plan button in the top-right corner to trigger validation across all tabs. The tab headers (Work plan, Shifts, Rotation, Assign people) display red badge counters indicating how many errors exist on each tab – in the example screenshot below, the Work plan tab shows five errors, and the Shifts tab shows three.
Required Field Validation
Required fields are marked with a red asterisk (*). When a required field is left empty, and validation is triggered, a red Required label appears beneath the field.
Cross-Field Validation
The form enforces relational constraints between different fields, for example, paid hours across the day, week, and month periods. When a value entered for a shorter period exceeds the value set for a longer period – or vice versa – the affected fields display an inline error message indicating which constraint is violated.
Saving the Plan
To save a work plan:
-
Click Validate work plan to check for errors across all tabs.
-
Review errors shown in tab badges and field-level messages.
-
Fix all reported errors.
-
Click Save.
Alternatively, click Cancel to close the sidebar without saving. All unsaved changes are discarded.
Editing a Work Plan
To edit a work plan, open the Actions menu for the row and click Edit. The sidebar opens with the existing values populated. Update the necessary fields and click Save.
If the updated name matches an existing work plan name, the form displays a validation error, and the sidebar stays open.
Assigning and Removing People
To update people’s assignments for an existing work plan, open the work plan in edit mode and go to the Assign people tab. Select or clear people from the list and click Save.
Deleting a Work Plan
To delete a work plan, open the Actions menu for the row and click Delete. A confirmation dialog appears. Click Delete to confirm the removal, or click Cancel to keep the work plan. The list refreshes automatically after deletion.
Only users with the WFM_DELETE_WORK_PLAN permission can delete work plans.