
Adding a New Schedule
Overview
The studio environment allows for the creation of many draft schedules covering different time periods, the time periods may even overlap. All draft schedules for queues that are of the type 'Voice' are based on a production forecast and can be used in production. A schedule for queues that are of the type 'Chat' or 'Email' can be created even if there are no forecasts for them.
This chapter describes the schedule creation process using the auto-scheduling feature. To learn how to assign schedule elements manually, visit the page Manual Scheduling.
Note that only users with the WFM_SCHEDULER role are able to add new schedules. Read more about Workforce Management Roles.
Basic Schedule Settings
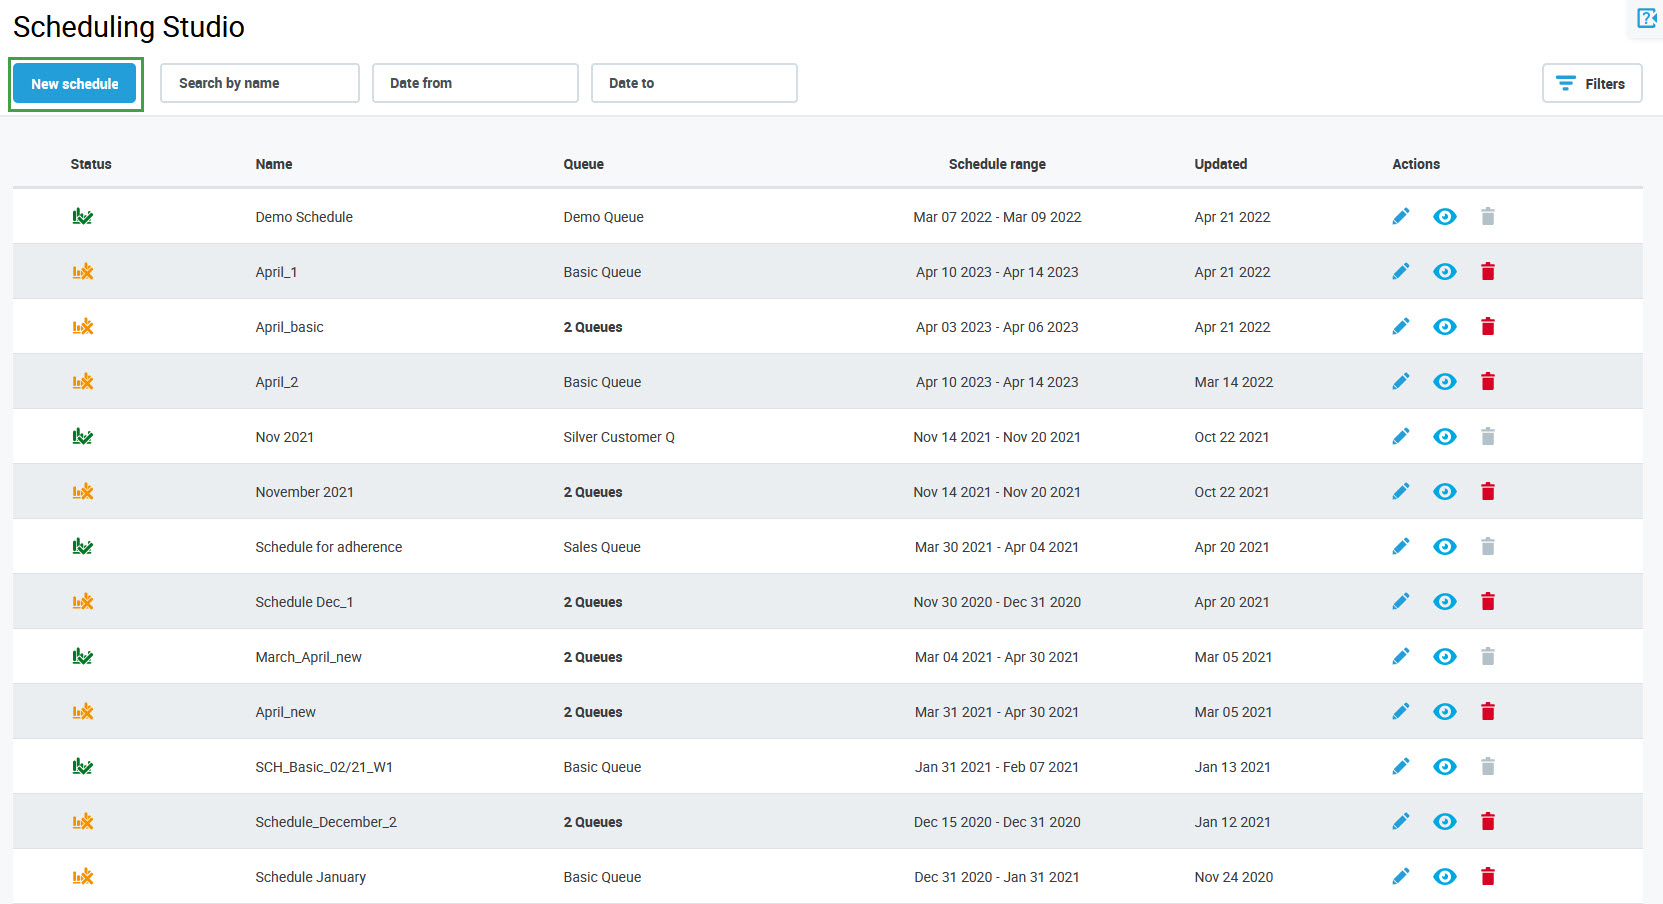
To add a new schedule, click on the New schedule button.
The Create New Schedule wizard will open.
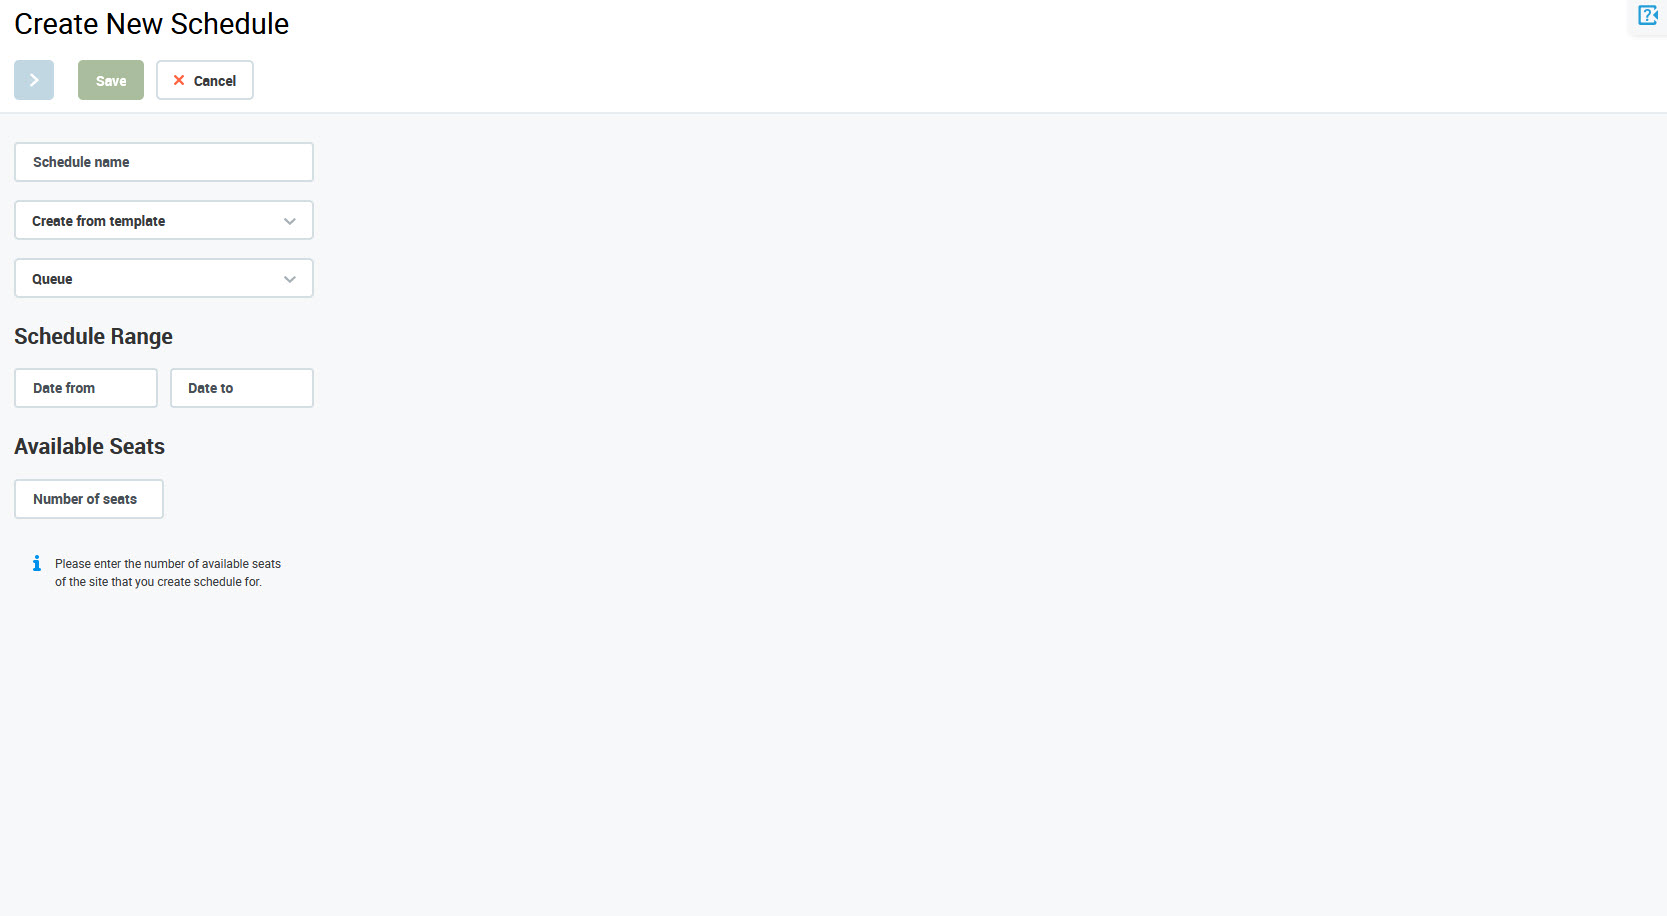
Fill in all fields necessary to complete the first step:
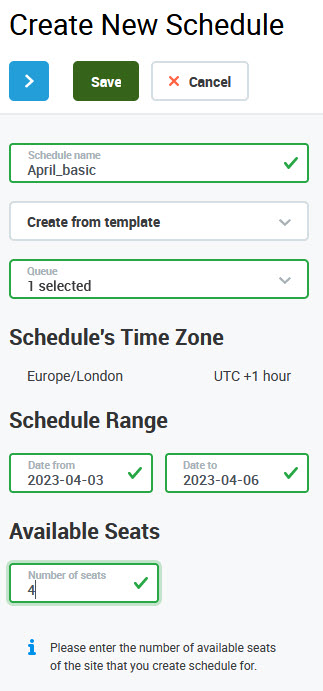
Schedule Name – name of the new schedule
Create from template (optional) – select the name of an existing schedule to be used as a template (select from the drop-down menu) and queue(s) will be filled in automatically. If the queue selection was already made, queue(s) will be overwritten based on the template schedule. When some other queue(s) are added or removed from the list after selecting a template, the template selection will be reset and no template will be used.
Queue – queue for which the schedule will be created (select from the drop-down menu; it is possible to select up to 10 queues).
Schedule Range: Date from/Date to – time range of the new schedule
Available Seats (optional) – maximum number of people who can be scheduled to work on site (the others should be scheduled to work remotely)
After selecting a queue, the time zone of the schedule is displayed. It is the same as the time zone of the selected queue. If more than one queue is selected, the following logic applies:
the schedule uses the time zone in which the majority of the selected queues are (for example: three queues were selected, two of them are in Europe/London and one is in Europe/Kiev. As a result, the schedule will be in Europe/London)
if each selected queue is in a different time zone, or there is no time zone used by the majority of the selected queues (for example: two queues are in Europe/London and two queues are in Europe/Kiev), the time zone of the oldest queue is used by the schedule.
What if I want to select more than one queue?
Note that when more than one queue is selected, all queues should have the same SLA settings configured (compare the settings on the Queues screen) and there should be production forecasts created for them (this can be confirmed from the Forecasting Studio screen). When only one queue is selected, a forecast is not mandatory.
How templates work?
Once the template schedule is selected, people assignments and all schedule element assignments are copied from the selected schedule. However, changes and modifications can be made later.
The schedule elements assignment is copied to match days of the week (for example, from Monday of an existing schedule to Monday in the new schedule) while at the same time it attempts to cover as many days as possible (to find the longest match), starting from the first matching day of the week. As a result, not all days from the existing schedule will necessarily be copied to the new schedule.
Only the time range containing assigned schedule elements will be taken from the existing schedule, empty days at the beginning or at the end of the existing schedule are ignored. Empty days from inside this range are copied to the new schedule (as empty days).
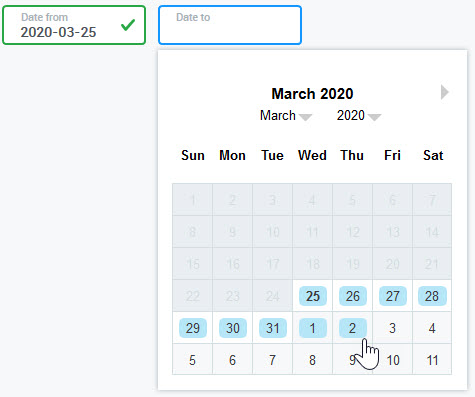
How to configure Schedule Range?
To configure the Schedule Range, click on the Date from field to expand the calendar. Click on a day to select it:

To quickly jump to a specific month or year, use drop-down menus.
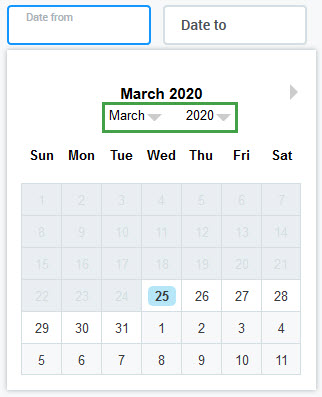
Then, click on the Date to field to expand the second calendar. Click on a day to select it. The whole range will be marked with blue:
Click Next step to proceed to the second step.
Alternatively, click Save to create a schedule without having to proceed to the second step. In this case, the schedule will be empty.
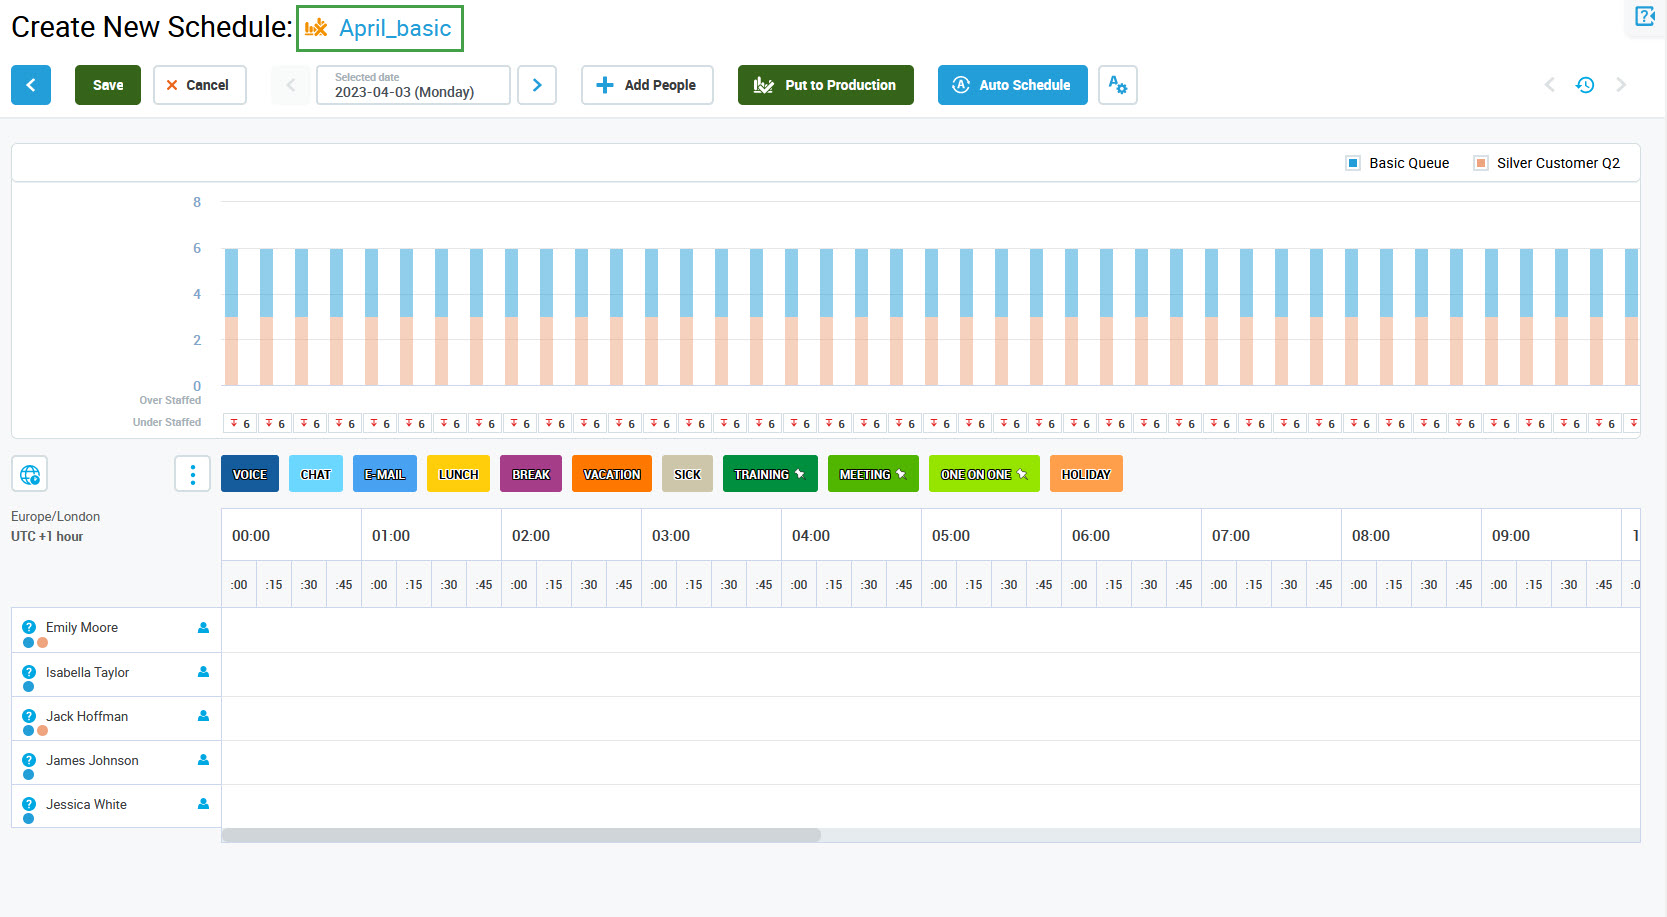
Navigating in the Schedule Composer
The second Create New Schedule screen will display. The name of the schedule is displayed in the top left corner, and the In Draft icon (![]()
If any changes to the settings configured on the previous screen are needed, click the Previous step button to go back.

Selecting a Day
By default, the screen displays the first day of the configured schedule range.
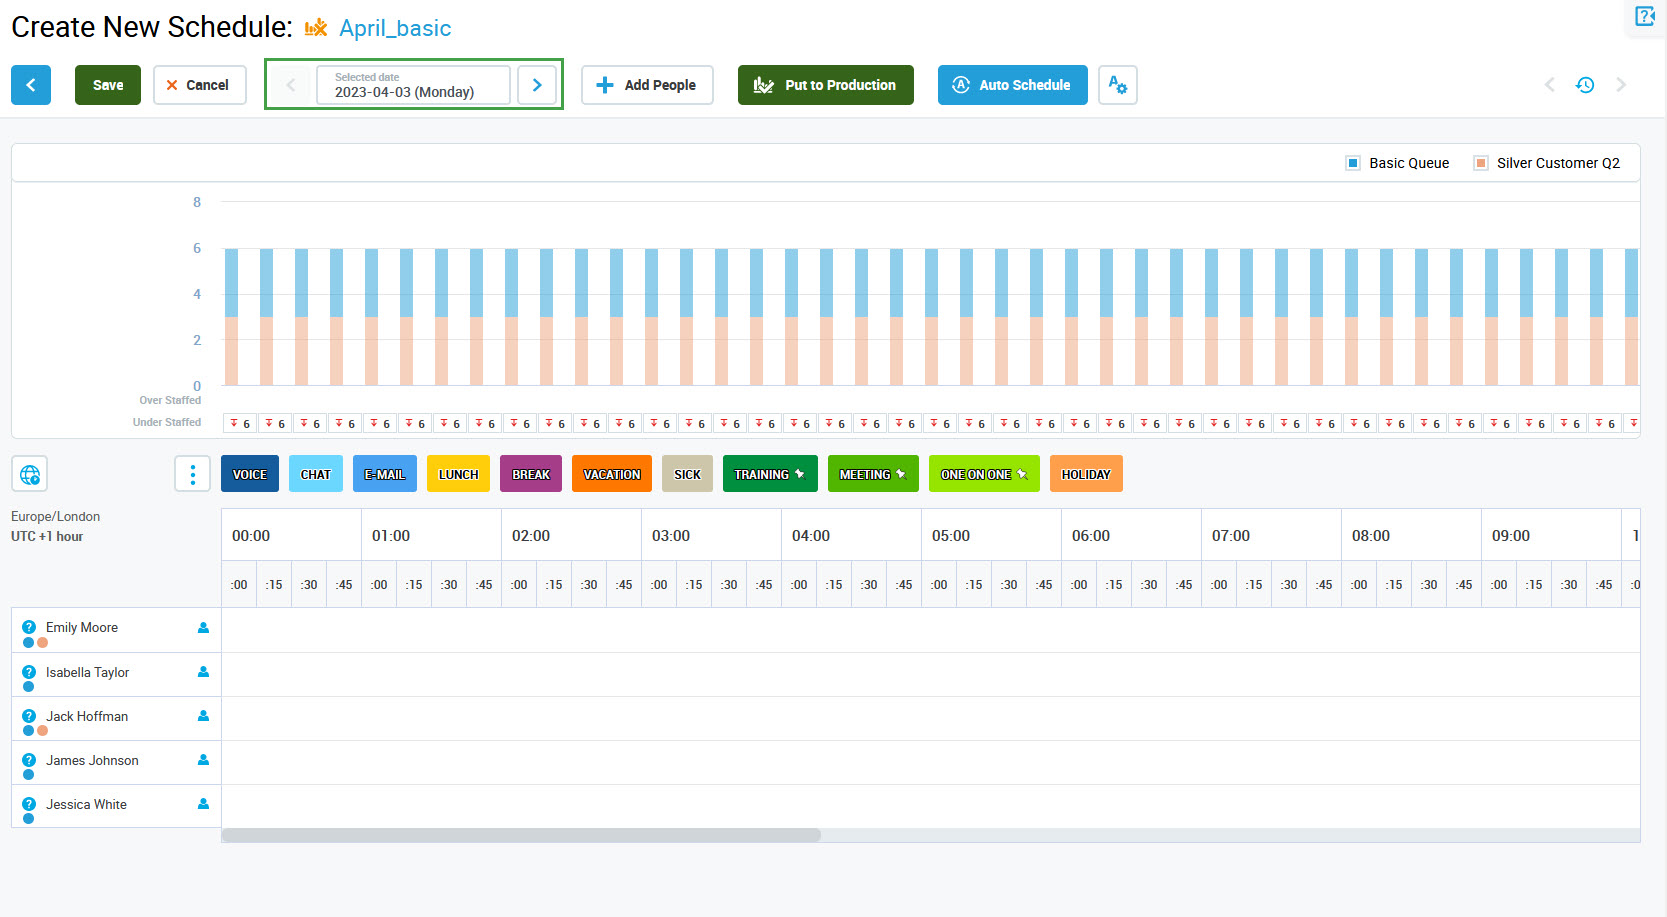
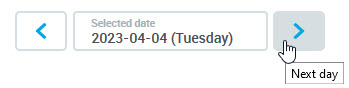
Use the arrows to navigate forward or backward and to change the date:
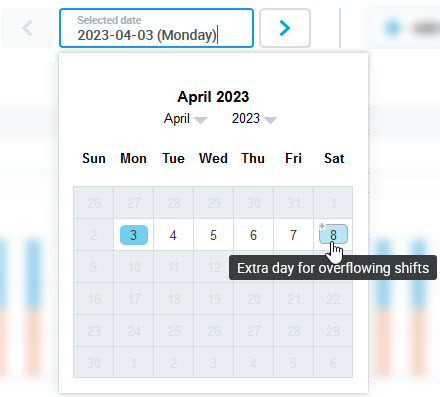
To select any other date, click on the Selected date field to expand the calendar. Then click on a day to select it:
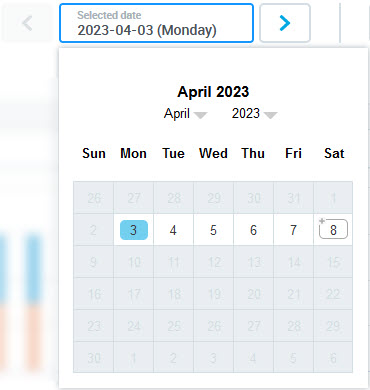
Note that one extra day for overflowing shifts is added to the schedule range. In case a night shift is added on the last day of the schedule range, it is possible that it will end the next day (outside the schedule range). Adding an extra day ensures that this shift displays correctly.
Undo and Redo
To undo or redo any actions, use the Undo (![]()
![]()
Composing a Schedule
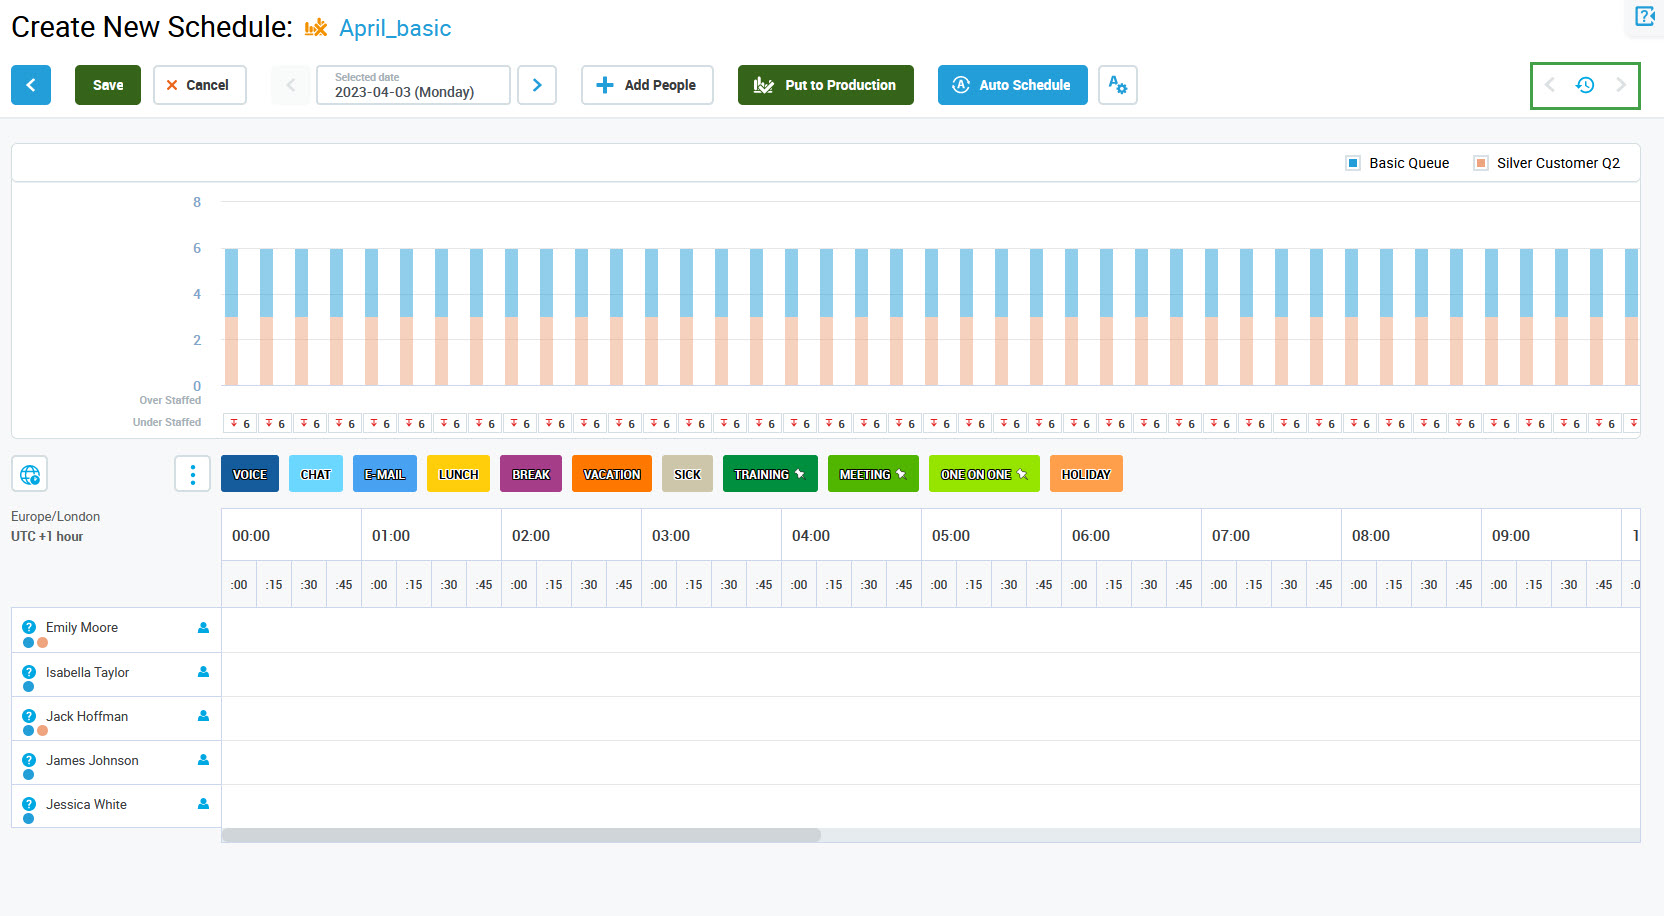
On the Create New Schedule screen, the forecast chart for the currently selected day is displayed (if it exists). Also, all people with the skills to handle the selected queue(s) are added automatically.
Reading a Forecast
The forecast chart differs depending on whether the schedule is created for a single queue or for multiple queues.
Single Queue
If the schedule is being created for one queue only, the bars are single-colored. There are two bars present for each time interval (15 minutes): showing the required number of people and the scheduled number of people. The legend in the top right corner shows which color represents which bar.
The following information is displayed on the chart:
Required Staff (light blue bar) – number of people calculated for an interval based on the forecast
Multiple Queues
If the schedule was created for multiple queues, the colors of the bars represent the selected queues. The legend in the top right corner indicates which color represents which queue.

Click on the legend item to hide/show bars for a particular queue. Then click Show me all to show all queues again.

The following information is indicated for each time interval (15 minutes):
Required Staff (left bar, light colors) – number of people calculated for an interval based on the forecast. Each color represents one of the queues.
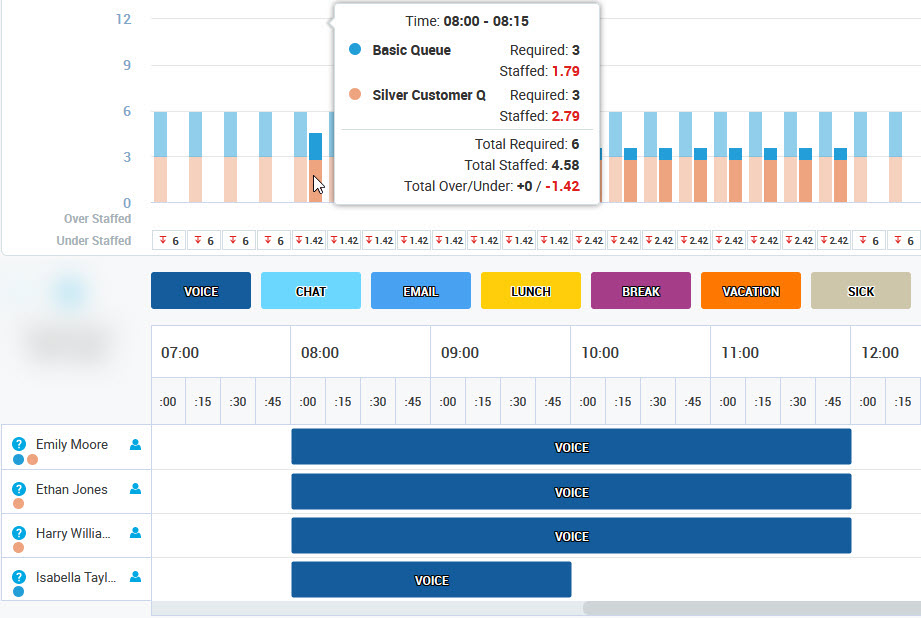
People's Assignment
All agents who belong to the teams that the current user has assessed in User Management → Can Review section are available.
People with the skills to handle the queues selected in the first step of schedule creation are automatically displayed in the schedule table below the chart. There is no need to assign people manually, however, it is possible to do it.
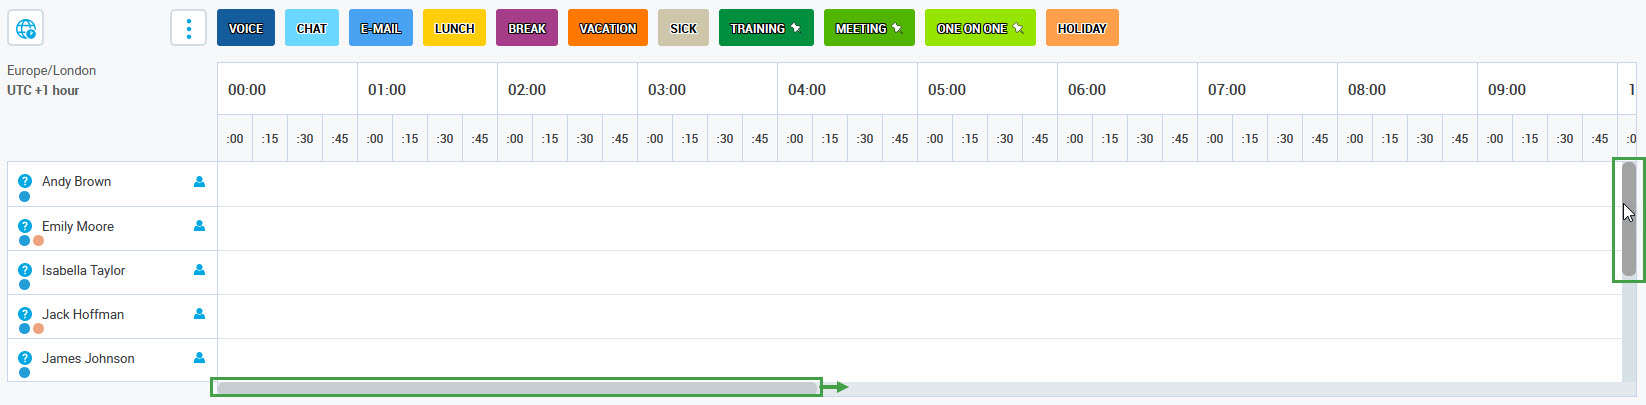
Use the scroll bar on the right of the table to see all people. The scroll bar appears after hovering the mouse pointer over the right edge of the table. Use the scroll bar below the table to view the whole timeline.
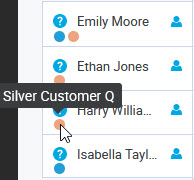
Colorful dots under the person's name indicate the queues to which this person is assigned. Hover the mouse pointer over the dot to see the name of the queue. Colors match bars on the chart with requirements and staffing.
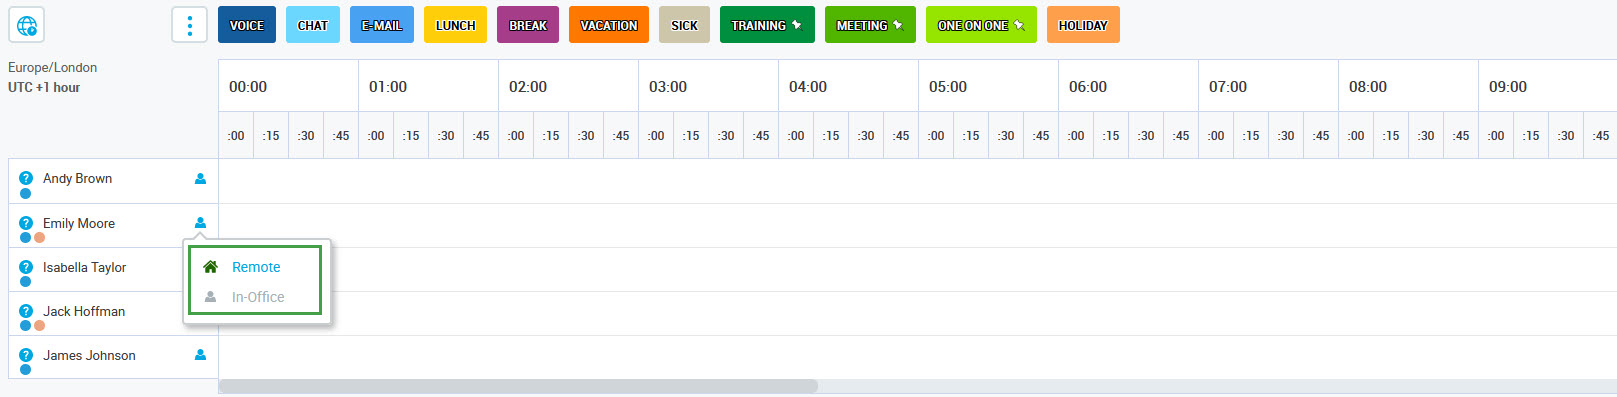
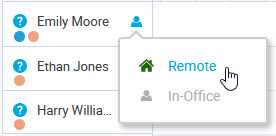
Click the icon and select Remote to schedule the person to work remotely. Click the icon again and select In Office to change it back. This setting applies only to the currently displayed day.
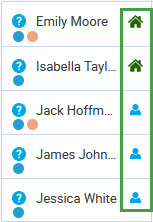
People who are scheduled to work on-site (by default all assigned people) are indicated by the Working in Office icon (![]()
![]()
Tips:
In case a person was disabled or removed from within the User Management application after being assigned to a schedule, the person is marked as deactivated:

Hover the mouse pointer over the exclamation mark to read the notification: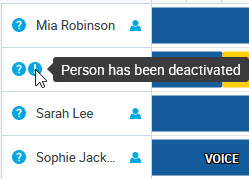
Removing People
To remove people from the schedule:
Right click with the mouse on the person's name. A tooltip will display.
Click Remove person to remove this individual from the schedule.
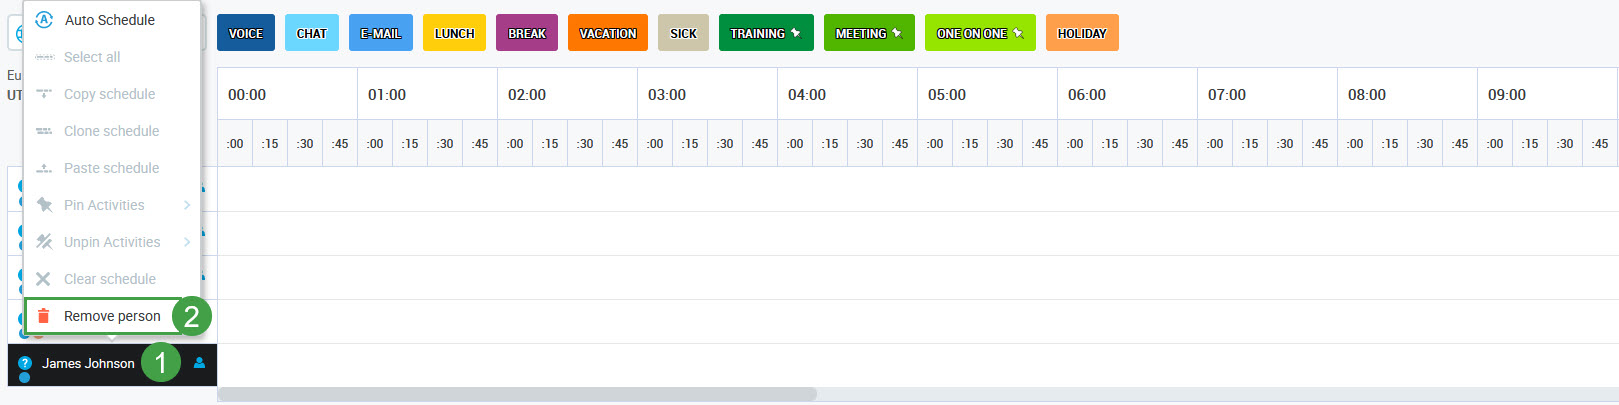
This will remove the person and their activities from the schedule (the person remains assigned to the queue and can be added to the schedule later on).
Adding People Back Manually
The removed people can be manually added back. Also, if an additional queue was selected after the people were assigned on the second screen of the schedule creation process, the people with the skills to handle this queue will not be assigned automatically. They also need to be added manually.
To assign people to the schedule click the Add People button menu at the top of the screen. The pane will expand.

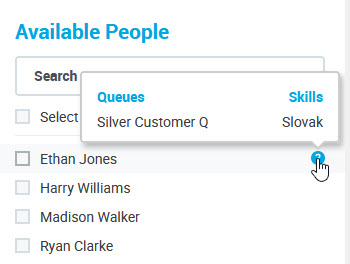
By default, the pane displays all people who are assigned to the queue(s) selected during schedule creation and are not assigned to the schedule yet. To filter people based on a queue or a skill, use the filters. Click Queue(s) or Skill(s) to expand filters.
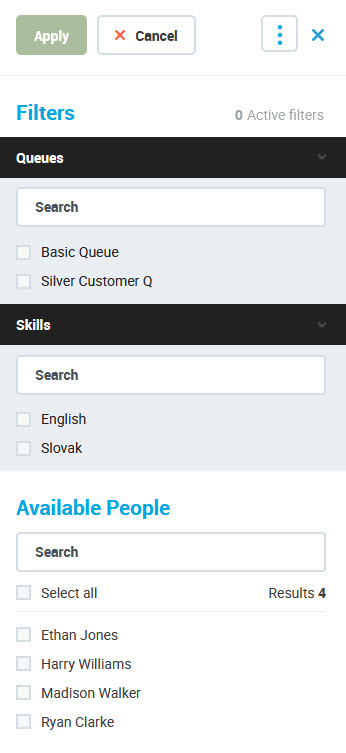
Select a queue or a skill to display only people who have this queue or this skill assigned. The number of applied filters and the name of the selected queue or skill will display.
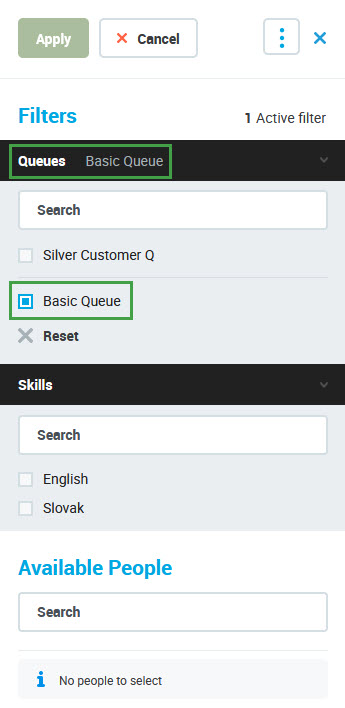
Use the Reset button (![]()
Hover the mouse pointer over the person's name to reveal a blue question mark. Hover your pointer over it to see a tooltip with the person's skills and queue assignment.
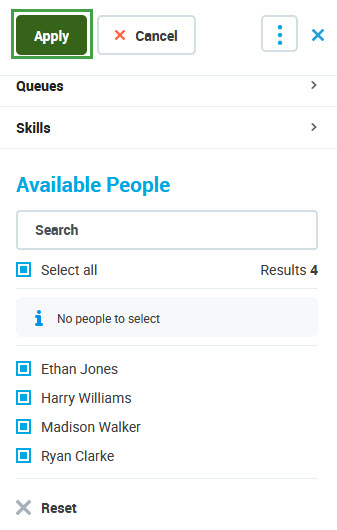
Select the box to assign a person. The selected person will move to the bottom, while people still available will be listed at the top.

Click Select all to select all available people.

If needed, use the Reset button (![]()
To add selected people to the schedule, click Apply.
Phantom Elements
Although a new schedule should be empty by default, it can happen that some elements may already be assigned to people. These are so-called "phantom elements" - activities from another production schedule that overlaps with the date range of the new schedule. The phantom elements are striped, instead of being solid colors:
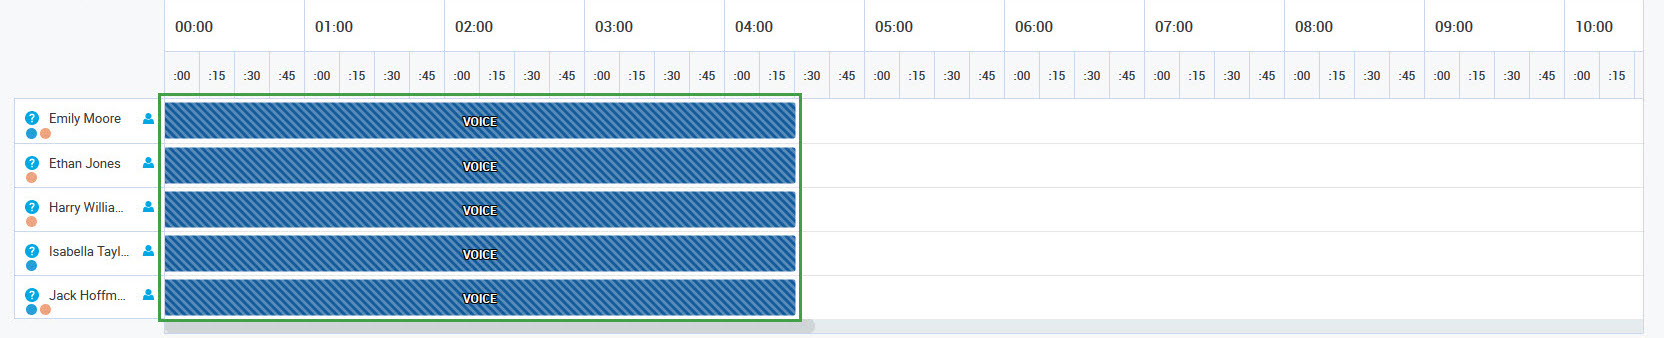
It is not possible to delete, move or modify phantom elements. They are used as a placeholder, to avoid assigning any other elements at the same time when further modifying the schedule.
Scheduling
A schedule can be created in two ways:
automatically, as described on the Auto Scheduling page
manually, as described on the Manual Scheduling page.
After creating the schedule, proceed with the sections below.
Checking the Results
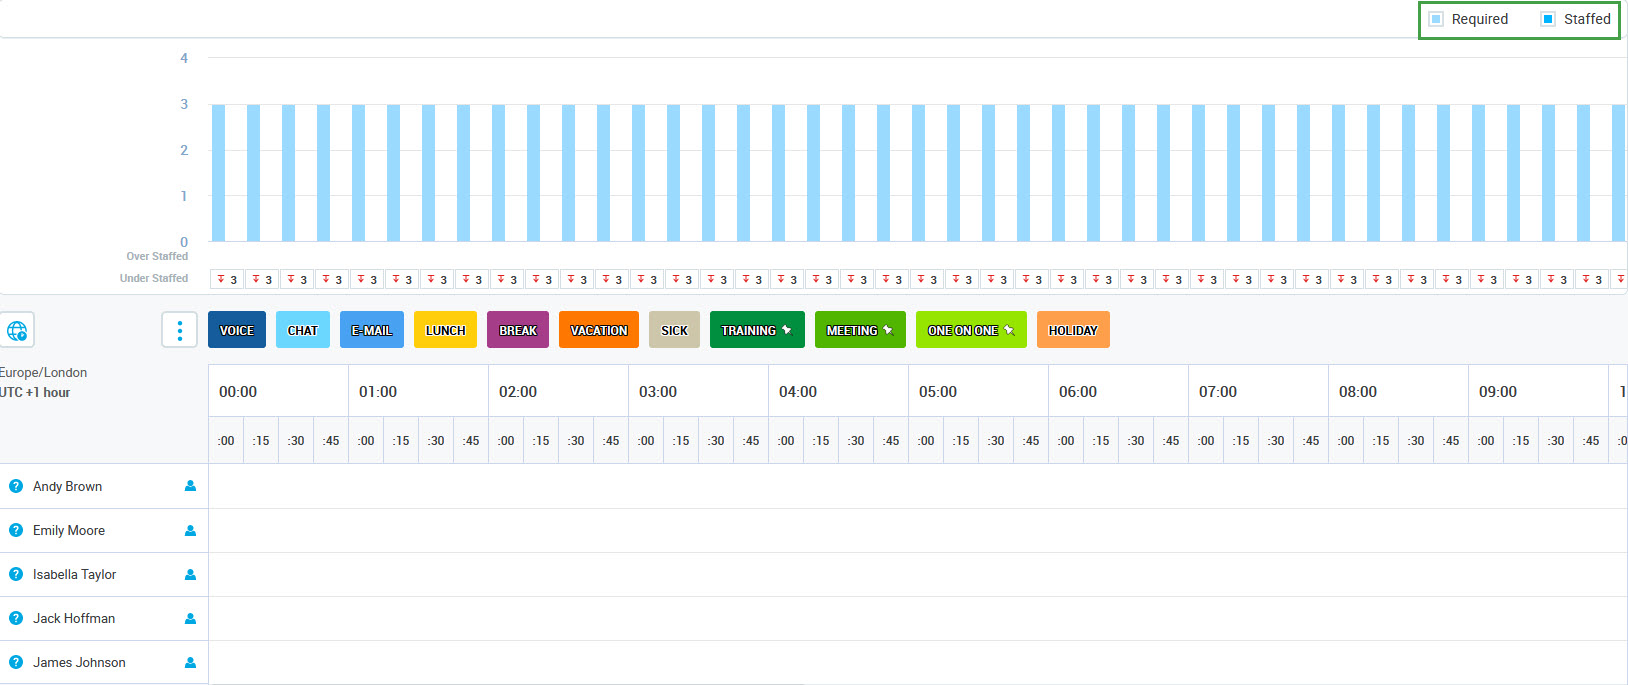
When the auto scheduling process is successfully finished, people are assigned schedule elements and the staff assignment is reflected on the chart together with the staff requirements.
The chart displays how many people are needed and assigned for each 15 minutes interval. The chart differs depending on whether the schedule was created for a single queue or for multiple queues.
Single Queue
The chart changes dynamically after the people are assigned elements (Voice, Chat or Email) that match the channel types of the queues to which the people are assigned (no matter if they are assigned automatically or manually):
Now, the following information can be read from the chart:
Required Staff (light blue bar) – number of people calculated for an interval based on the forecast
Scheduled Staff (dark blue bar) – number of people already scheduled for an interval
Over Staffed/Under Staffed values – numbers below each bar, indicating the difference between the number of people required and the number of people scheduled.
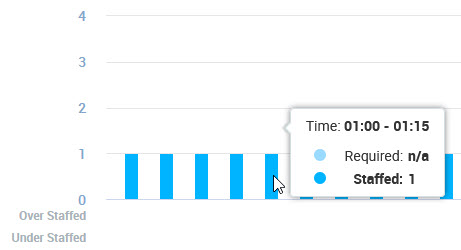
Hover the mouse pointer over the bar to display a tooltip with exact values for the selected time interval:
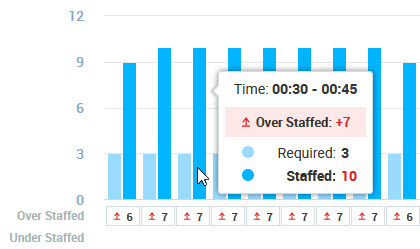
If there was no production forecast for the selected time interval, n/a will display instead of the Required Staff value:
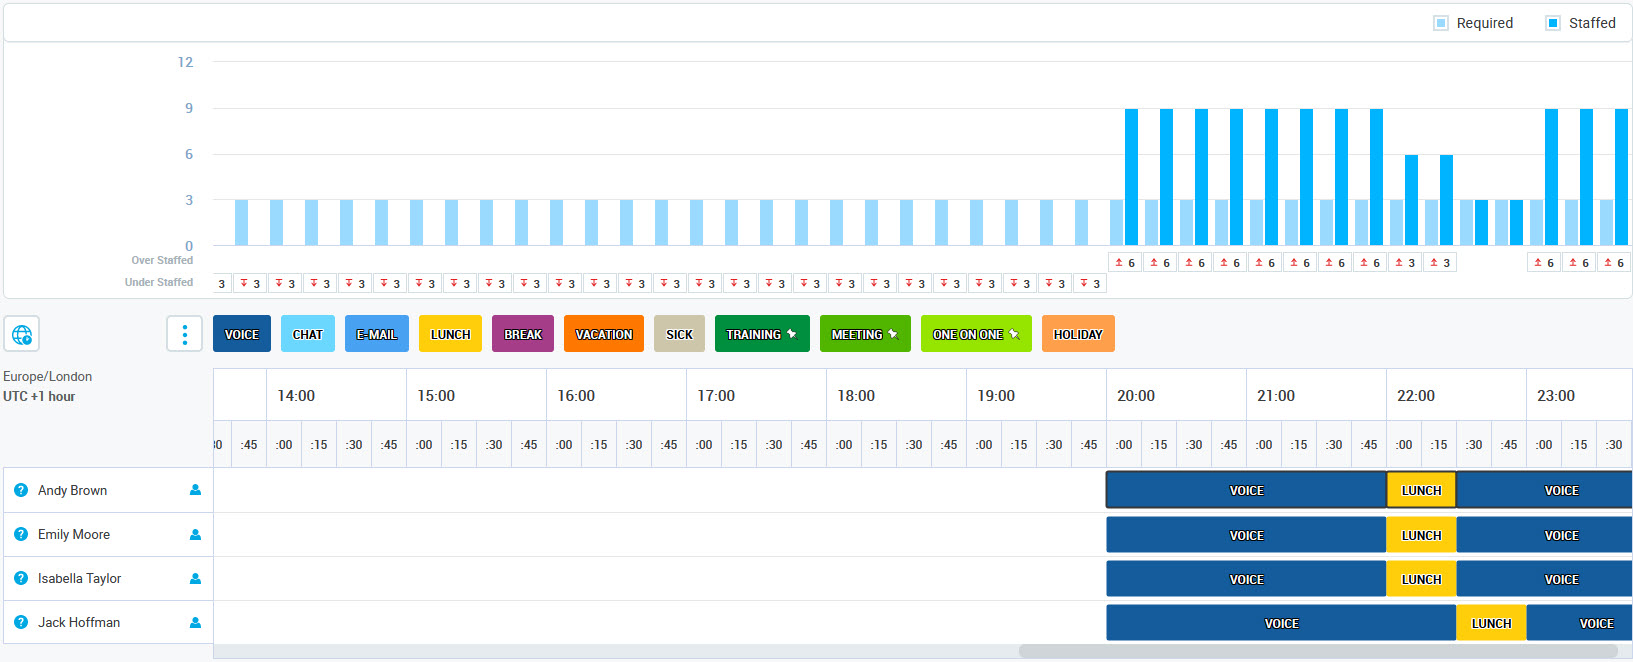
Example:
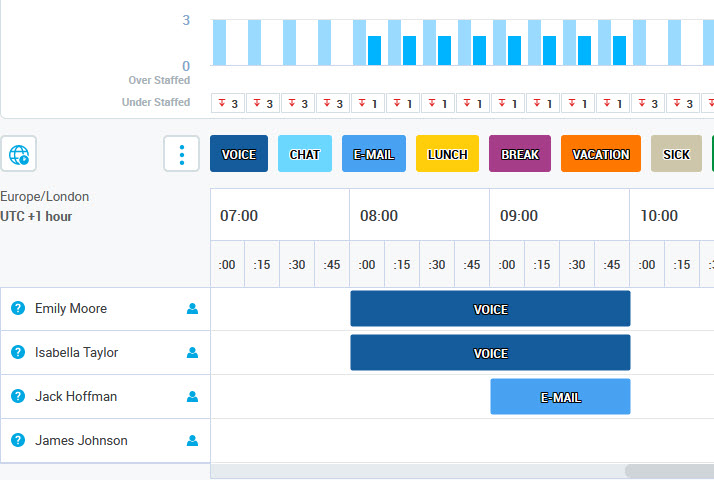
The following information can be concluded from the above image:
three people are required between 08:00 and 10:00 (light blue bars)
two people are assigned between 08:00 and 09:00 (dark blue bars)
two people are assigned between 09:00 and 10:00 (dark blue bars) – Jack Hoffman has an Email element assigned, but the queue type is Voice, so he doesn't contribute
between 07:00 and 08:00 the contact center is understaffed (three people are missing)
between 08:00 and 10:00 the contact center is understaffed (one person is missing)
between 10:00 and 11:00 the contact center is understaffed (three people are missing)
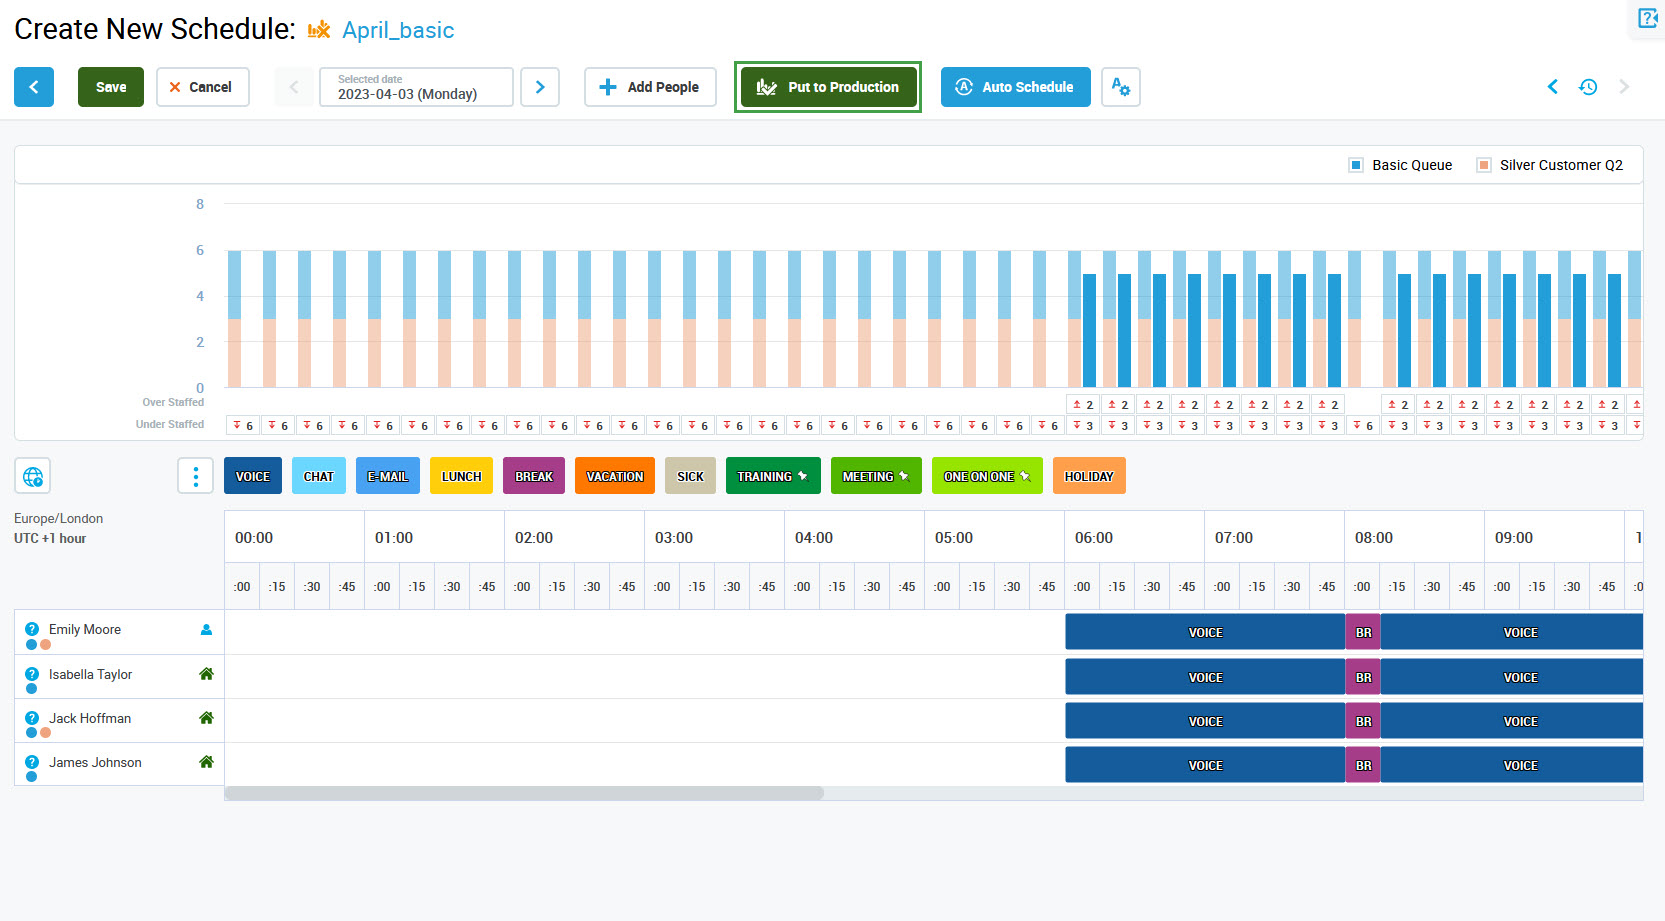
Multiple Queues
The chart changes dynamically after the people are assigned elements (Voice, Chat or Email) that match the channel types of the queues to which the people are assigned (no matter if they are assigned automatically or manually):
Now, the following information is indicated for each time interval (15 minutes):
Required Staff (left bar, light colors) – number of people calculated for an interval based on the forecast. Each color represents one of the queues.
Scheduled Staff (right bar, dark colors) – number of people already scheduled for an interval. Each color represents one of the queues.
Over Staffed/Under Staffed values – numbers below each bar, indicating the difference between the number of people required and the number of people scheduled; each number is the sum of values for all queues visible on the chart.
Hover the mouse pointer over the bar to display a tooltip with exact values for the selected time interval. The tooltip displays how many people are required for each queue and how many people are already scheduled (in total and for each queue separately). If one person is assigned to multiple queues, they can contribute to all of the queues which: are included in the schedule, there is a forecast present for them, and are understaffed. The exact value of the contribution is the result of an algorithmic calculation.
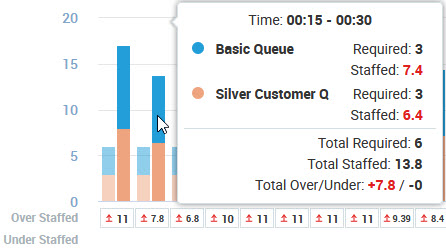
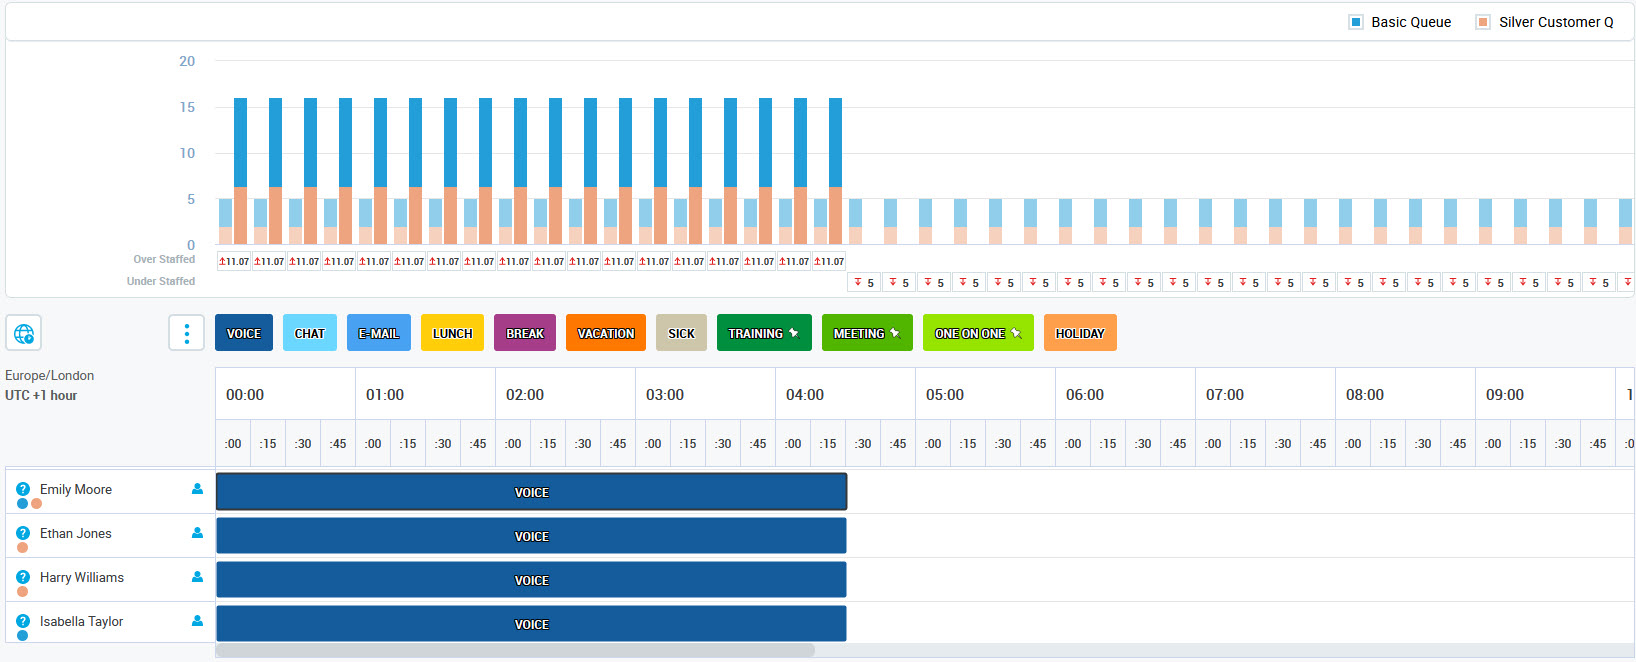
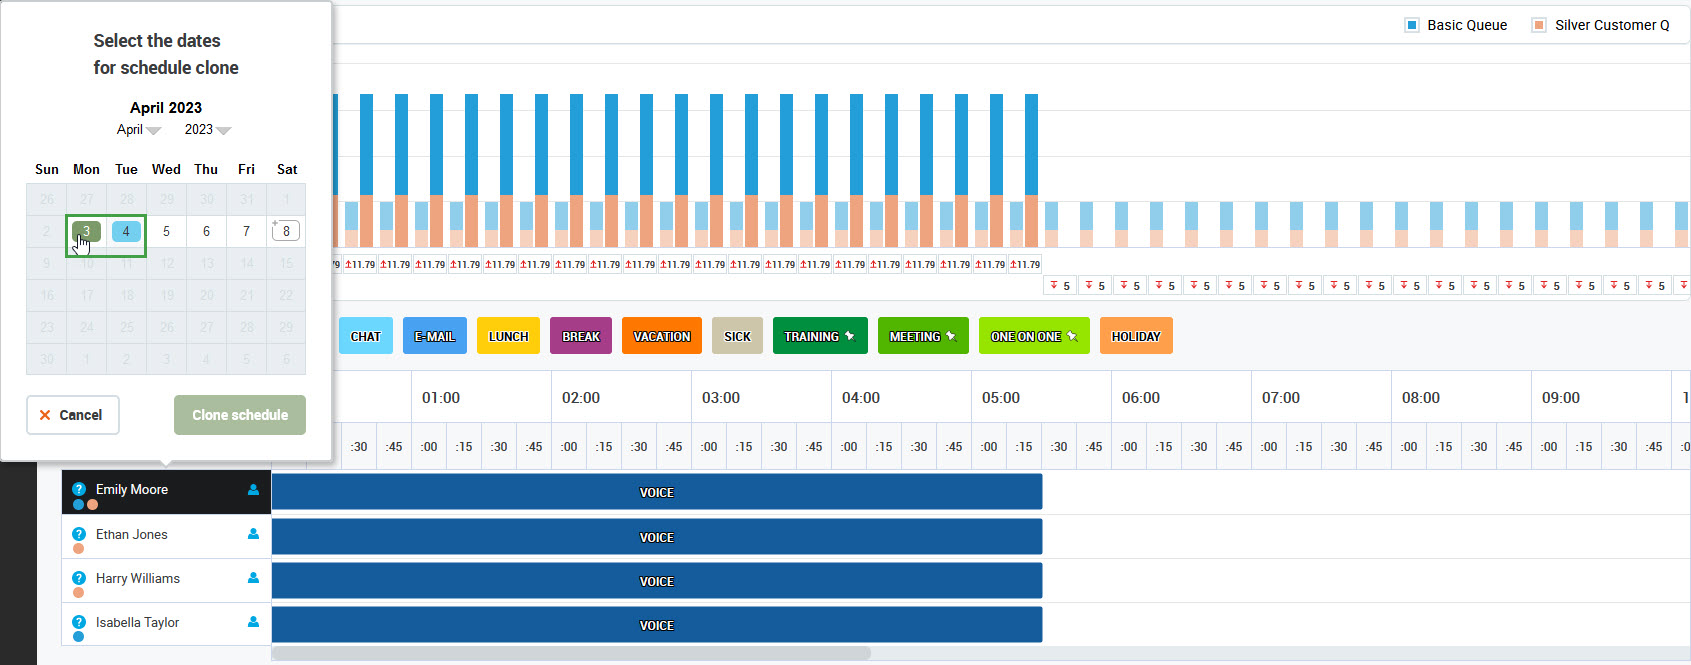
Example 1:
The following information can be concluded from the above image:
Requirements:
six people are required for each interval during the time range visible in the picture above (indicated by the lighter bars), three for a Basic Queue (blue color) and three for a Silver Customer Q (in orange)
Assignments:
Ethan Jones and Harry Williams are assigned to the Silver Customer Q queue, so each of them contributes with a value of 1 to this queue between 8:00 and 12:00
Emily Moore is assigned to both queues, so she contributes with a value of 0,79 to each queue between 8:00 and 12:00
Isabella Taylor is assigned to Basic Queue and contributes to this queue with a value of 1, between 8:00 and 10:00 only
Staffing levels:
The contact center is understaffed between 8:00 and 10:00: only 2,79 of a person are scheduled for Silver Customer Q and 1,79 of a person are scheduled for Basic Queue (in total: 4,58 of the required 6, so it is understaffed by a value of -1,42)
Between 10:00 and 12:00, the contact center is even more understaffed: only 2,79 of a person are scheduled for Silver Customer Q and 0,79 of a person are scheduled for Basic Queue (in total: 3,58 of the required 6, so it is understaffed by a value of -2,42).
Example 2:
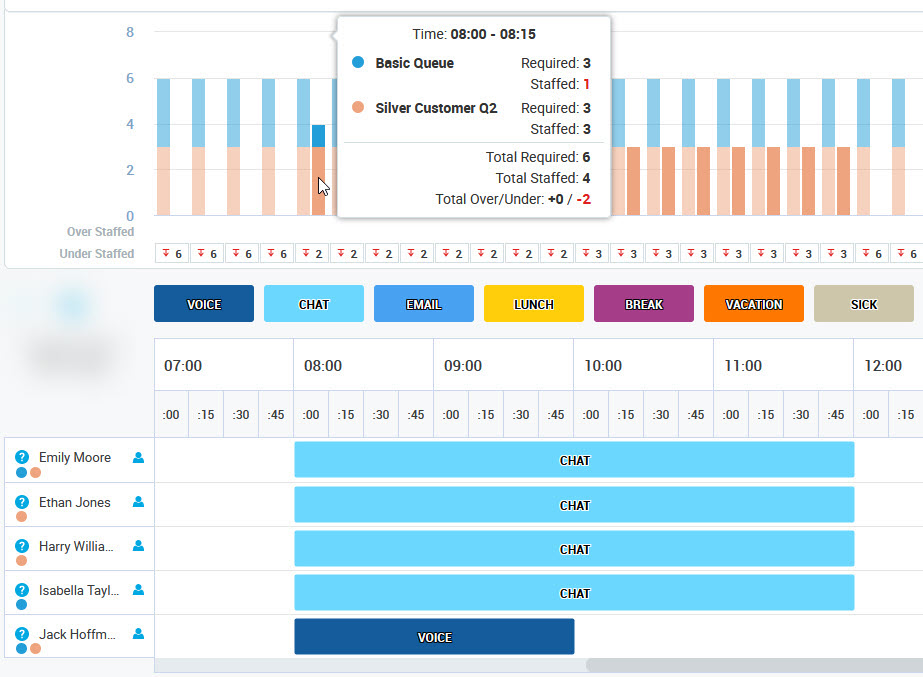
The following information can be concluded from the above image:
Requirements:
six people are required for each interval during the time range visible in the picture above (indicated by the lighter bars), three for a Basic Queue (blue color) and three for a Silver Customer Q2 (in orange)
Assignments:
Emily Moore is assigned to both queues, and she has a Chat element assigned, so she contributes with a value of 1 to the Silver Customer Q2 queue (Channel Type: Chat) between 8:00 and 12:00
Ethan Jones and Harry Williams are assigned to the Silver Customer Q2 queue (Channel Type: Chat) and they have a Chat element assigned, so each of them contributes with a value of 1 to the Silver Customer Q2 queue (Channel Type: Chat) between 8:00 and 12:00
Isabella Tylor is assigned to the Basic Queue, but she has a Chat element assigned, so she doesn't contribute at all
Jackson Hoffman is also assigned to both queues, and he has a Voice element assigned, so he contributes to Basic Queue (Channel Type: Voice) with a value of 1, between 8:00 and 10:00 only
Staffing levels:
The contact center is understaffed during the whole analyzed period of time.
To solve the problem, Isabella Tylor should have a Voice element assigned instead of a Chat, and more people should handle Basic Queue by assigning them Voice elements.
Note the following important details:
only elements (Voice, Chat, or Email) that match the queue channel type contribute to the queue that the person is assigned to
the work contribution is calculated based on the skills that are necessary to handle queues for which the schedule is created
the work contribution of each person in the queue is re-calculated each time the list of scheduled people changes
when a queue is unassigned from a person, the schedule may be affected in two ways:
if the person is assigned to other queues in the same schedule, this person will stay assigned to the schedule contributing to the other queues, but the work contribution will be re-calculated
if the person is not assigned to any queue in the same schedule, this person will be displayed as an 'inactive' person and their work contribution will not be included.
In-Office vs Remote
If the number of people scheduled to work on-site who have any elements assigned (except the Vacation, Sick or Holiday) is greater than the number of seats configured in the previous step (the Available Seats value), a warning is displayed. Even if the issue is detected on one day or several days only, the warning will be displayed globally, no matter the date selected, until the issue is resolved.
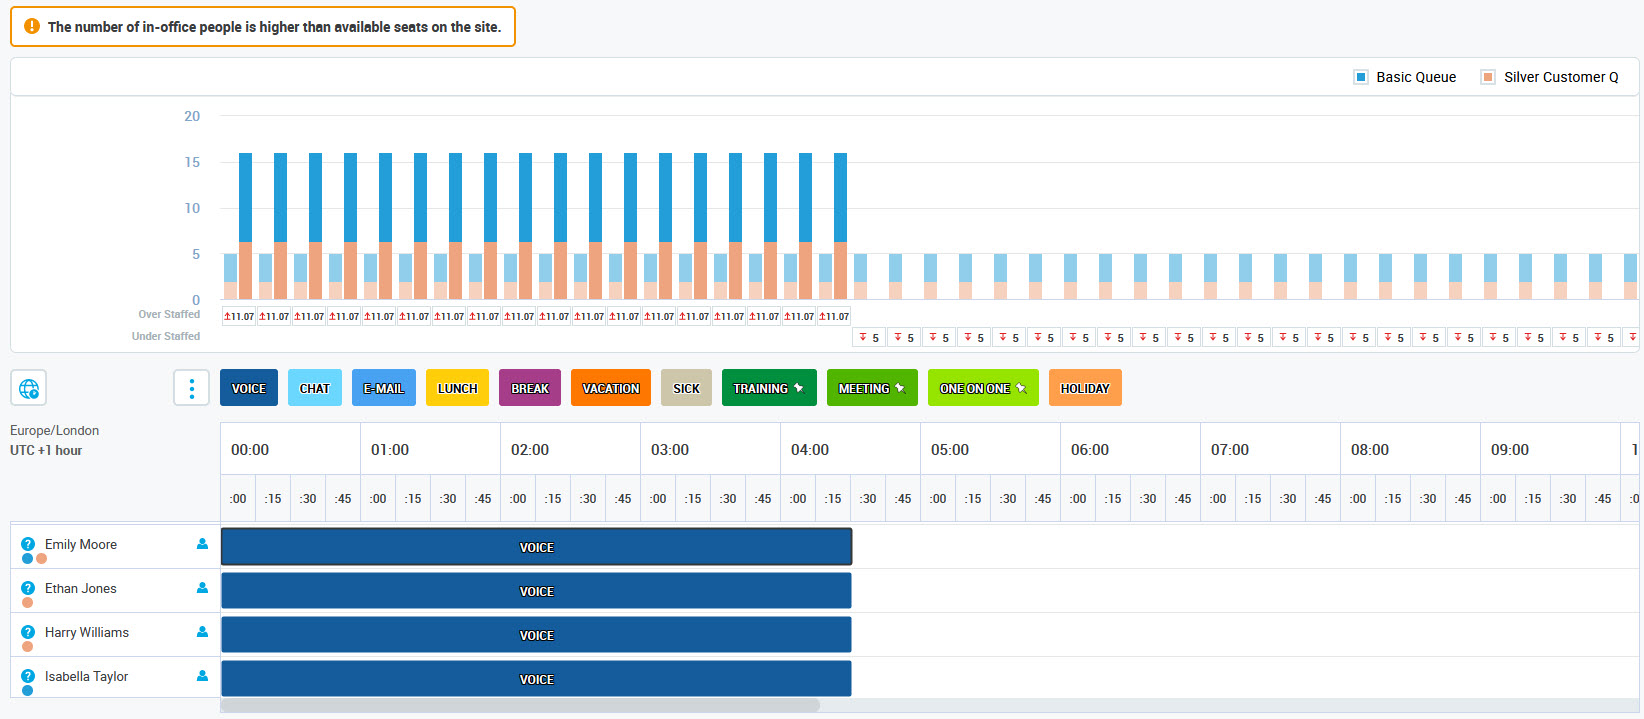
Click the Remote icons to schedule people to work remotely. Read more in the People Assignment section.
Displaying the Number of Hours
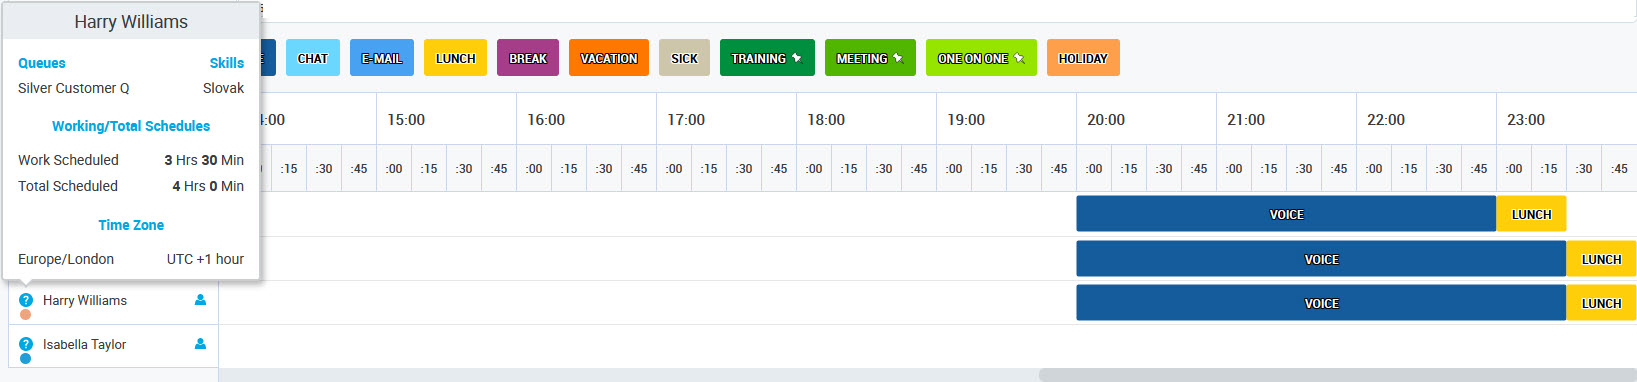
To display the number of scheduled hours per person, click on the question mark next to the person's name. A tooltip will display the number of hours:
Queue(s) – queue(s) to which the person is assigned
Skill(s) – skills handled by the person
Work Scheduled – number of work hours assigned to the person
Total Scheduled – total number of hours scheduled (for all activities)
Time Zone – time zone that the user has set in User Management
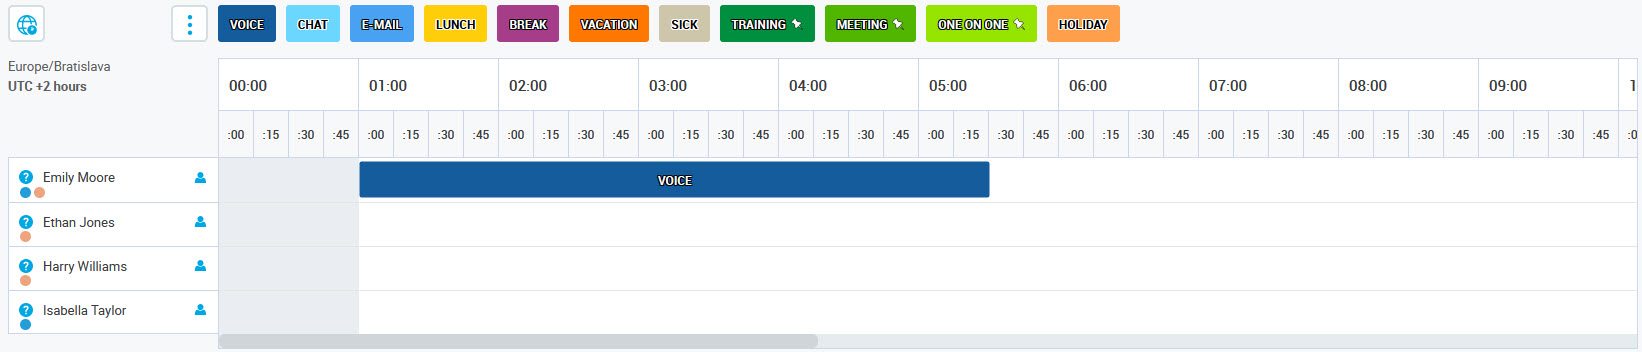
Changing a Time Zone
The schedule is calculated in its default time zone, which is based on the selected queue(s). The schedule is displayed in this time zone by default.
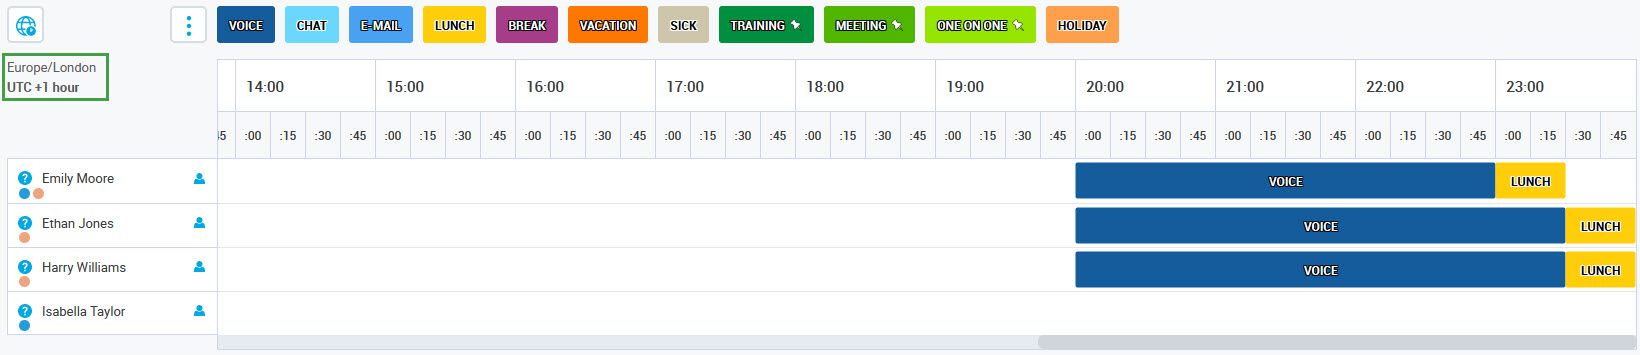
To change the time zone in which the schedule is displayed (but not recalculated), click on the time zone icon (![]()
Schedule's Time Zone – time zone in which the schedule is calculated, based on selected queue(s)
My Time Zone – time zone that the user browsing the schedule has set in User Management
People's Time Zones – all time zones that the users assigned to the schedule have set in User Management (selectable from a drop-down menu)
Queues' Time Zones – time zones set for the queue(s) for which the schedule was created
All Time Zones – any other time zone (selectable from a drop-down menu)
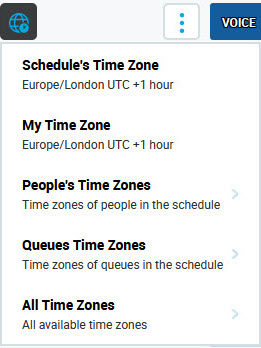
The schedule will automatically display in the newly selected time zone.
How time zones work?
As a result of a time zone change, out-of-schedule ranges will be added at the begging and at the end of a schedule. An out-of-schedule range is a time between the real start/end of a schedule and the start/end of a schedule in the currently displayed time zone.
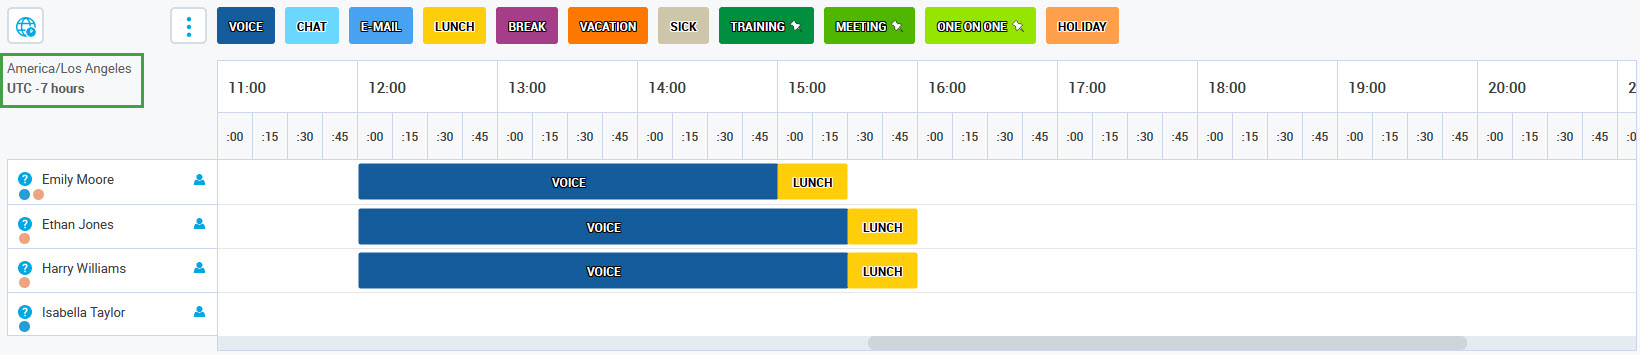
Also, the date range will change: one more day will be added at the beginning or at the end of the schedule (it depends on the direction of the time zone shift).A schedule was created in the Europe/London time zone (UTC+1). The schedule's date range is from the 3rd of April to the 7th of April (including an extra day for overlapping shifts):
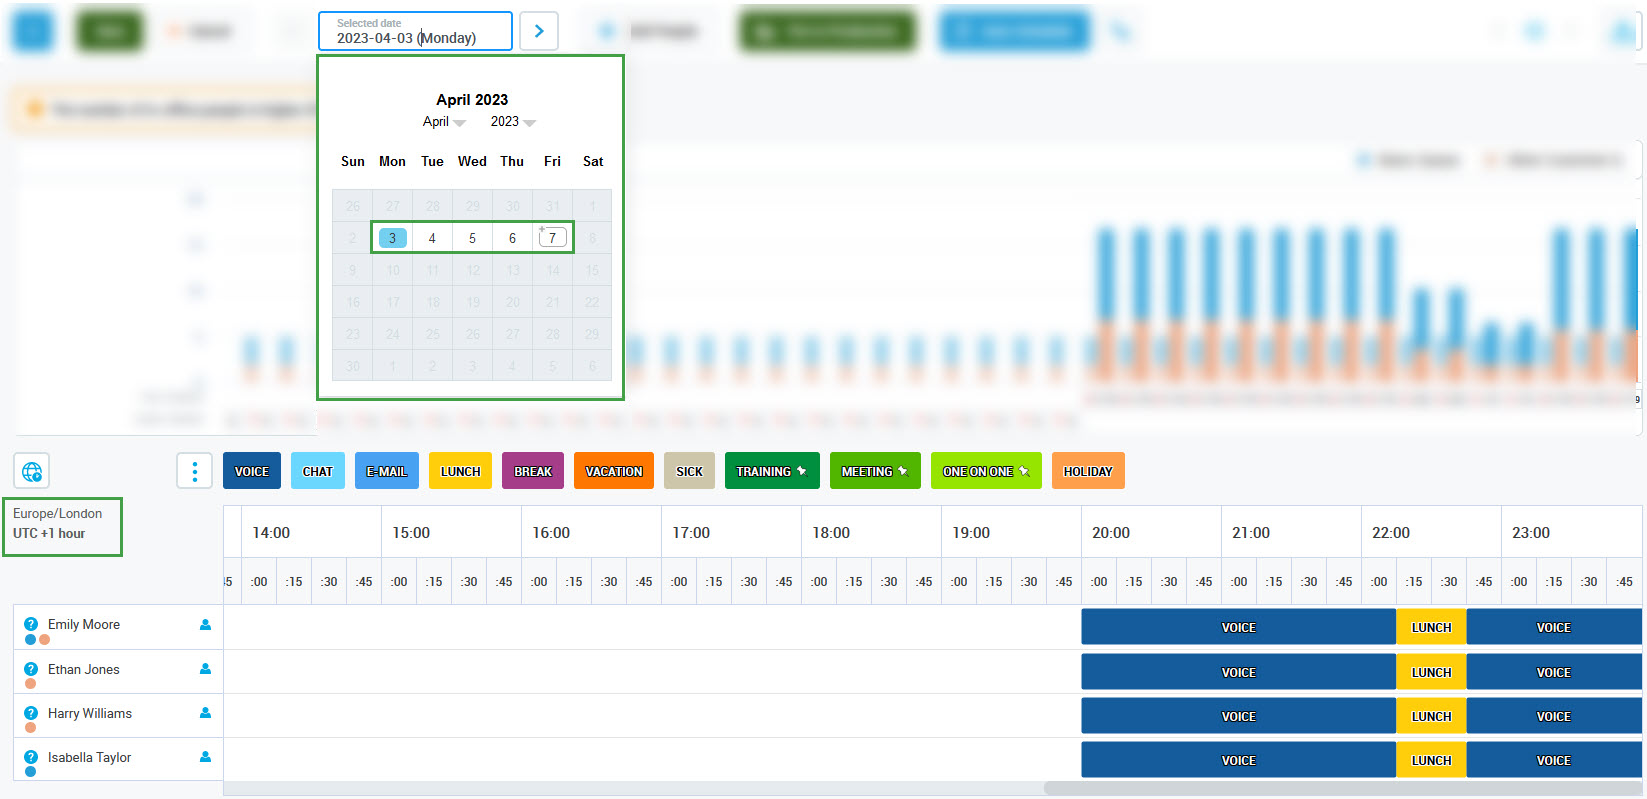
Then, the time zone was changed to Europe/Bratislava (UTC+2) and as a result, out-of-schedule ranges were added. An additional day was added at the end of the schedule (8th of April) and the first day of the schedule (3rd of April) is displayed as follows:
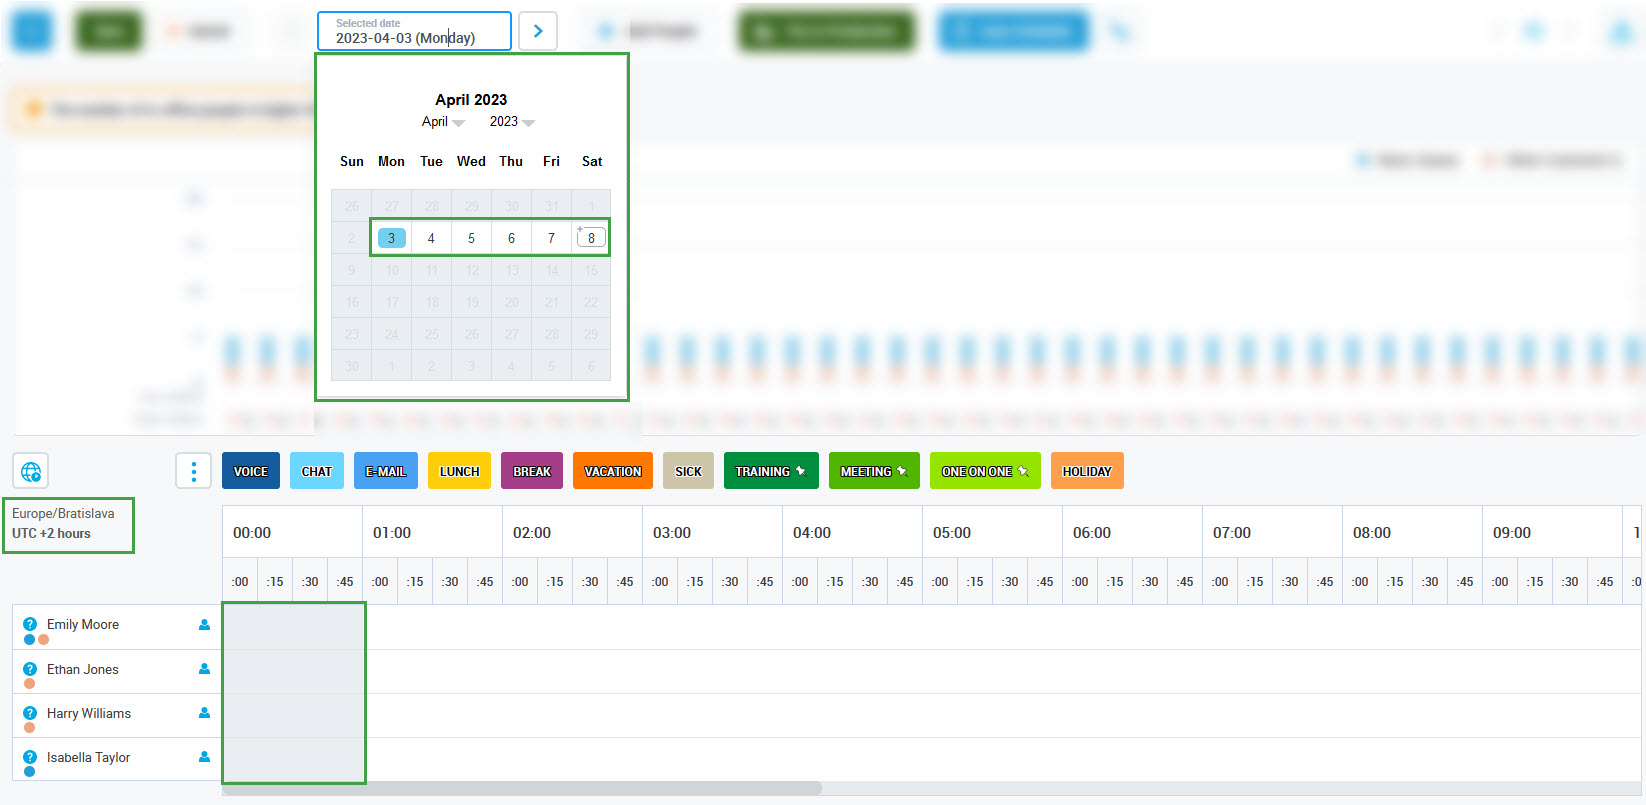
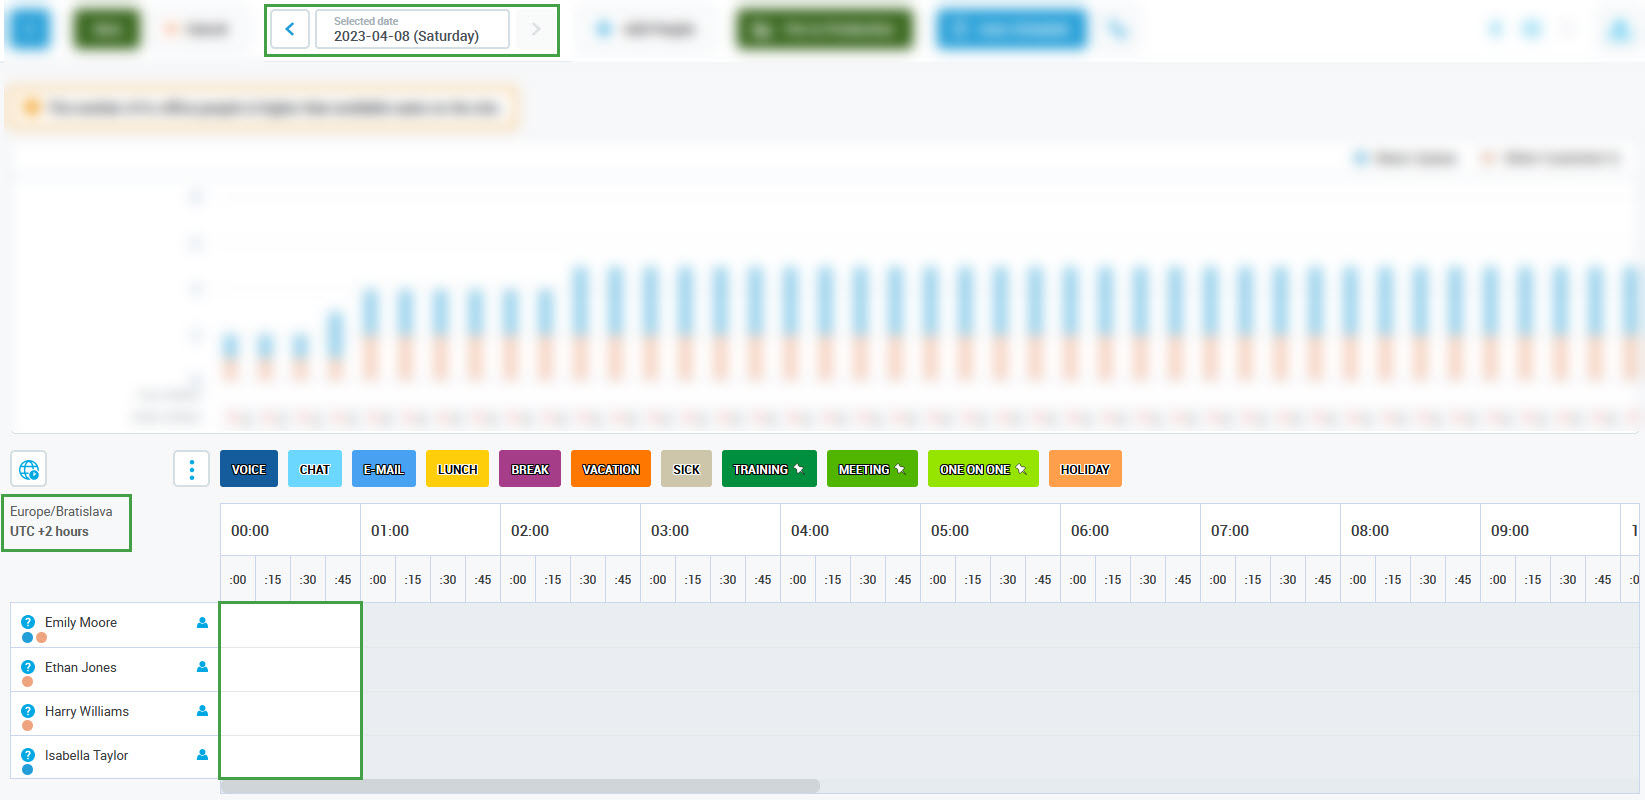
This out-of-schedule range is the time between the real start of a schedule (00:00 in UTC+1) and the start of the schedule in the currently displayed time zone (00:00 in UTC+2). The last day will appear as follows (only one hour of the schedule will expand to the next day, the rest of this day is out-of-schedule):
When cloning a schedule, the elements that would be pasted into the out-of-schedule range will be removed. The elements that would overlap with the out-of-schedule range will be cut (the part overlapping with the out-of-schedule range will be removed).
The schedule on the 4th of April, which starts at 00:00, should be cloned to the 3rd of April:
The schedule was cloned successfully, but the first element, overlapping with the out-of-schedule range, is cut. The part of this element, between 00:00 and 01:00 was removed.
If a user's schedule was copied using the Copy schedule feature and then the time zone was changed, the content of the clipboard will be reset. Copy and paste a schedule within the same time zone.
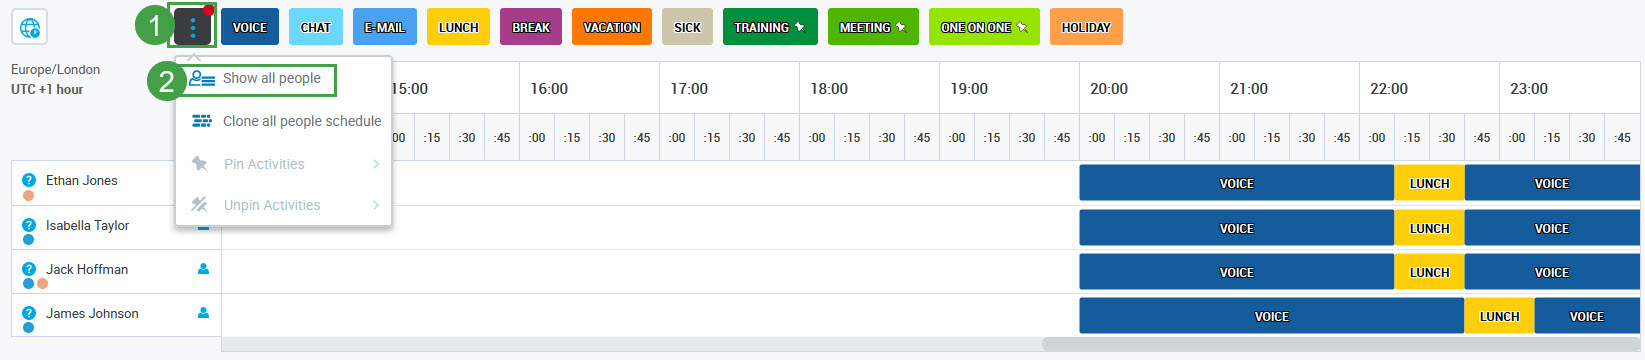
Hiding and Showing People
To hide people who have no elements assigned for the current day (their schedule is empty) or have non-working elements assigned (Vacation, Sick):
Click the Settings button on the left side of the table. A tooltip will display.
Click Hide non-working people.
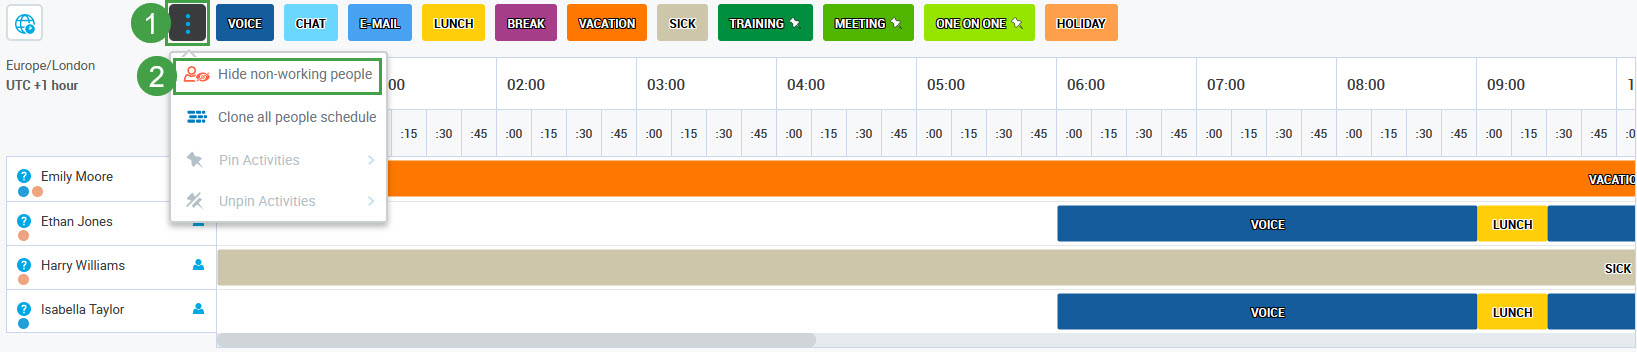
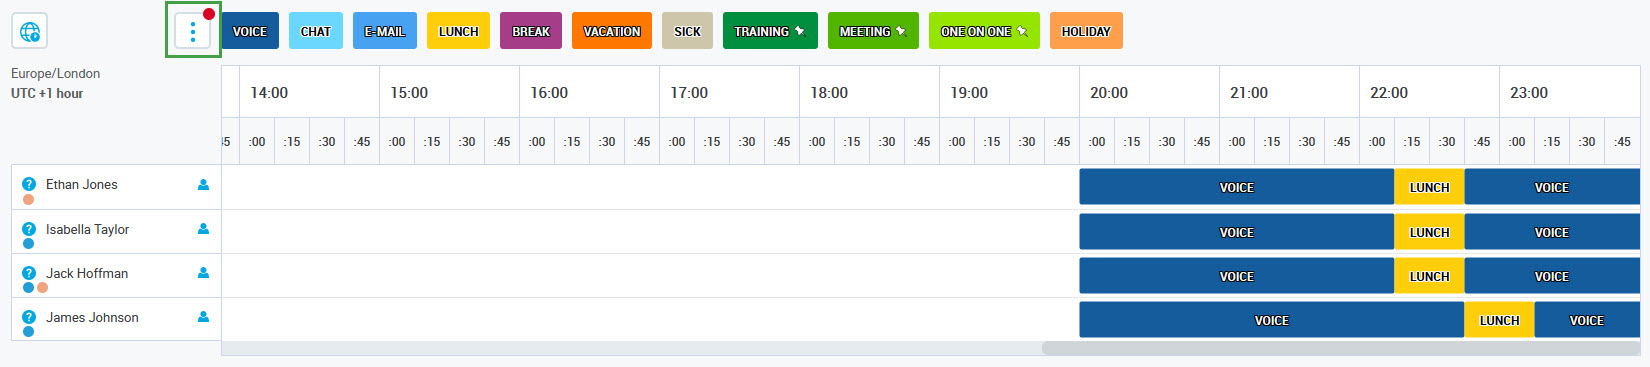
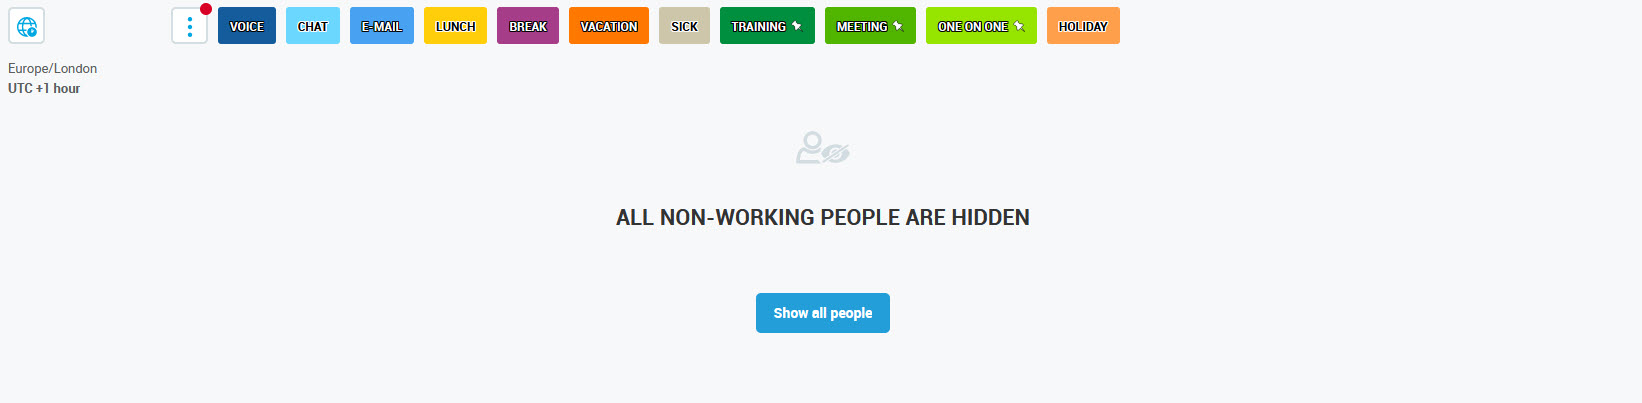
As a result, all people without working elements assigned for the current day will disappear from the table. A red dot on the Settings button indicates that the filter is applied.
To view all people assigned to the schedule:
Click the Settings button on the left side of the table. A tooltip will display.
Click Show all people.
Note the following:
This feature applies to the currently selected day only. It needs to be enabled/disabled on each day separately and is remembered for each day it is applied to.
When people without activities are hidden and then a new person is added to the schedule (with an empty schedule, by default), the view will automatically change back to show all people assigned.
If all people are hidden, a warning will display. Use the Settings button or the Show all people button to view all people.
Further Changes to the Schedule
Even after generating the schedule automatically, further manual changes to the schedule can be applied:
schedule elements can be moved, added or deleted
the whole schedule of one person can be removed or copied and pasted to another person
the whole schedule of one person can be cloned and pasted to other days.
Proceed to the page Manual Scheduling to learn more about manual changes to the schedule.
It is also possible to start the auto scheduling process on the already existing schedule:
if it is a draft schedule, it will be recalculated
if it is a production schedule, shifts in the past or already in progress will not be affected, but shifts in the future (not started yet) will be recalculated
all not pinned elements may be rescheduled (no matter if they were added manually or automatically).
It is not possible to start the auto scheduling process for the schedule that is in the past.
Saving a Schedule
The second step of the wizard also allows you to put the schedule in production. In order to do it, click the Put to Production button. If the schedule isn't saved yet, it will be first saved and then automatically put to production. Use the Put to Draft button to remove the schedule from production. More information about working with the production schedule can be found on the page Working With Production Schedules.
If the schedule is ready, click Save to save it. Alternatively, click Cancel to leave without saving changes.

A dialog window will indicate that there are unsaved changes. Click Save and leave to save changes before leaving the Scheduling page or Leave to abandon changes. Click Cancel to close the dialog window and continue working with the schedule.

Note that after clicking the Save button you will remain on the Edit Schedule screen. Use the navigation tree on the left to go back to the Scheduling Studio screen or other screens.
Resolving Conflicts
In most cases, conflicts between schedules will not occur. It is the role of phantom elements to prevent any potential conflicts. They don't allow you to schedule a new activity when a person already has an activity assigned in a production schedule.
However, in some edge cases, elements added to a new schedule (still a draft) may be in conflict with elements from the schedule that is already in production. The most probable scenarios when this situation can happen are:
two draft schedules were created in parallel, and then one of them was put in production,
two schedules, one draft and one in production, were edited in parallel, and conflicting changes were added, then a production schedule was saved first,
two schedules were created in an older version of WFM which was not able to detect conflicts, and then they are opened after an upgrade.
A warning will display when opening the draft schedule in such a case. This warning will list all production schedules with which the draft is in conflict.
.jpg?inst-v=46cf2c98-d76b-4021-8b71-698ba4d4a783)
To resolve these conflicts, click Proceed. As a result, all activities from the draft that is in conflict with the production schedule will be removed. Alternatively, when Cancel is clicked, the schedule creation will be abandoned.