
Auto Scheduling
Overview
A schedule can be created in two ways:
automatically, as described on this page
manually, by assigning schedule elements to people (based on the provided forecast or your judgment), as described on the Manual Scheduling page.
This page provides technical details on how to automatically create a schedule. The process of understanding the requirements and initial steps are described on the Adding a New Schedule page.
The auto scheduling feature allows an automatic assignment of schedule elements to people. Only people who have a Shift Template assigned will be involved in auto scheduling. People without the template assigned will be skipped. They can have elements assigned manually and this assignment will not be overwritten during the auto scheduling process.
All agents who belong to the teams that the current user has assigned in User Management → Can Review section are available.
The schedule is automatically created for the time range of the schedule. It means that all shifts that should start during this time range will be automatically scheduled.
Alternatively, a schedule can be created manually - more details can be found on the dedicated page: Manual Scheduling.
Limitations and Requirements
The auto scheduling feature has the following limitations:
the schedule date range should be a maximum of two weeks long
a maximum number of 100 people can be scheduled.
If any of these preconditions are not met, the Auto Schedule button won't be active.
The auto scheduling feature has the following requirements:
for the schedule including two or more queues of the Voice type, a forecast is necessary. If the schedule contains only one Voice queue or queues of the other types (Chat, Email), a forecast is not needed.
Schedule Elements
The elements represent work, other activities or non-working times, for example: lunch, break, training, meeting or sick. Each element has a default length assigned (for example: Voice - 2 hours, Lunch - 30 minutes etc.).
Hover the mouse cursor over elements to see their default duration.

Each schedule element has the following parameters assigned: default length, type, and if paid or unpaid. Length can be easily modified, whereas type and if paid/unpaid are fixed values.
Elements can be one of the following types:
productive – time spent working (for example, being available for incoming calls), only the Voice, Chat and Email elements have this type assigned
non-productive – all other work-related activities, when a person is not performing their primary task (for example, is not available for incoming calls due to a meeting, training or break)
Additionally, the Lunch element is marked as an unpaid activity (as many employers do not count lunch as work time), all other elements are paid. This information is used for shift length calculation.
The table below contains information about all available schedule elements:
Name | Description | Default length | Type | Paid? | Pinnable?* |
|---|---|---|---|---|---|
Voice | Basic work element representing time spent answering calls (channel type: voice). | 2 hours | Productive | Yes | No |
Chat | Basic work element representing time spent answering chats (channel type: chat). | 2 hours | Productive | Yes | No |
Basic work element representing time spent answering emails (channel type: email). | 2 hours | Productive | Yes | No | |
Lunch | Unpaid lunch break. | 30 minutes | Non-Productive | No | No |
Break | Any work break which is paid. | 15 minutes | Non-Productive | Yes | No |
Vacation | An element representing paid time off requested by a person. | 24 hours | Non-Productive | Yes | Pinned by default |
Sick | An element representing a day off due to illness. | 24 hours | Non-Productive | Yes | Pinned by default |
Training | Time spent on training. | 1 hour | Non-Productive | Yes | Yes |
Meeting | Time spent in a meeting. | 1 hour | Non-Productive | Yes | Yes |
One on One | Time spent in an individual meeting with a supervisor/leader. | 30 minutes | Non-Productive | Yes | Yes |
Holiday | An element representing all non-working days, like public/national holidays, Christmas etc. (not a user's paid time off). | 24 hours | Non-Productive | Yes | Pinned by default |
*Read more about the pinning functionality in the Pinning and Unpinning Elements section.
Note that by default the Vacation element is set to one day:
|
Initial Tasks
Before starting the auto scheduling process, it is recommended that you consider the following:
Assign the Sick, Meeting, Vacation, Holiday, Training, One on One elements to people manually. Pin the elements where it is needed to ensure that they won't be moved during auto-scheduling.
Do not create more than one schedule for the same date range. If it is necessary to change the schedule, it is recommended that you correct the existing one (even in production) rather than create another draft schedule for the same (or overlapping) date range. This will help to avoid conflicts.
An additional extra day that is automatically added at the end of the schedule should be used only to display the night shift that ends on this day. Do not add any shifts on that day manually.
If a forecast is required (there are two or more queues of the Voice type), ensure that it also covers the one additional day for overflowing shifts. For example, if the schedule covers the date range from 1.04 to 10.04, the forecast should cover the range from 1.04 to 11.04.
Pinning and Unpinning Elements
To ensure that the Training, Meeting or One on One elements that were manually added to the schedule will not be moved or overwritten by the auto scheduling process, pin them to the schedule.
To pin the element(s):
Optionally: select the element (if only one element needs to be pinned).
Right click with the mouse on the person's name. A tooltip will display.
Expand Pin Activities.
Click Pin Selected Activity.
Alternatively, click Pin all Activities (Given Day) to pin all schedule elements during the current day, or click Pin all Activities (Whole Schedule) to pin all schedule elements during the whole schedule range.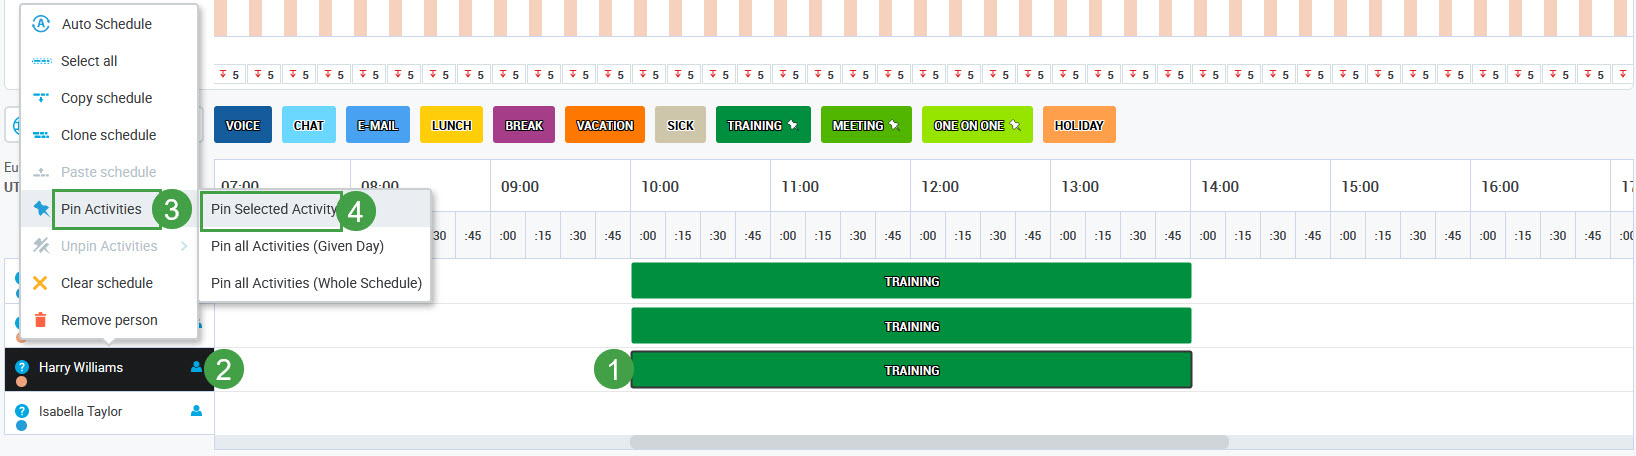
Any element that is already pinned is marked with the Pin icon:

To unpin the element(s):
Optionally: select the element (if only one element needs to be unpinned).
Right click with the mouse on the person's name. A tooltip will display.
Expand Unpin Activities.
Click the option you want to use: Unpin selected activity, Unpin all Activities (Given Day) or Unpin all Activities (Whole Schedule).
To pin the elements for all people assigned to the schedule:
Optionally: select the element(s) (if the particular element(s) needs to be pinned).
Click the Settings button on the left side of the table. A tooltip will display.
Expand Pin Activities.
Click the option you want to use: Pin selected activities, Pin all Activities (Given Day) to pin all schedule elements during the current day, or click Pin all Activities (Whole Schedule) to pin all schedule elements during the whole schedule range.

To unpin the elements for all people assigned to the schedule:
Optionally: select the element (if the particular element(s) needs to be unpinned).
Click the Settings button on the left side of the table. A tooltip will display.
Expand Unpin Activities.
Click the option you want to use: Unpin selected activity, Unpin all Activities (Given Day) or Unpin all Activities (Whole Schedule).
If the Training, Meeting or One on One elements are added to a schedule but are not pinned, the auto scheduling process may move them to another time within the same shift (to a time that is considered optimized by the process), but it won't delete them.
There is no need to pin the Vacation, Holiday and Sick elements. They will not be moved or overwritten by the auto scheduling process anyway.
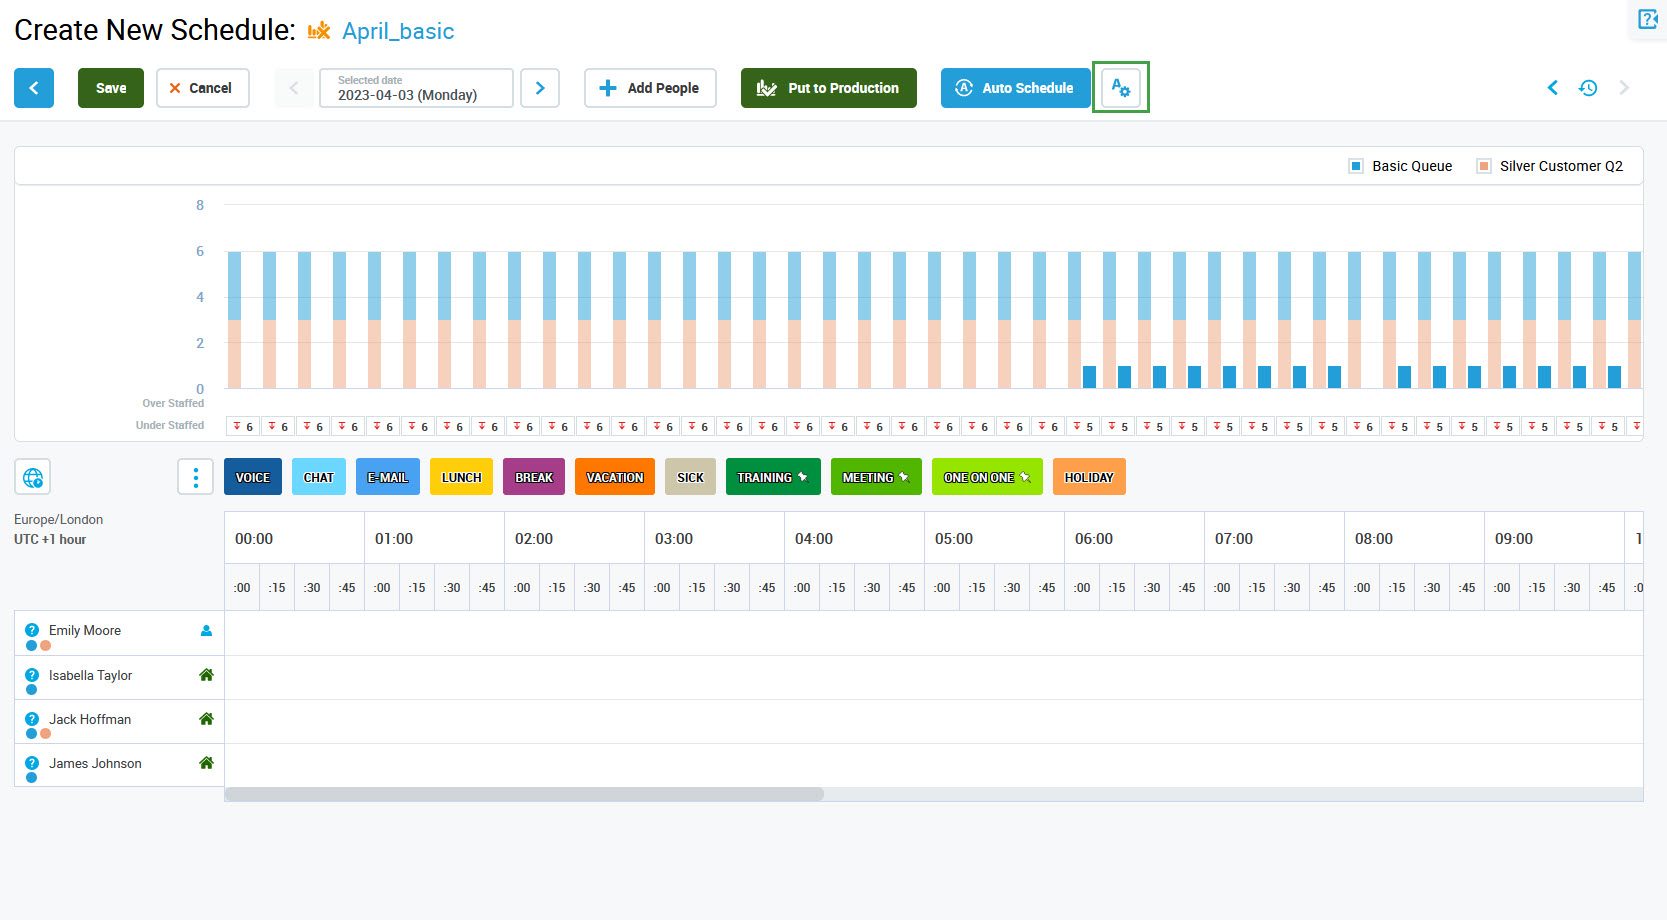
Configuring Settings
Click the Schedule Configuration button to adjust the schedule settings.
The Schedule Configuration pane will display. The default settings are illustrated in the image below.
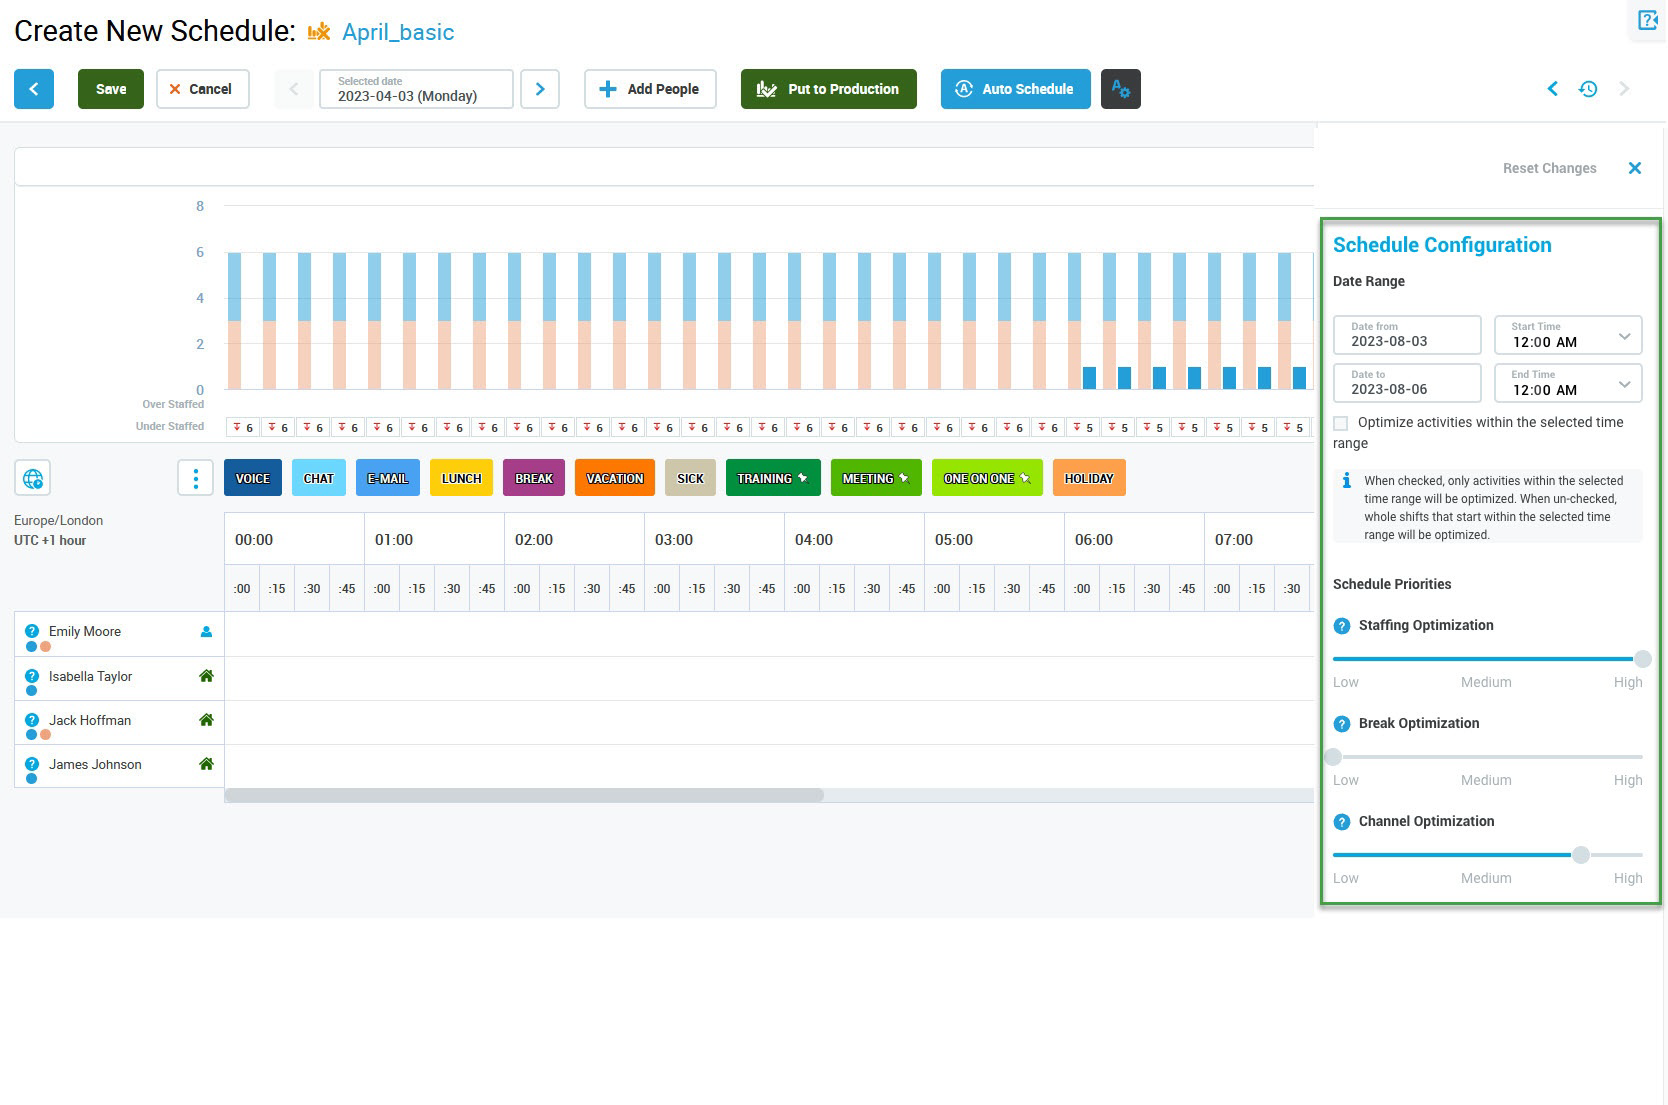
If needed, use the sliding bars to adjust the settings:
Staffing Optimization – set how much weight should be given to staffing prioritization (when set to 'High', the schedule will cover staffing requirements as much as possible)
Break Optimization – set how much weight should be given to the equal distribution of breaks across schedules
Channel Optimization – set how much weight should be given to the equal distribution of channel assignment across schedules
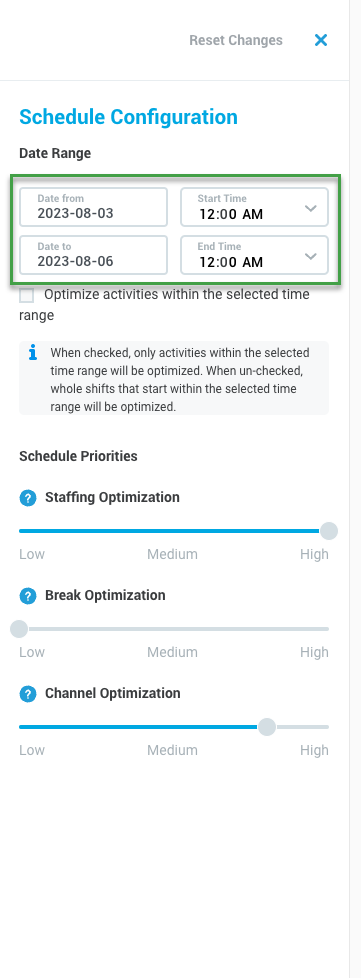
Note that the adjustment can be applied to the whole schedule range (the default setting) or it can be applied to the selected date range only. It is not possible to select a date from the past.
Optimize activities within the selected time range - if the default production forecast is active, this box can be checked or unchecked. If unchecked, whole shifts starting in the selected range will be optimized (regenerated). If the box is checked, only scheduled activities that fall within the selected range will be optimized.
If the Intraday forecast is enabled, the box is checked by default and cannot be unchecked. Then, only the scheduled activities that fall within the selected range will always be optimized (regenerated).
The configured settings will be applied during the next run of the auto scheduling process, no matter how it will be triggered: for the whole schedule or for an individual person only. The settings will be reset to default each time the schedule is closed.
If there is a need to remove the adjustments, click Reset Changes. To close the pane, click the Close button.
Auto Scheduling For All People
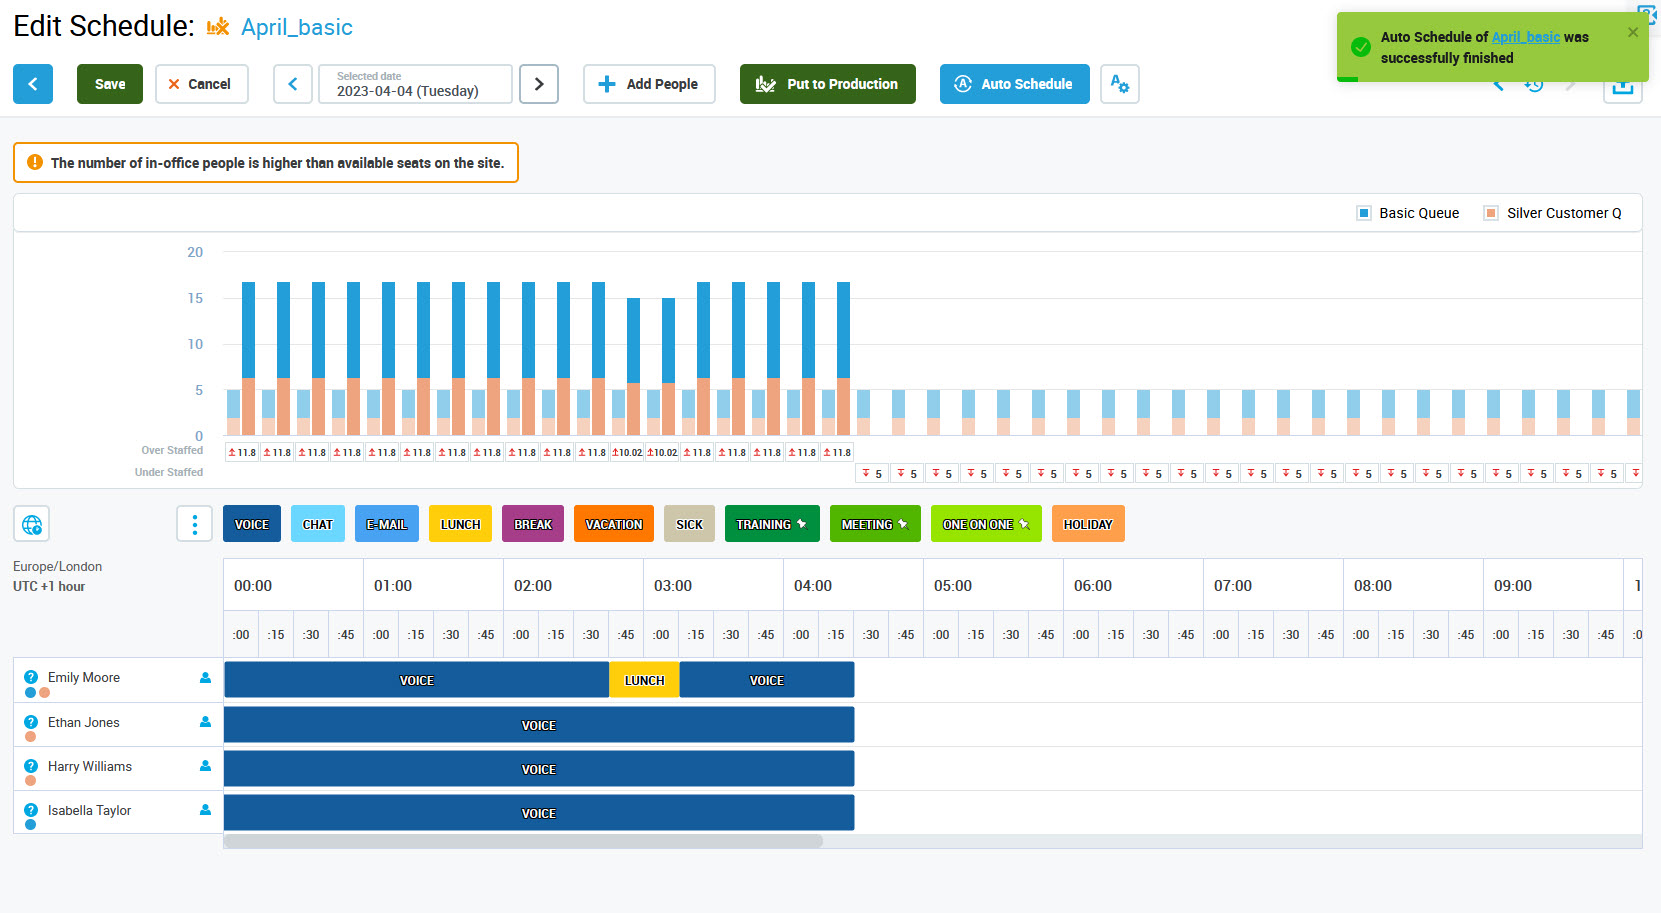
Click the Auto Schedule button to start the auto-scheduling process.

This process can take some time to complete. When ready, schedule elements are automatically added to people.
Auto Scheduling For a Person
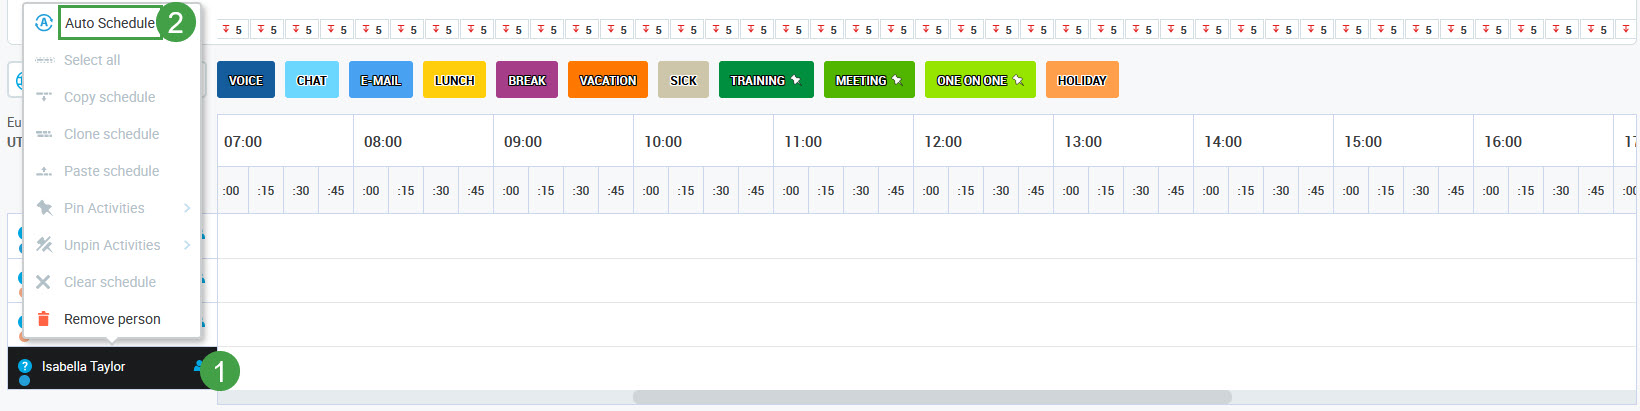
Alternatively, it is possible to generate a schedule for one person only:
Right click with the mouse on the person's name. A tooltip will display.
Click Auto Schedule.
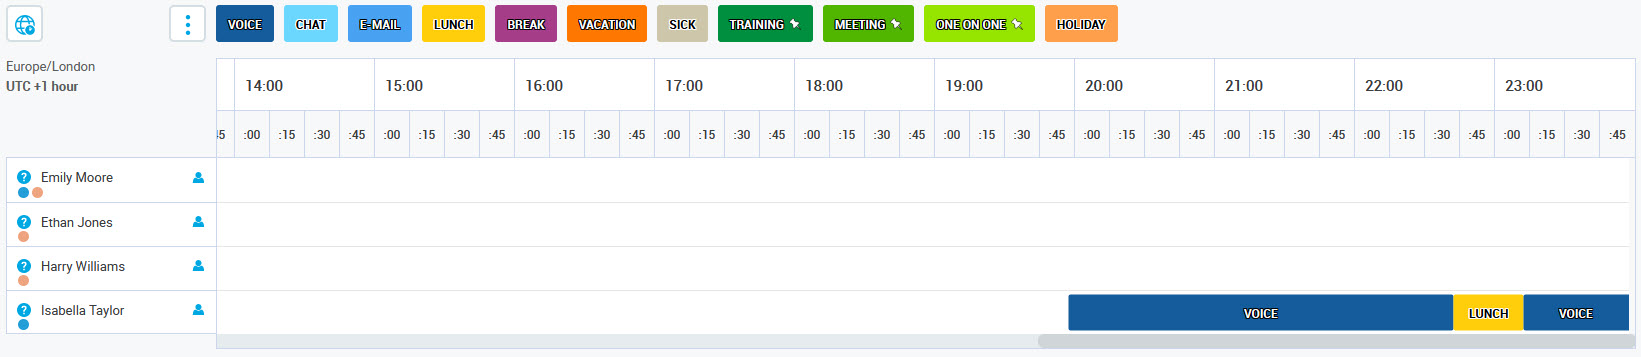
The auto scheduling process is running. This process can take some time to complete.
The schedule for the person will be added:
Auto Schedule process
Note that after clicking the Auto Schedule button, for all users or for one user, the schedule is automatically saved before starting the auto schedule process. The name of the screen (Create New Schedule) changes to Edit Schedule, and also from this moment, it is not possible to change the basic schedule settings (selected queues, schedule range) on the previous screen. While the auto schedule process is running, the user is in the 'view mode' - it is possible to view the schedule, but not apply any changes to it.
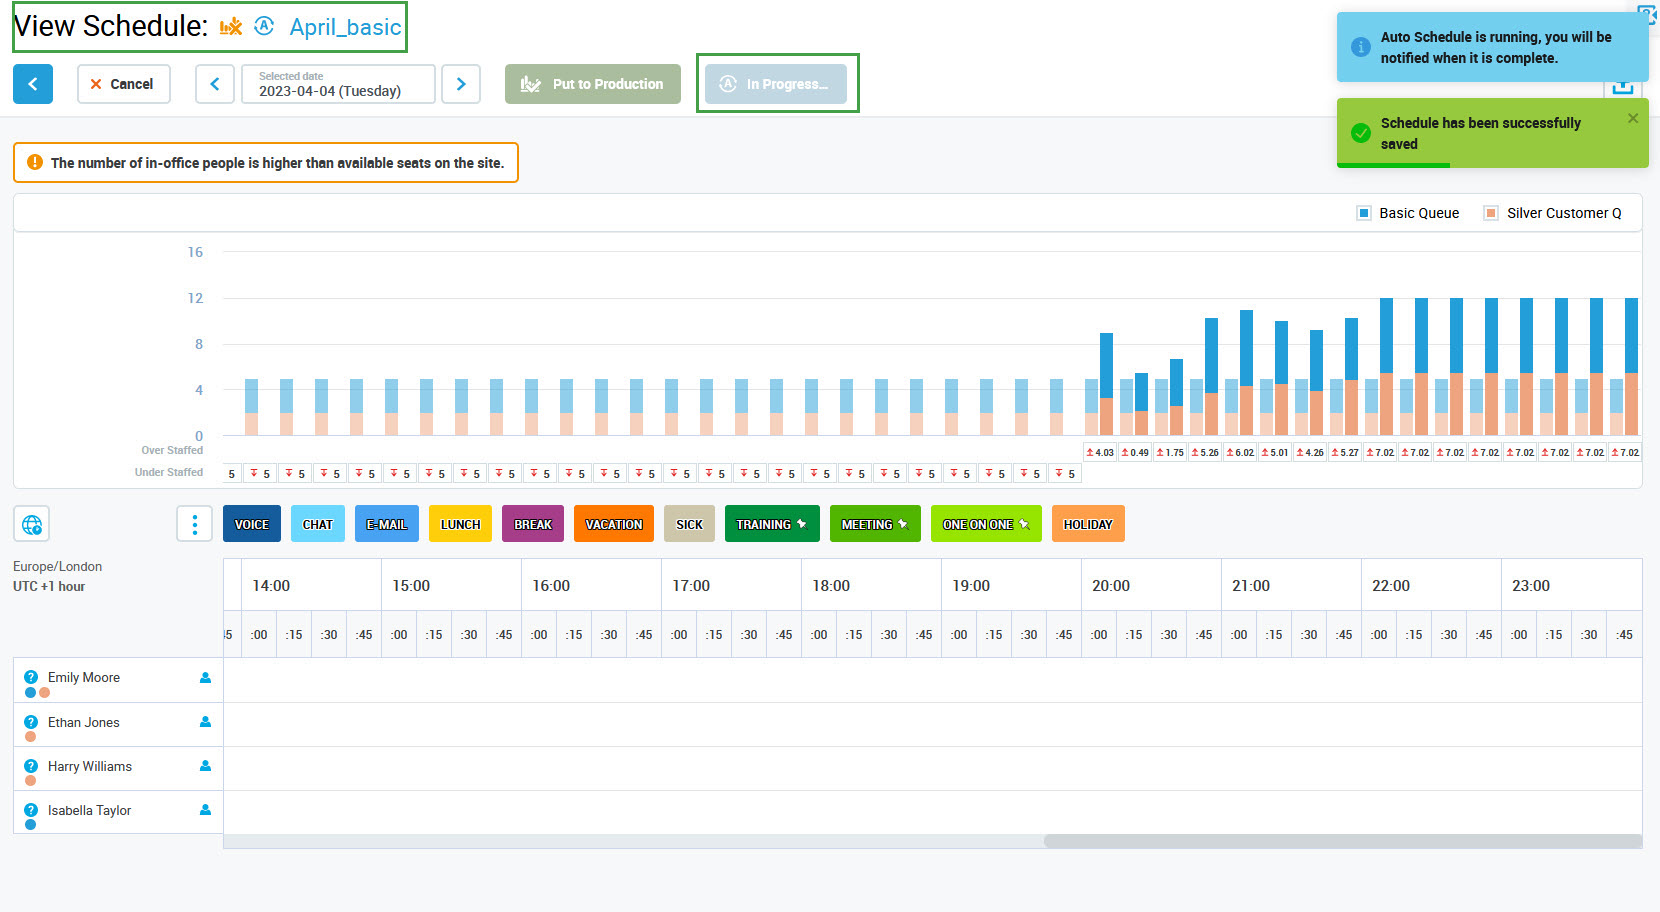
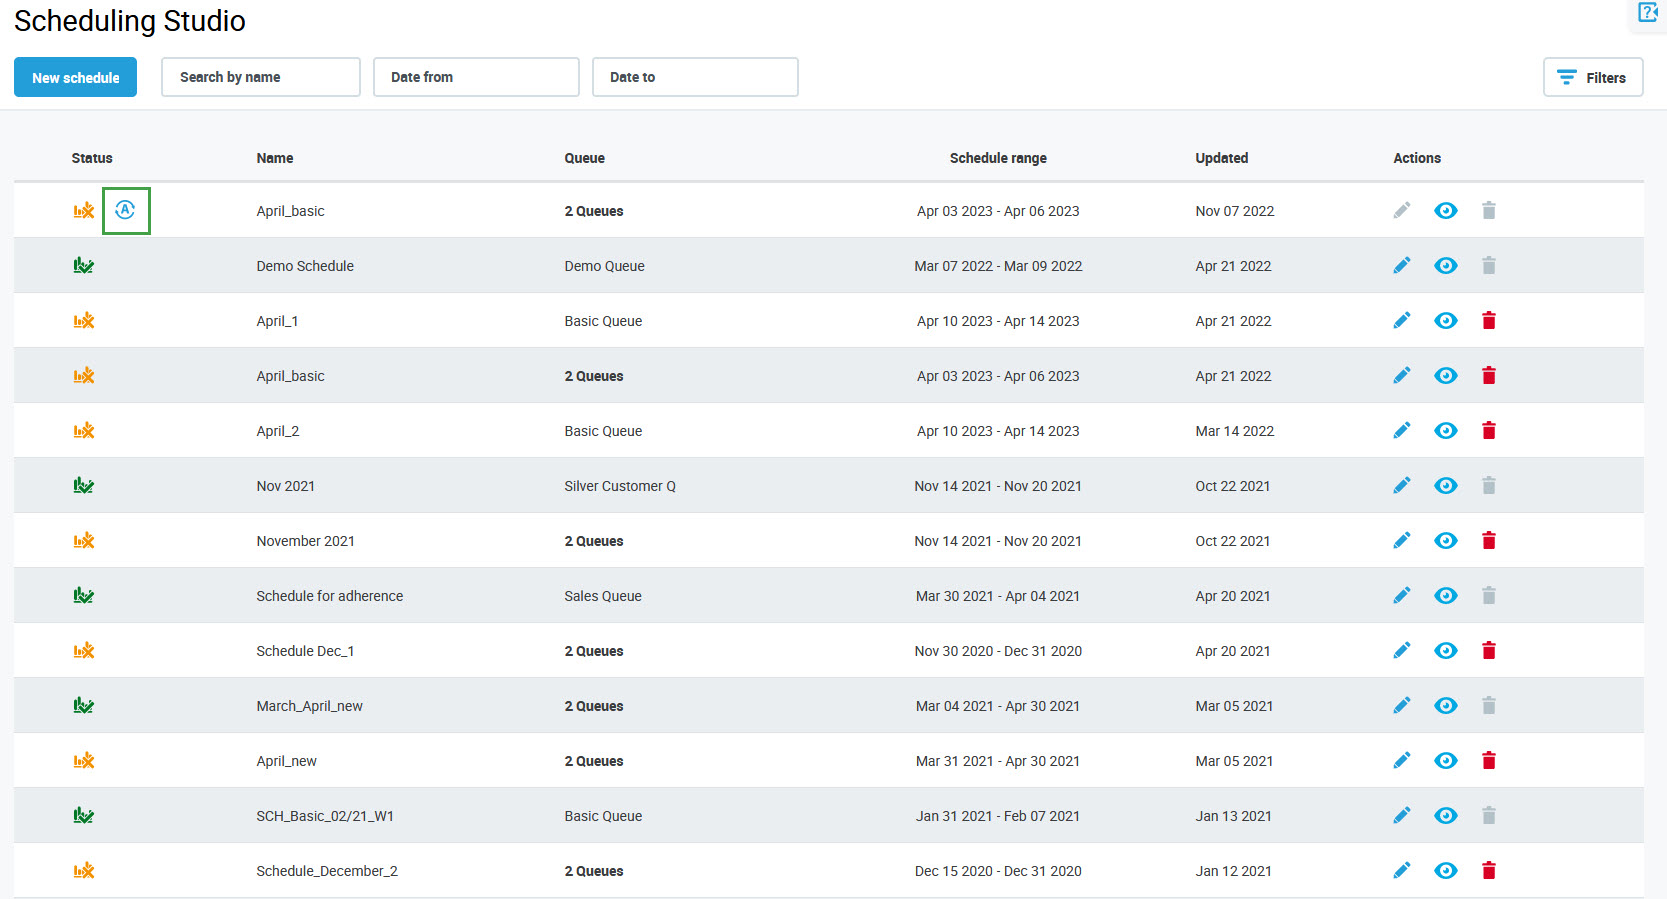
Additionally, while the Auto Schedule process is running, it is indicated by the Auto Scheduling in progress icon on the Scheduling Studio screen. The icon disappears when the process is finished.
Next Steps
After creating the schedule, proceed to evaluate the results as described on the Adding a New Schedule page.