
Automated Rules
Automated Quality Management (AQM)
This feature requires a dedicated license file. Users must be granted the appropriate license–based effective role in order to access the functionality provided. Please review the instructions on Using Eleveo Specific Roles to ensure that the appropriate license–based roles are added to Eleveo-specific roles.
Users must have the following role assigned by an administrator: AUTOMATED_RULES_MANAGE
NOTE: The system is only evaluating conversations that are matched to agents. If no automated score is assigned to a conversation, it is possible that the conversation has not been correctly matched to a user (agent).
Automated Rules
Automated Quality Management(AQM) is able to automatically evaluate all call-based conversations available within the Quality Management application. The Automated Rule builder allows you to create rules that assess all conversations (or a subset of conversations) and assign a score to individual conversations. Multiple rules and their final score can be used to gain better insight into your contact center operations. Results are displayed directly within the Conversation Explorer, you may then search for Conversations based on their score. Automated Rules help to find underperforming agents, outstanding agent performance, questionable interactions, or unexpected issues that may otherwise go unnoticed in the contact center.
Use Automated Quality Management (AQM) to:
Find specific (problematic) conversations and better understand the needs of customers.
Focus on a lack of expertise in key areas within your contact center teams.
Provide feedback and guidance to agents.
Assess agent performance or adherence to specific requirements.
Information available is installation dependent
Some information used by Automated Quality Management is dependent on the specific installation, and integrations, connected to your Quality Management server. For example, each speech engine provides slightly different outputs, which impact the data available for Automated Quality Management.
Specifically, not all speech engines provide emotion and acoustic parameters. If your installation does not display emotion information this is most likely the reason why.
How do Automated Rules work?
The Eleveo server evaluates conversations based on the Automated Rules configured by the user. Conversations are assessed on a regular basis, with the evaluation results displayed in the Conversation Explorer. Users can search for conversations based on the score assigned by the Automated Rules or by the rule name itself.

Example Automated Rule
What conversations are evaluated? How often are they evaluated?
By default, the backend service will evaluate new (and recent) conversations on an hourly basis. Any conversation from within the past 3 days (by default) will be assessed.
Specifically, any conversation will be evaluated if it meets the following conditions:
Occurred within the last 3 days (the default setting may be modified by your administrator)
Occurred at least one hour ago (this is configurable as a 'delay period')
Matches the conditions set by the user when creating an automated rule (metadata, voice, etc.)
Has not yet been evaluated by this specific automated rule
What attributes can be used when creating Automated Rules?
The system calculates an Automated Score based on standard metadata associated with a conversation. Supported metrics for the calculation include(installation dependent):
Standard metadata – Available options may vary based on the data available within your specific installation.
Agent-related attributes (impact specific agents score only)
Average talk speed
Agent crosstalk duration
Agent crosstalk ratio
Agent emotion
Agent number of interruptions
Agent talking duration
Agent talking ratio
Customer (impacts the score of each agent within the conversation)
Customer Emotion
Conversation level attributes (impacts the score of each agent within the conversation)
Duration – time (number)
Number of segments
Number of agents
Tags – predefined list of tags (dropdown)
Speech Tags
Where are the scores displayed?
The score is displayed in a dedicated column on the Conversation Explorer screen. Additional details are visible within the Details pane. 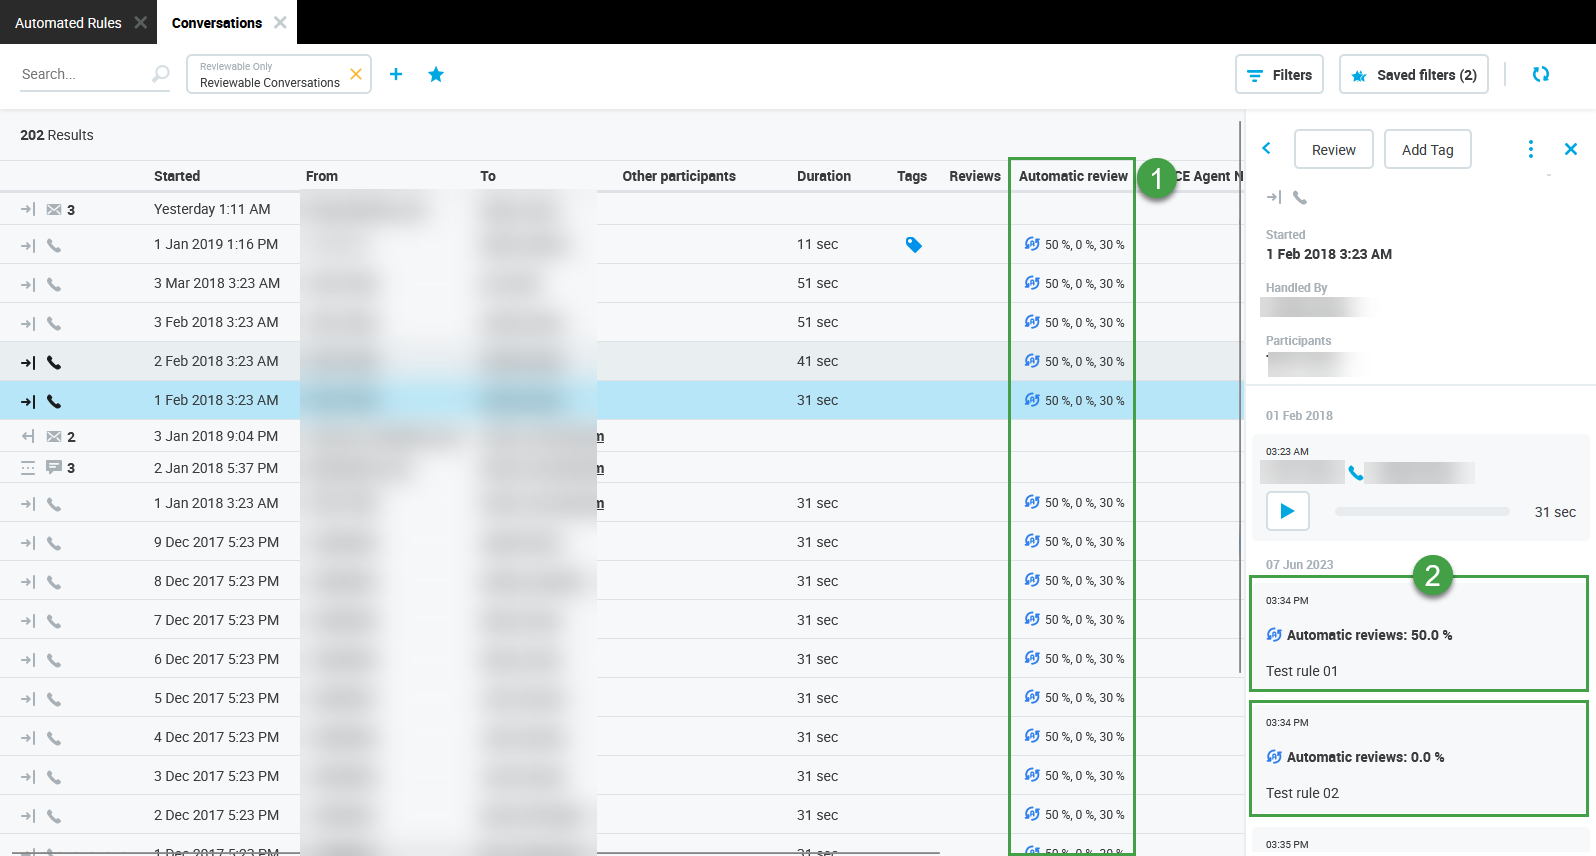
Can Automated Rules be shared between managers?
Any user who has the role AUTOMATED_RULES_MANAGE can view and modify rules. The score is visible to all users.
Can a conversation be evaluated multiple times?
Yes. The Automated Rules are applied to a conversation only once for EACH specific rule. But each conversation can be scored by multiple rules based on the use of saved filters, and individual agents will be evaluated separately. Results are displayed within the details pane.
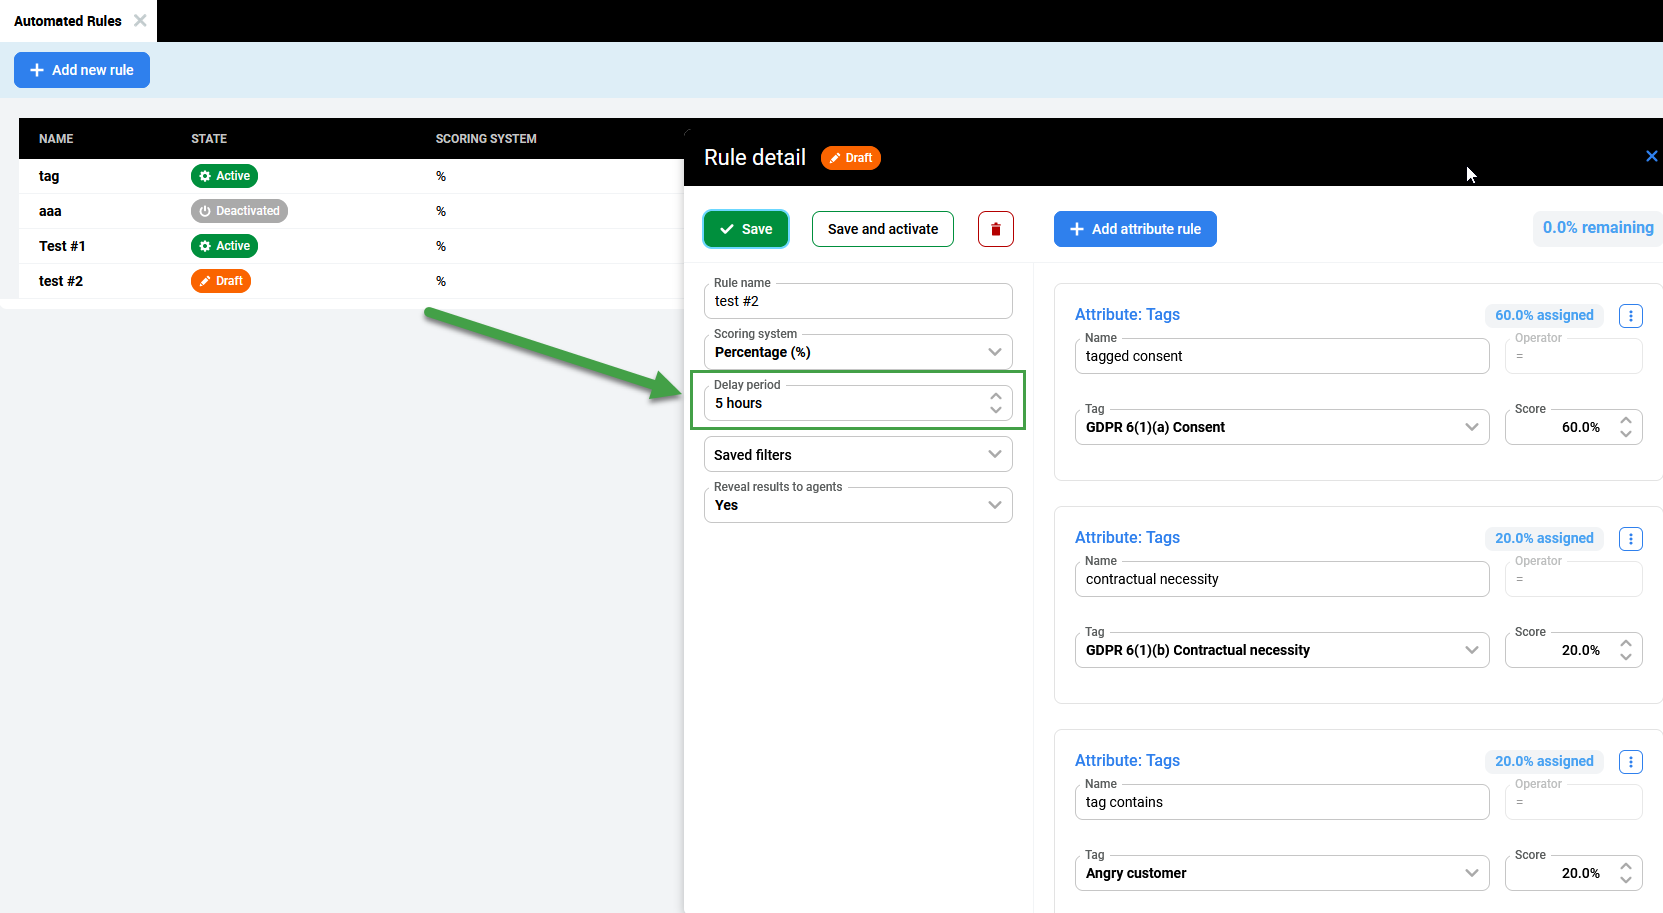
Delay period
When creating an Automated Rule the delay period is set and specifies the minimum time period that the system will wait before scanning a conversation and assigning it a score. This delay is necessary to ensure that all relevant data has time to be processed after being imported into the system.
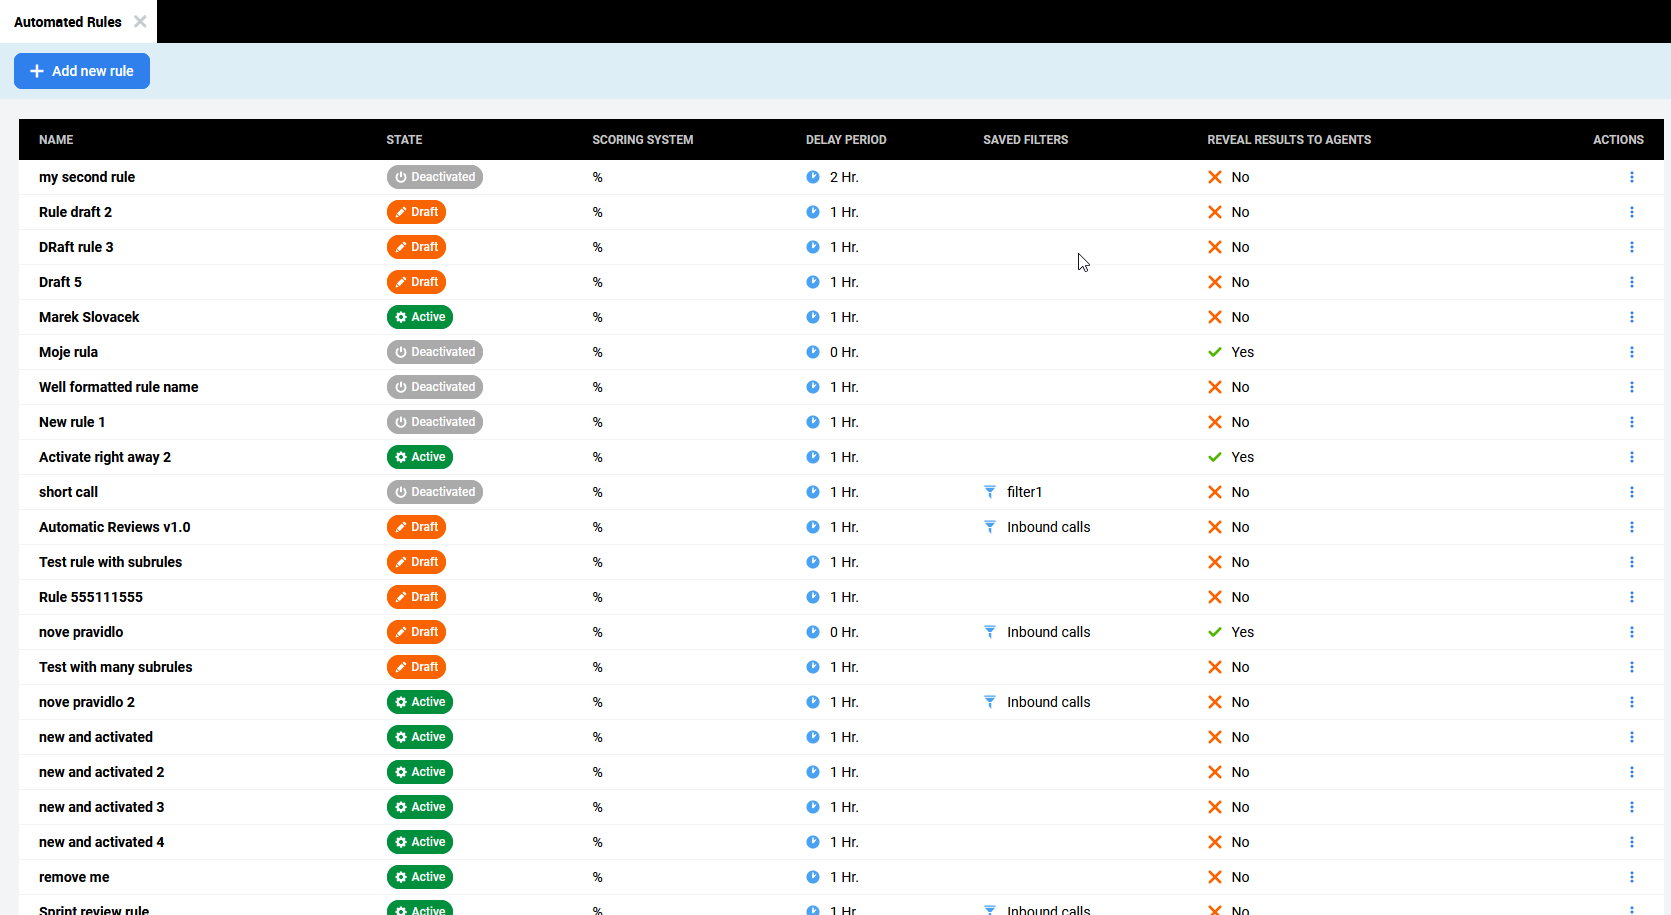
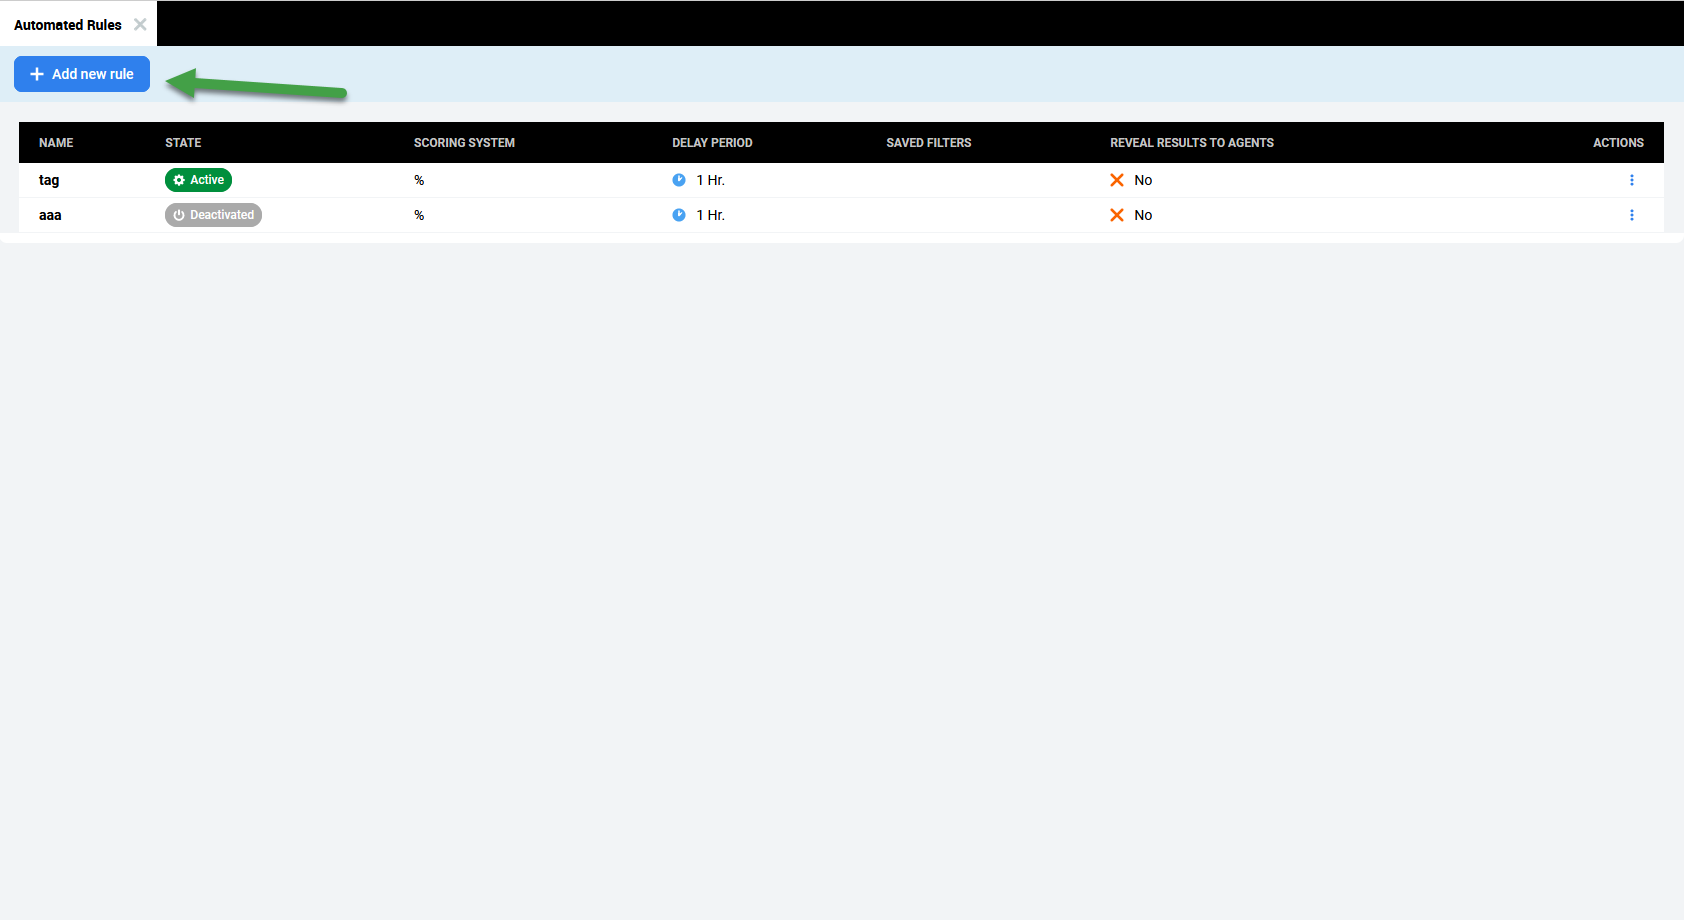
View Automated Rules
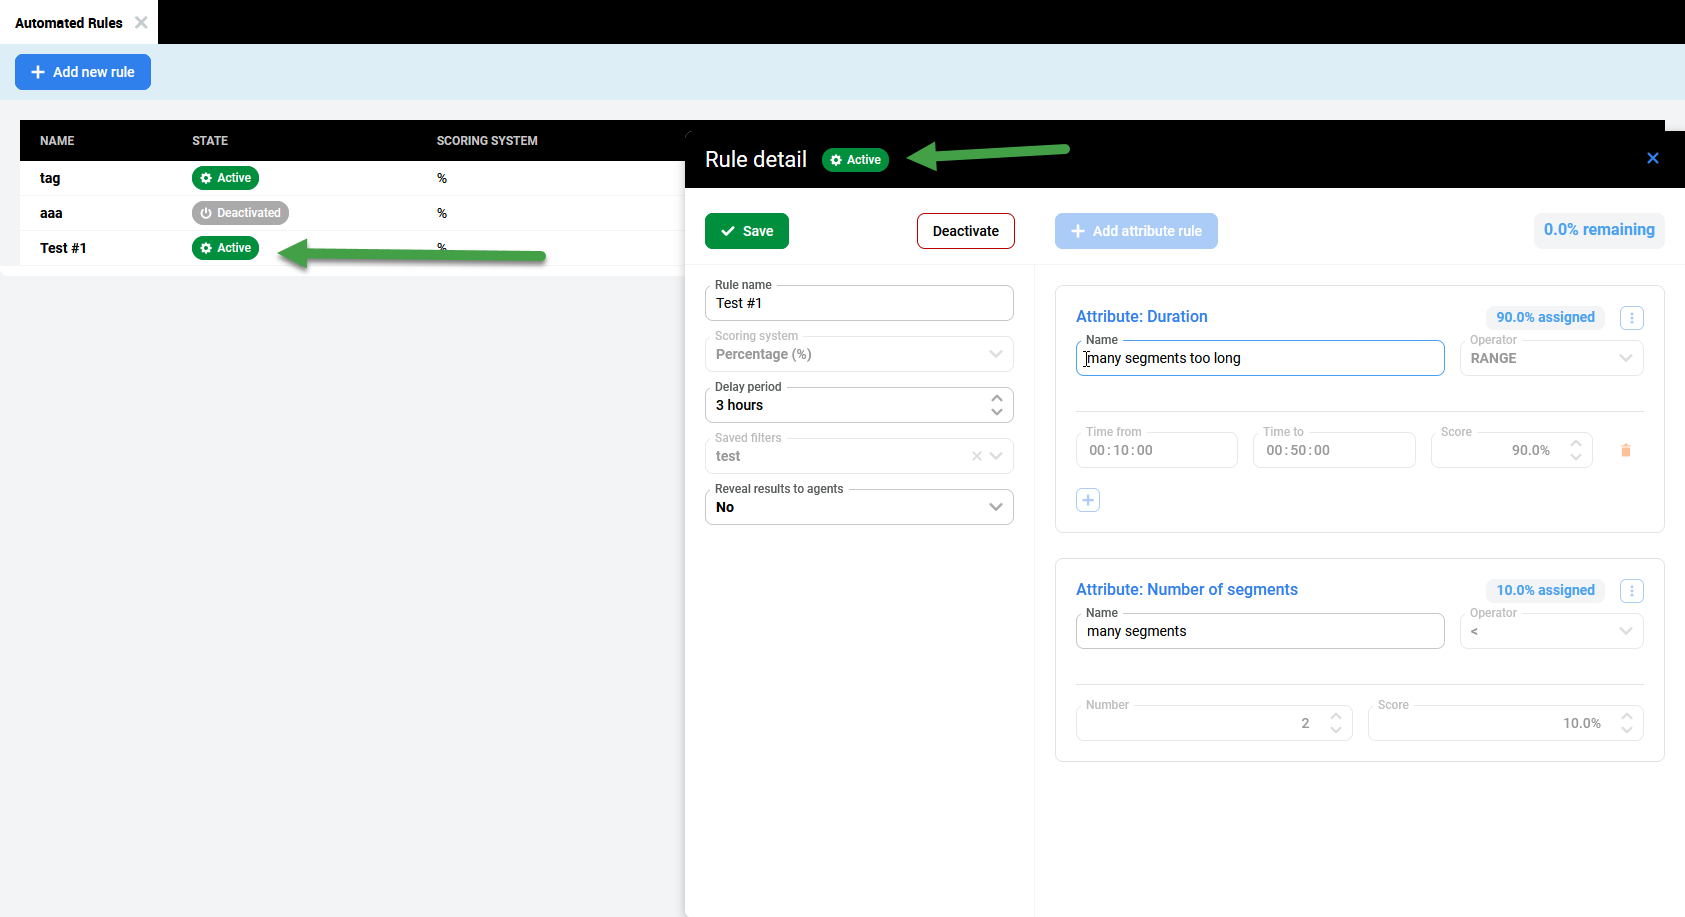
The Automated Rules tab displays a list of all Automated Rules. The following information is displayed by default.
Name – User-defined name of the rule
State – The current state of the rule. Rules can be in one of the following states: Active, Draft, or Deactivated.
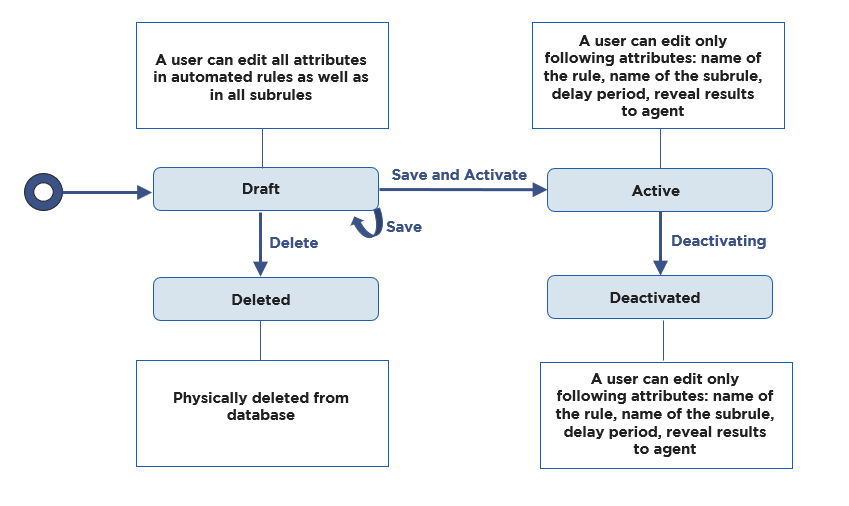
The following image depicts the possible options available based on the status of an Automated Rule.
In each state different options are available.
Draft (fully editable),
Active (semi-editable, attributes of the rule cannot be modified but other values can be changed- name, delay period, visible to agent)
Deactivated(cannot be activated again,- name, delay period, visible to agent are editable)
NOTE: The arrows depict the action that is possible. Some actions are irreversible.
Scoring system – User-defined scoring system used when calculating the results (only % is available in this version)
Delay Period – User-defined delay. This affects how often the system scans and calculates results. Note that creating many filters to run every hour may impact performance.
Saved Filters – User-defined filters that define which conversations are included when calculating results.
Use filters to focus the rule on a specific subset of conversations. Failure to use a filter will lead to all conversations being evaluated! This may clutter the details pane.
Reveal Results to Agents – Indicates if the result will be visible to agents
All results are displayed to all users in this version. We are actively working to enable this feature.
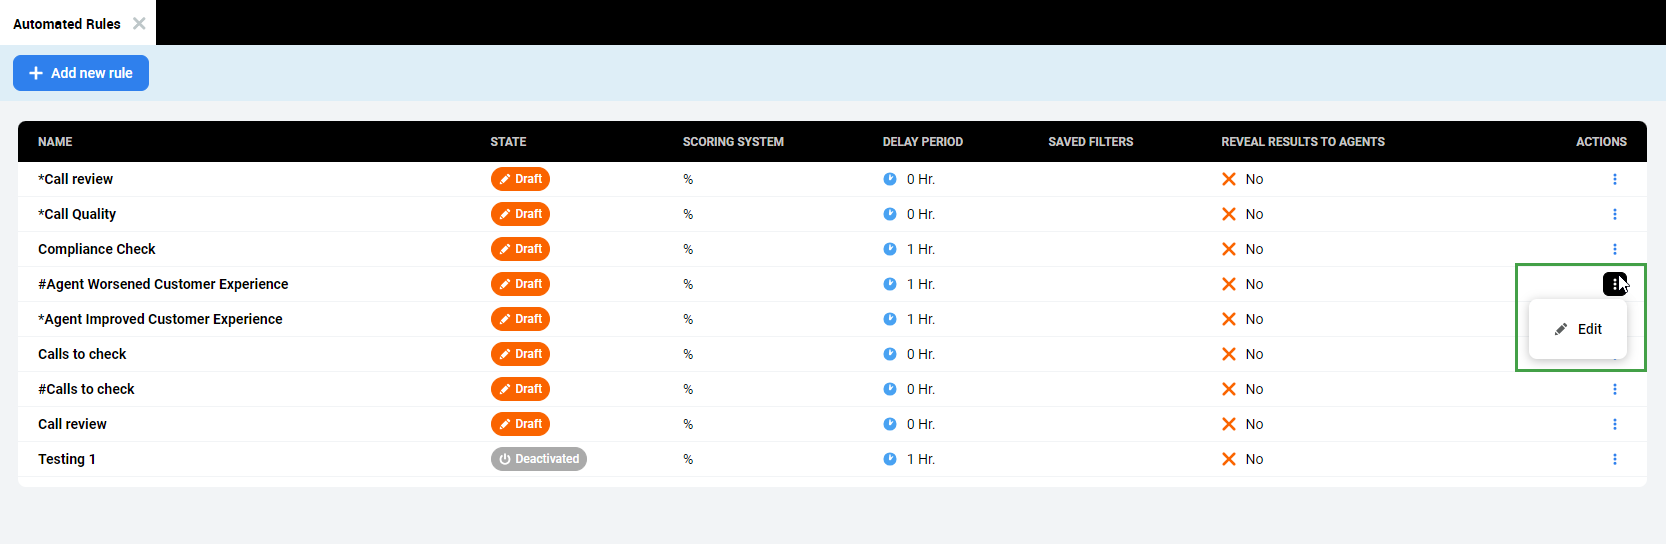
Actions – Click to view more options.
Create an Automated Rule
Users who have been assigned the permission AUTOMATED_RULES_MANAGE are able to add new rules from within the Automated Rules tab in Quality Management.
Rules are created using a combination of filters, attributes, and tags. Not all options can be combined when creating a rule, and not all options are mandatory.
To add/create a new Rule:
Click the Add new rule button
A menu will open on the right–hand side.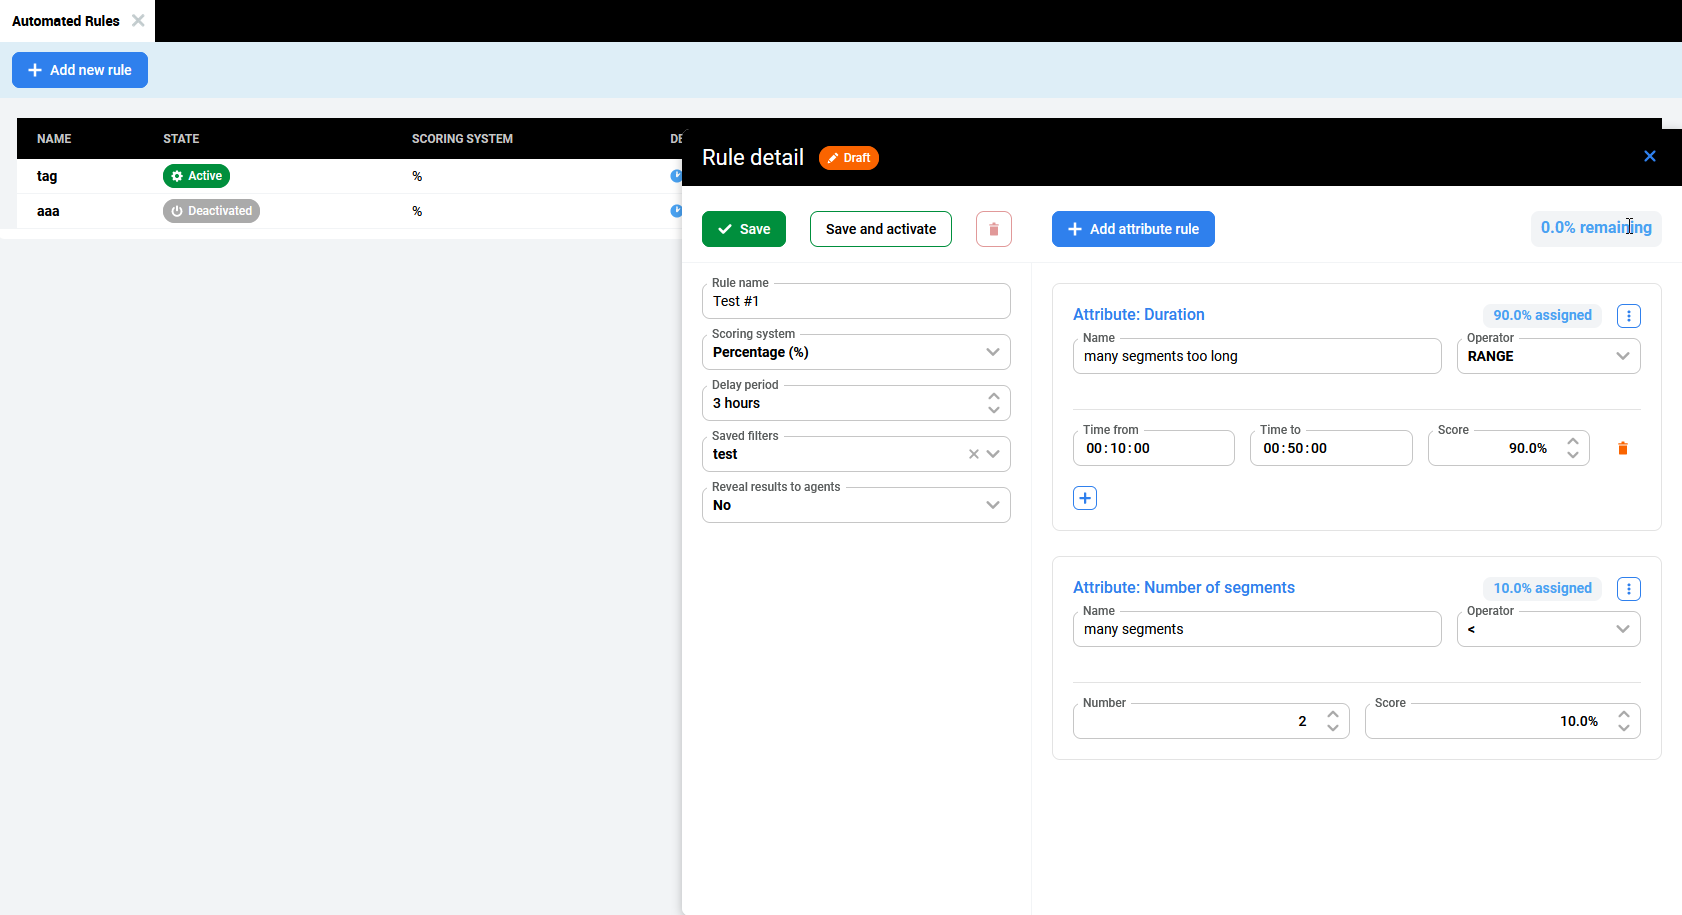
The Rule detail pane will display.
Fill in or Select the relevant fields:Rule name – Name the new rule (mandatory field)
Scoring system – Percentage (%)
Delay period – Defines how long the system waits before assigning a score to a conversation after it is imported (1 hour by default).
Saved filter(s) – Use a filter to limit the conversations to be assessed by the Automated Rule. Select one of the available options. Options vary based on your existing set of filters. If no filter is selected, this rule will assess all conversations. (Hint- Create a filter in the Conversation Explorer before creating an Advanced Rule)
Reveal results to agents – Select one of the options.
No (default)
Yes - Agents will see the result in the Conversation Explorer.
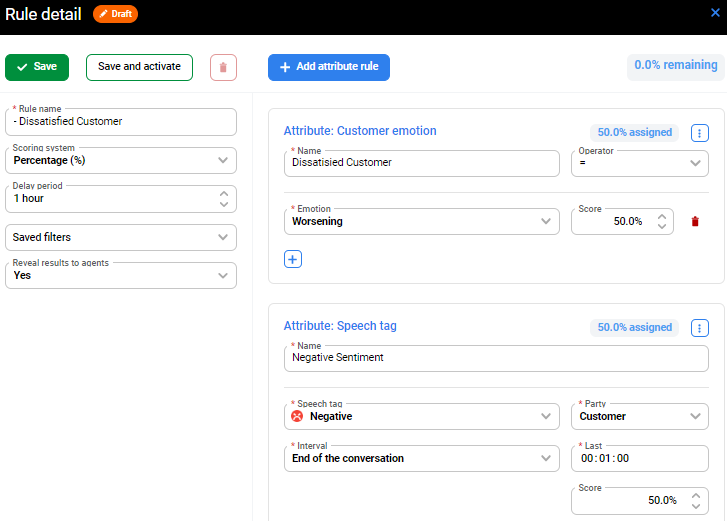
Add attribute rule(s):
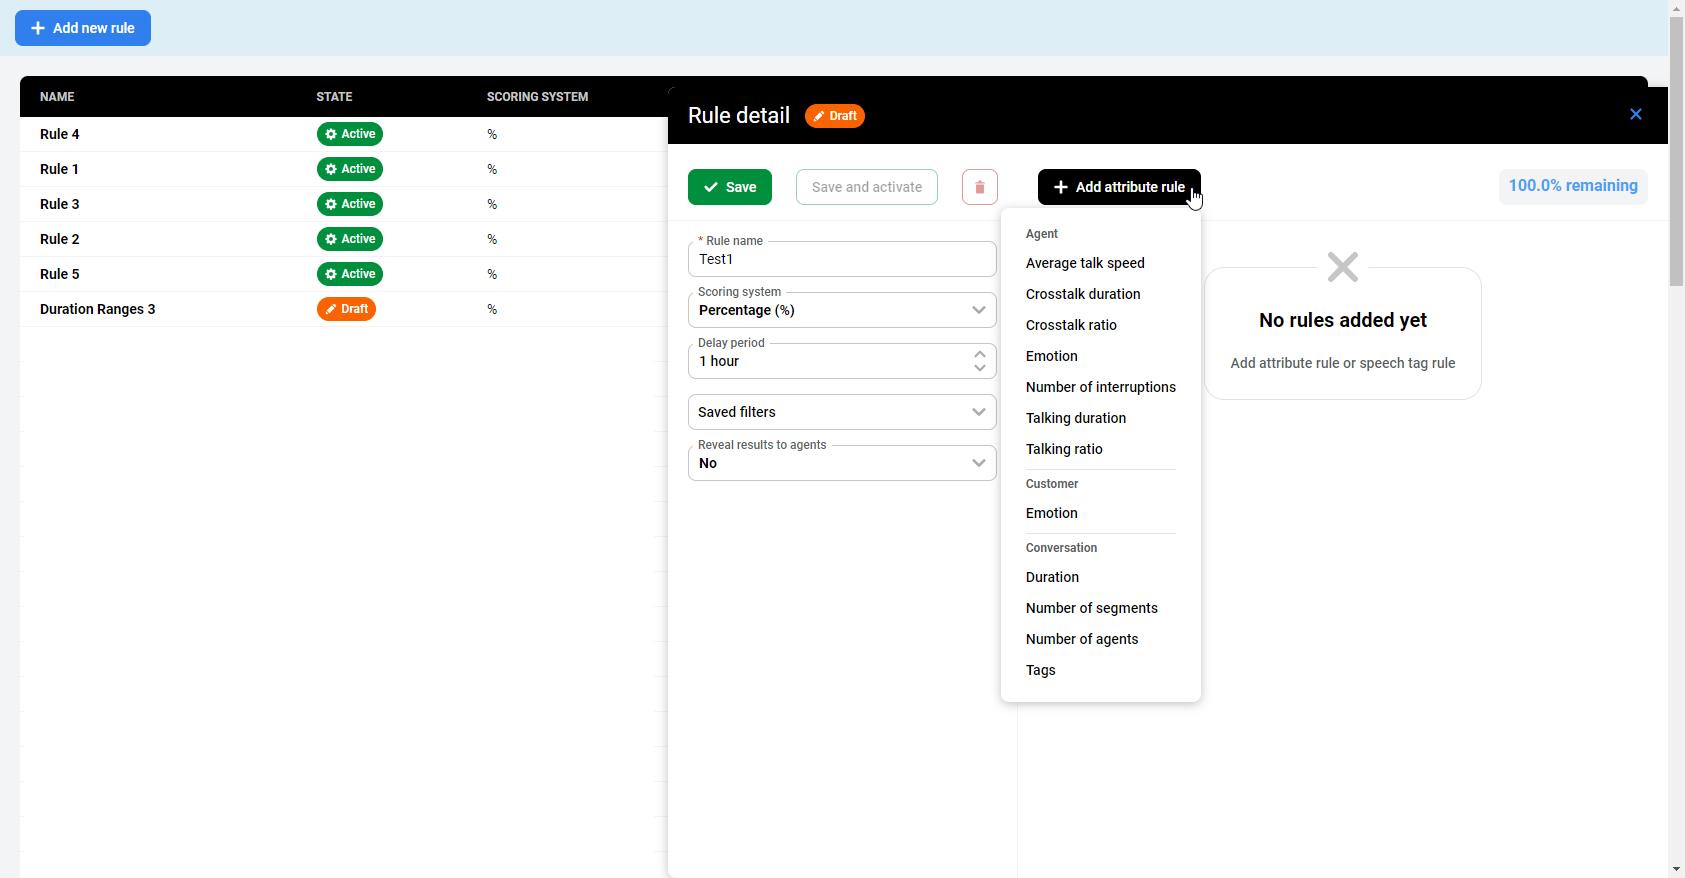
Select one of the available attribute types and fill in the available options. The Total Remaining Value (in the top right corner) indicates the total score that the rule will assign, based on your preferences. Add attribute rules until you have 100% assigned for each attribute.Agent average talk speed
Agent crosstalk duration
Agent crosstalk ratio
Agent emotion
Agent number of interruptions
Agent talking duration
Agent talking ratio
Customer emotion
Duration
Number of segments
Number of agents
Tags
Speech tag
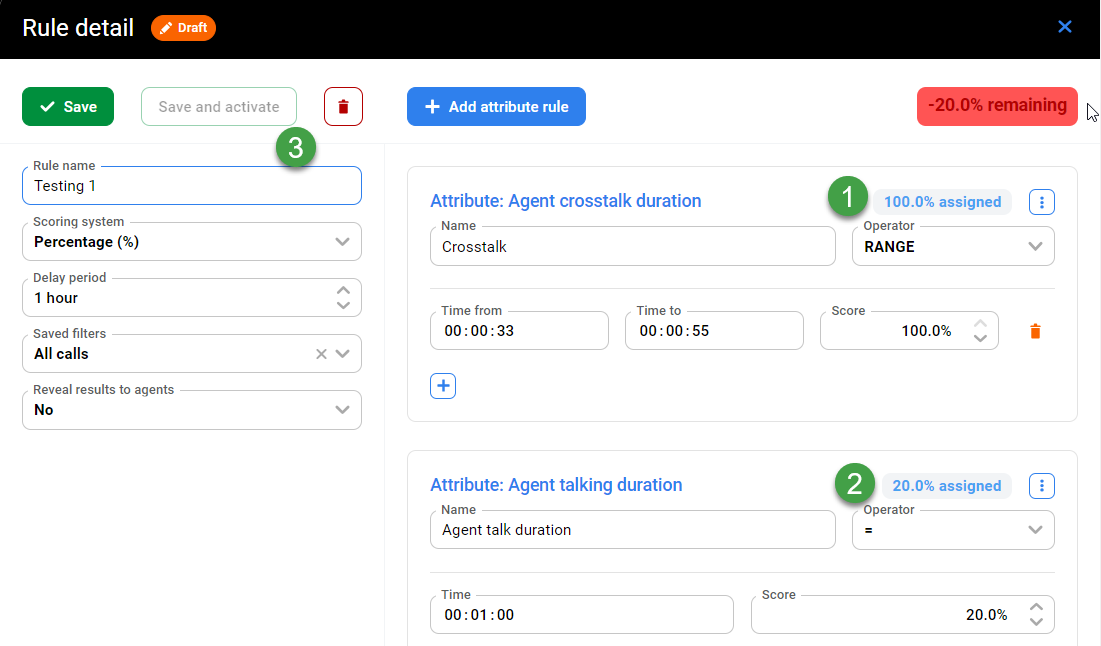
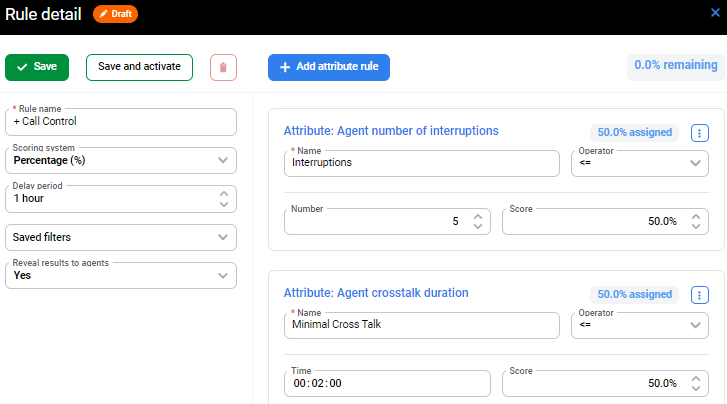
Add rules until the Percentage assigned equals 0%, and the Save and activate button is active.

If the total value of all attribute rules exceeds 100% the system will indicate that you have assigned more than 100% in total and prevent you from activating the rule. It is possible to save the rule as a draft, however, you will not be able to click on the Save and activate button until the error has been corrected.
Check the values assigned to each attribute rule (#1 and #2 in the image) and modify them until the value (%) remaining equals 0.0% and the Save and activate button is enabled (#3).
Click Save to save the rule as a Draft.
Click Save and activate to activate the rule.The new rule will be displayed in the list of all rules and is displayed as Active or Draft.
Rules in the state Draft are not active and can be edited before being activated. Refer to the graphical representation of the Automated Rule workflow in the section View Automated Rules for detailed information about editing rules at based on their 'state'.
NOTE:
When setting time parameters for
delayandperiod. Saved filters are defined based on UTC time, and are not shifted to the user timezone. Please take this into account when configuring the filters.Saved filters are not mandatory in the definition of the Automated Rule – If a Saved Filter is not specified in the Automated Rule, then all reviewable conversations with
type=callwill be evaluated.
To remove an attribute, select the three dots and click Remove attribute.
Modify Automated Rules
You may change any attribute/setting for those rules marked as Drafts. Rules with the status of Draft can also be deleted. Existing rules (marked as active) can only be Deactivated.
Editing existing rules is possible. You may rename an existing rule, rename a subrule, change the delay period, and reveal results to agents if the rule status is (Active, Disabled) but NOT modify the attribute rule(s).
Deleting a Rule
Discard changes to an unsaved rule
When Editing a rule, you can discard your changes (by clicking on the x in the corner of the screen) A pop-up dialogue will ask you to confirm that you want to proceed. You can Cancel, Save Changes, and Return to editing, or Discard changes.
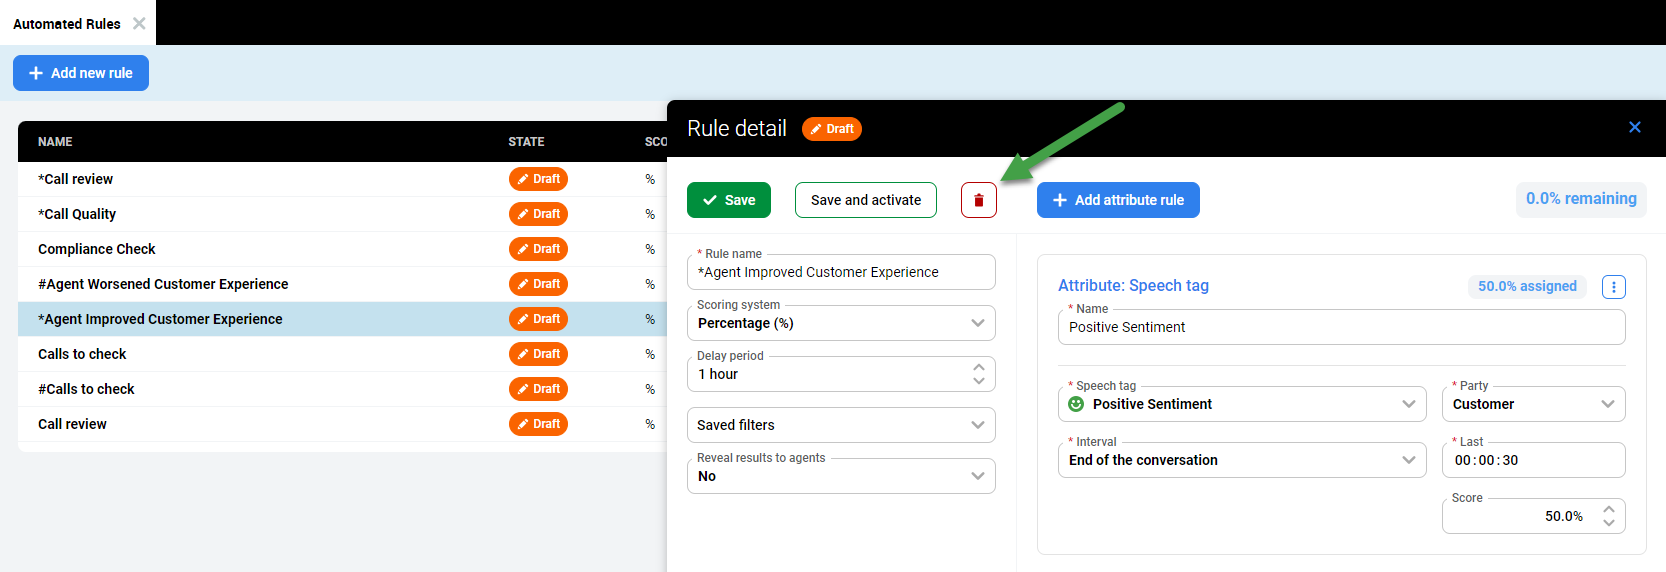
Delete a rule
To delete a draft, open the rule in edit mode.
Deletion of Active or Deactived rules is not supported. It is only possible to delete rules in the Draft state.
Click on the Red trash can symbol.
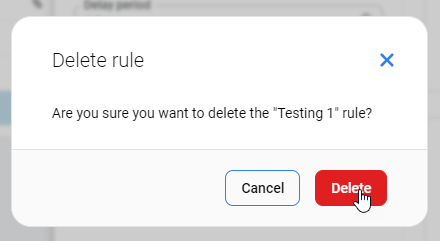
A pop-up dialogue will ask you to confirm that you want to proceed. You can cancel or delete the rule.
Deactivating a Rule
Deactivated rules cannot be activated again. After deactivation, it is possible to edit some values. These include name, delay period, and if visible to agent.
To deactivate a rule. Open the rule for editing, and select Deactivate. A prompt will ask you to confirm the action.
Limitations
The system does NOT take into account roles (Role-Based Access Control) or filters (Attribute-Based Accsess Control) assigned to the owner of the filter that is used for the automatic evaluations.
Conversations are NOT re–evaluated if a new segment is added to the conversation after the conversation has been evaluated by the current rule(see Delay period).
Examples of Complex Automated Rules
Automated Rules can be as simple or complex as you like. You may create a single rule that assigns 100% of the value to a single attribute, or you may create a complex rule that factors in multiple attributes.
Example 1 – Combine various attributes:
Here is an example of a complex rule that combines various attributes.
Attribute | Operator | Configuration of the rule | Values | Max | Explanation of why this combination was chosen |
|---|---|---|---|---|---|
Duration | Range | 0-1 min | 10 | 10 | Duration is for Contact Centers that emphasize adherence to a specific duration of a call. |
1-2 min | 7.5 | ||||
2-3 min | 5 | ||||
Tags | "=" | Happy customer | 10 | 10 | Tags are important to Contact Centers that leverage call tagging during the recording of calls (auto tagging). |
Customer emotion | "=" | Positive | 15 | 15 | Focus on customer emotion - all agents within the conversation will be evaluated for emotion. |
Improving | 10 | ||||
Neutral | 5 | ||||
Agent emotion | "=" | Positive | 7.5 | 7.5 | Every agent benefits from having a positive, improving, or neutral emotion. Worsening and Negative is not acceptable. |
Improving | 5 | ||||
Neutral | 2.5 | ||||
Agent talking ratio | < | 65% | 10 | 10 | For Contact Centers that want to keep in check the ratio of agent talk time (agent should not be talking more than XY percent of the time) |
Agent average speed | Range | 0-100 | 0 | 15 | Very slow speech might be monotonous and customers may get bored. |
100-200 | 15 | Very quick speech might not be understandable to all customers and therefore it is important that the agent speaks at a reasonable pace. | |||
200-250 | 10 | ||||
>250 | 0 | ||||
Agent number of interruptions | Range | 0-1 | 15 | 15 | The agent should not be interrupting the customer. Agents who do not interrupt customers more than twice should receive a more favorable score as a result. |
2 | 10 | ||||
>2 | 0 | ||||
Agent crosstalk duration | Range | <3 seconds | 12.5 | 12.5 | Crosstalk duration can be indicative of a call not going well. Agents should avoid crosstalk. |
3 - 5 seconds | 7.5 | ||||
>5 seconds | 0 | ||||
Speech Tags | "=" Beginning, 15 seconds. | Greetings Party = Agent | 5 | 5 | |
SUM | 100 | ||||
Impact of attributes
NOTE: Some attributes impact all agents (customer emotion, conversation attributes) while others are agent-specific (Any prefixed Agent....).
The results of the Automated Rules scoring is displayed within the Conversation Explorer.
Open the Details Pane and click on an Automatic review bubble to view the details (including the score #2) and a detailed breakdown of the Partial Evaluation #3. The Partial Evaluation table shows how the final score is calculated. A list of all attributes defined by the Automated Rule and their score are displayed.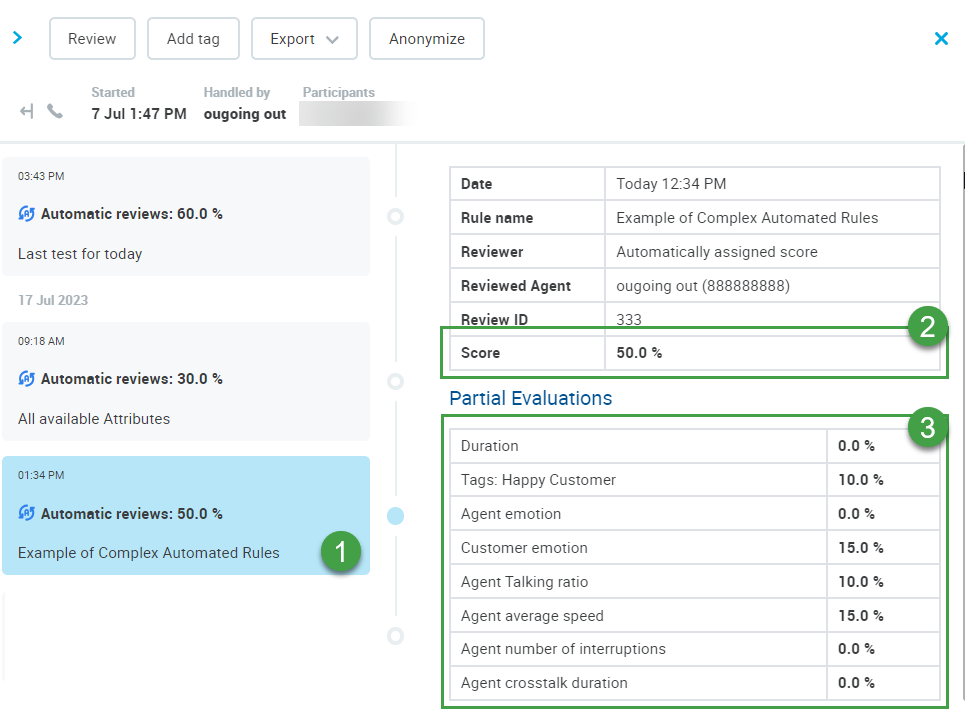
Trainers Tips
AQM Rule Best Practices
Automated Rules are designed to equal 100%. This is true whether the rule consists of a single attribute equaling 100%, or if there are multiple attributes that add up to 100%.
At this time, it is not possible to decrease the score based on an attribute, but rather only award a score based on the presence of the attribute. It's important to understand what a score of 100% means for each individual rule. Consider a naming convention that readily identifies 100% as a positive or negative outcome, using symbols to highlight this outcome.
Create a set of rules that search for either a positive outcome or its opposite.
How do I identify Positive vs Negative?
Begin the Rule Name with a simple identifier:
Positive Rule Name begin with + [plus sign]
Negative Rule Name being with - [minus/negative sign]
Positive Set of Rules:
Negative Set of Rules:
In this way, regardless of the name of the rule, the initial indicator (+ or -) shows whether a high score for this particular rule is good or bad.
Neutral Set of Rules:
In some cases, you may consider a third indicator (Neutral). For example, if there are rules you create that have neither a positive nor negative connotation but rather are simply being used to track the occurrence of some attribute.