
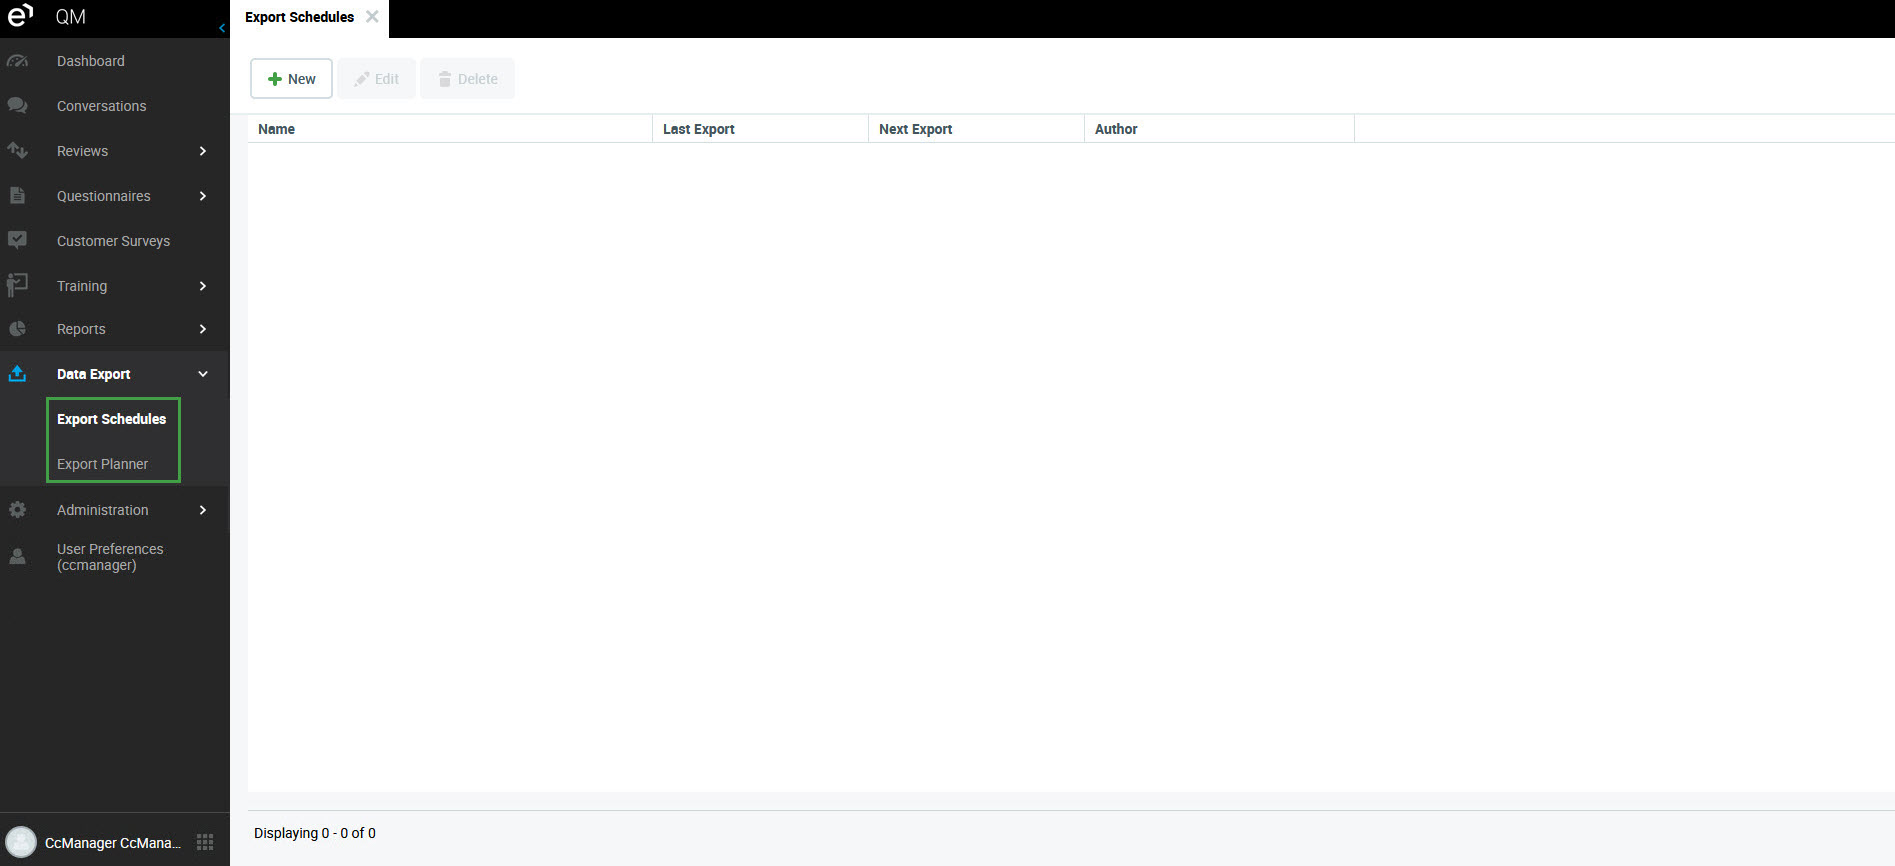
Data Export
Data Export is a feature that allows users to select data and export it as comma-separated values (CSV) or MS Excel (xlsx) files. The feature is represented in the navigation menu by the following items: Export Schedules and Export Planner. All team leaders and ccmanagers have permissions that allow them to utilize the features of data export.
Data exports are not affected by the user's timezone settings. Data exported will contain timestamps based on the server time (UTC by default), not the user timezone.
Export Schedules
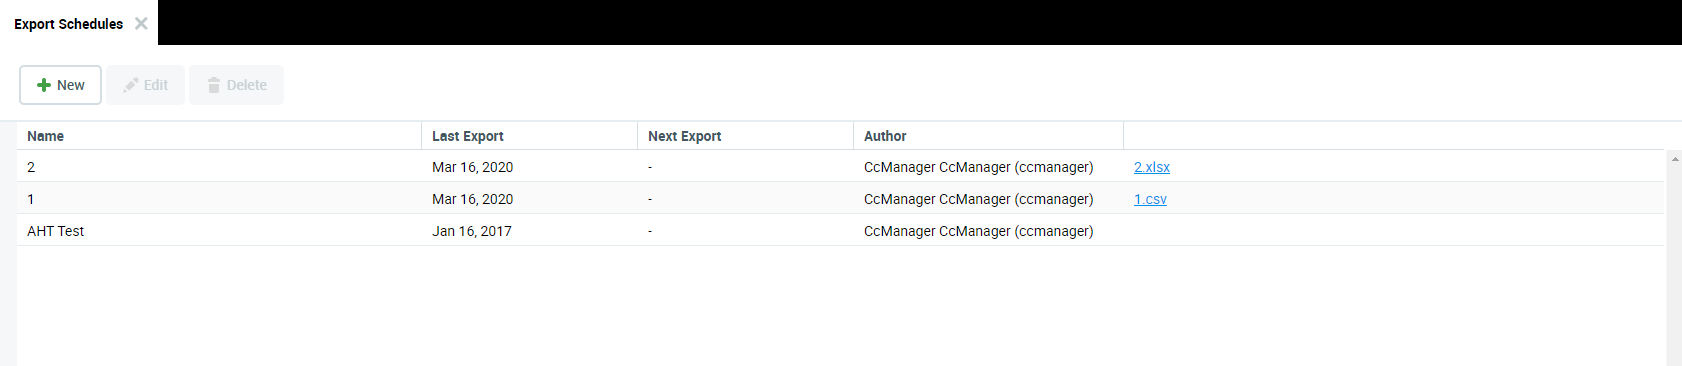
The Export Schedules screen allows you to view, edit or delete existing data exports and download the associated files (if available). Each record contains the name of the export, when it was last run (the last date the specific data export was executed) as well as when it will be run next (scheduled tasks). In the case of a user with the Master User permission the page also displays who the owner of the data export file is.
Downloading Data with Data Export
To download the data files which are created by the system simply click the file on the screen in the Export Schedules (the text is highlighted in blue). You will be prompted to save the file to your local system.
Edit or Delete a Data Export
In order to edit or delete a specific data export you must first select the desired row before clicking Delete or Edit.

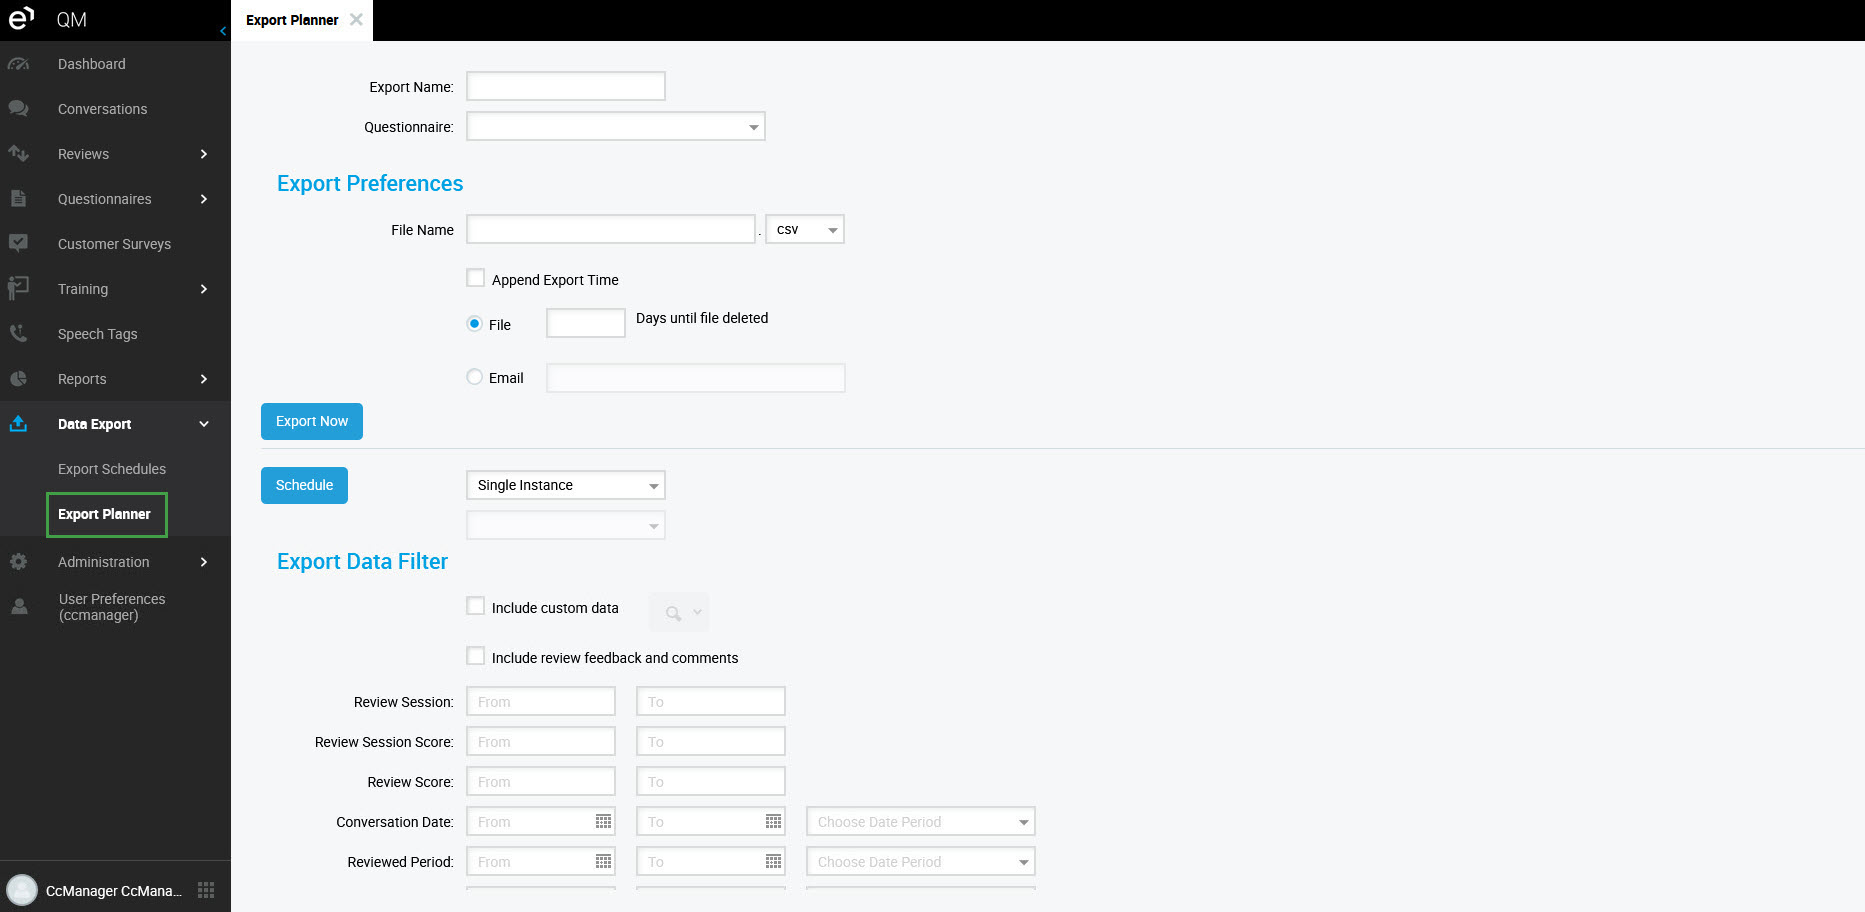
The Data Export screen will open:
Edit the Data Export as needed.
Click Export Now to save changes.
The changes will be visible in the Export Schedules list.
Editing the record opens the Data Export page allowing the user to modify the export before any data is exported.
Creating an Export
You can create a new export either in the Export Schedules screen by clicking the New button and then in the Data Export window or in the Export Planner.
There are two mandatory fields that must be completed: Export Name and Questionnaire. The default setup will generate a file once the export is run. Additionally, you can choose to append a timestamp to the output file name.
To create an export:
Click New in Export Schedules or click the Export Planner item.
Enter a title into the field Export Name.
Select a Questionnaire to include in the export.
Enter a File Name, select the file format CSV or xlsx (MS Excel) and click the box beside Append Export Time if necessary.
Leaving the File Name field empty will result in a default file name being generated automatically.
Specify how you would like the export made available:
File: If the file is selected as the preferred output users can also specify the number of days that the file will be kept on the server. The file is available for download from the Export Schedules tab. (Creating a file is recommended)
Email: If email is selected as the preferred output a file will not be saved to the server, instead it will be sent to the email address specified in the email input field.
Multiple email addresses can be entered if separated by a semi-colon.
You may also use the Export Data Filter tab and make a selection before proceeding if necessary.
Click Export Now or Schedule.
Clicking on the Export Now button will start the background data export process and the warning will display:
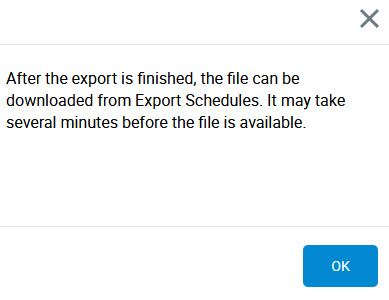
After the export is finished, the file can be downloaded from the Export Schedules page. If a user has set up a recurring export the next export will occur automatically as scheduled.The Schedule button allows users to schedule a data export for a later date. In order to set up the scheduler, there are two drop-down menus.
The first drop-down menu determines whether the export is recurring or occurs only once.
In case that this will be a recurring export the scheduler offers several options. The export can occur: Daily, Weekly, Monthly, Quarterly, Yearly, It is also possible to select options such as Custom Weekly, Custom Monthly, Custom Quarterly and Custom Yearly which are based on the custom terms defined in Quality Management Preferences.
There is a known issue with the export functionality. When a recurring export is set to export data 'daily', the system will repeatedly export data for that specific date(the date for which the export original was created). The system does not export data from a new day, each day.
Export Data Filter
There is an additional Export Data Filter section that permits you to refine the actual data export.
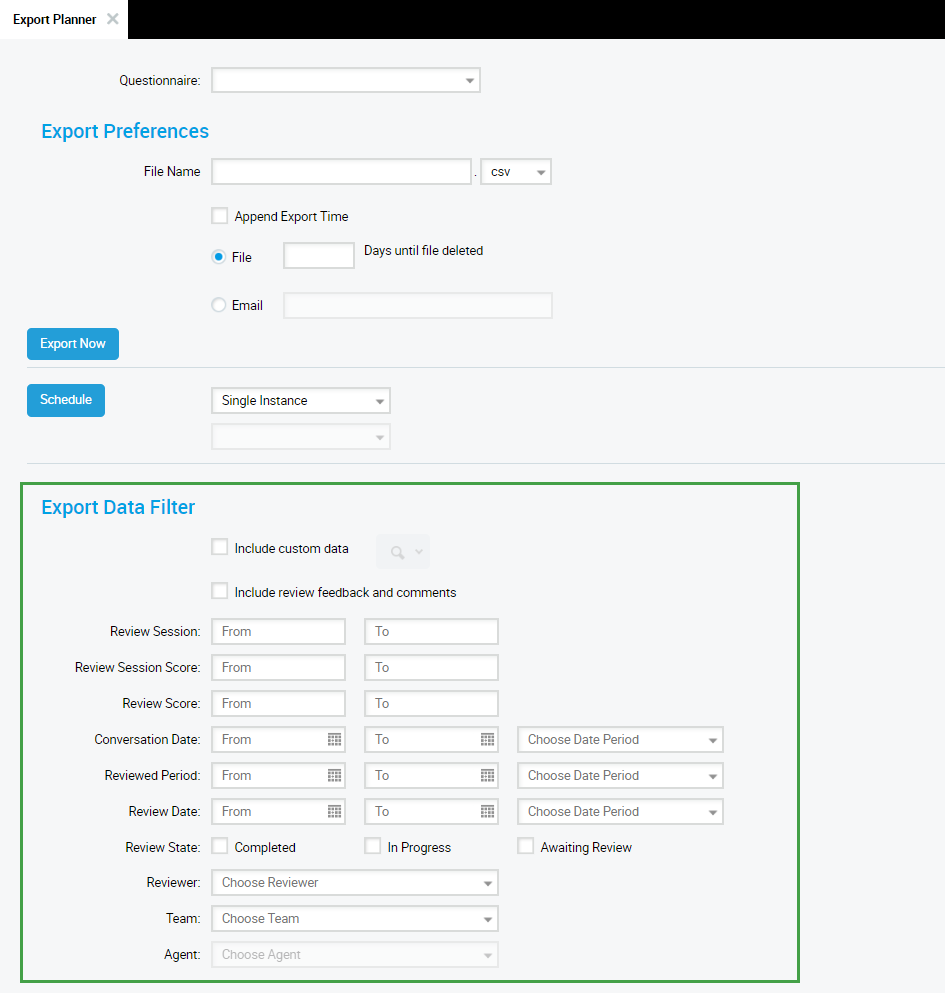
The additional search parameters include:
Include Custom Data: Check this checkbox to include all available call and custom data in the export.
The Custom Data Picker

becomes active and you may deselect or re-select individual custom data values for your export.
Include review feedback and comments: You may also include agent feedback and comments made by the reviewer.
Review Session:
From - If left blank defaults to earliest available value.
To - If 'From' is entered and 'To' is empty the single ID is searched for otherwise this is the upper limit of the range.
Review Session Score (total average of all sub evaluation scores):
From - If left blank defaults to earliest available value.
To - If 'From' is entered and 'To' is empty then a single score is searched for otherwise this is the upper limit of the range.
Review Score (filter by score for sub evaluation):
From - If left blank defaults to earliest available value.
To - If 'From' is entered and 'To' is empty then a single score is searched for otherwise this is the upper limit of the range.
Conversation Date:
From - If left blank defaults to earliest possible date.
To - If empty defaults to date the export is performed.
Choose Date Period - Choose from the list of predefined periods.
Reviewed Period:
From - If left blank defaults to earliest possible date.
To - If empty defaults to date the export is performed.
Choose Date Period - Choose from the list of predefined periods.
If you want to export review data, make sure that the date range in the Data Export Filter is the same or wider than the date range of reviews that are supposed to be exported.
Review Date:
From - If left blank defaults to earliest possible date.
To - If empty defaults to date the export is performed.
Choose Date Period - Choose from the list of predefined periods.
Review State: Allows for selecting specific review status for export. Multiple choices are allowed. Making no selections does not filter the result by status.
As the database content is not localized, the column
Statusin the exported file does not match what is seen in the UI. The following 'statuses' are visible in the exported file:Awaiting Review =
CREATEDIn Progress =
IN_PROGRESCompleted =
FINISHED
Reviewer: Exports data related to a specific reviewer.
Team: Exports data related to a specific team/group.
Agent: This drop-down box is dependent upon the group drop-down and exports data related to a specific agent.
After making your selection return to the Create Export tab to run the data export.
If additional parameters are not defined the data export will not be affected.