
Managing Queues
Overview
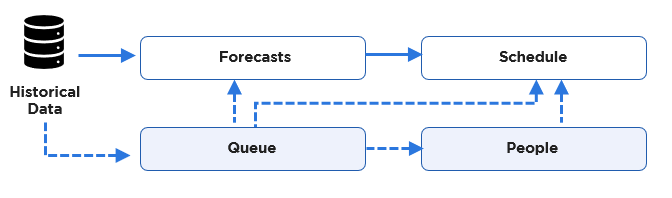
Queues are the links that hold the Eleveo system together. The historical data that the system receives is matched to a queue. The forecast accesses the correct historical data by selecting the queue it is matched to. The schedule selects the correct forecast using the name of the queue and the date range it covers. The schedule selects the people who will be assigned work because they are assigned to the same queue as the forecast.
Note that only users with the WFM_ANALYST role assigned are able to add, modify or remove queues! Read more about Roles.
Displaying Existing Queues
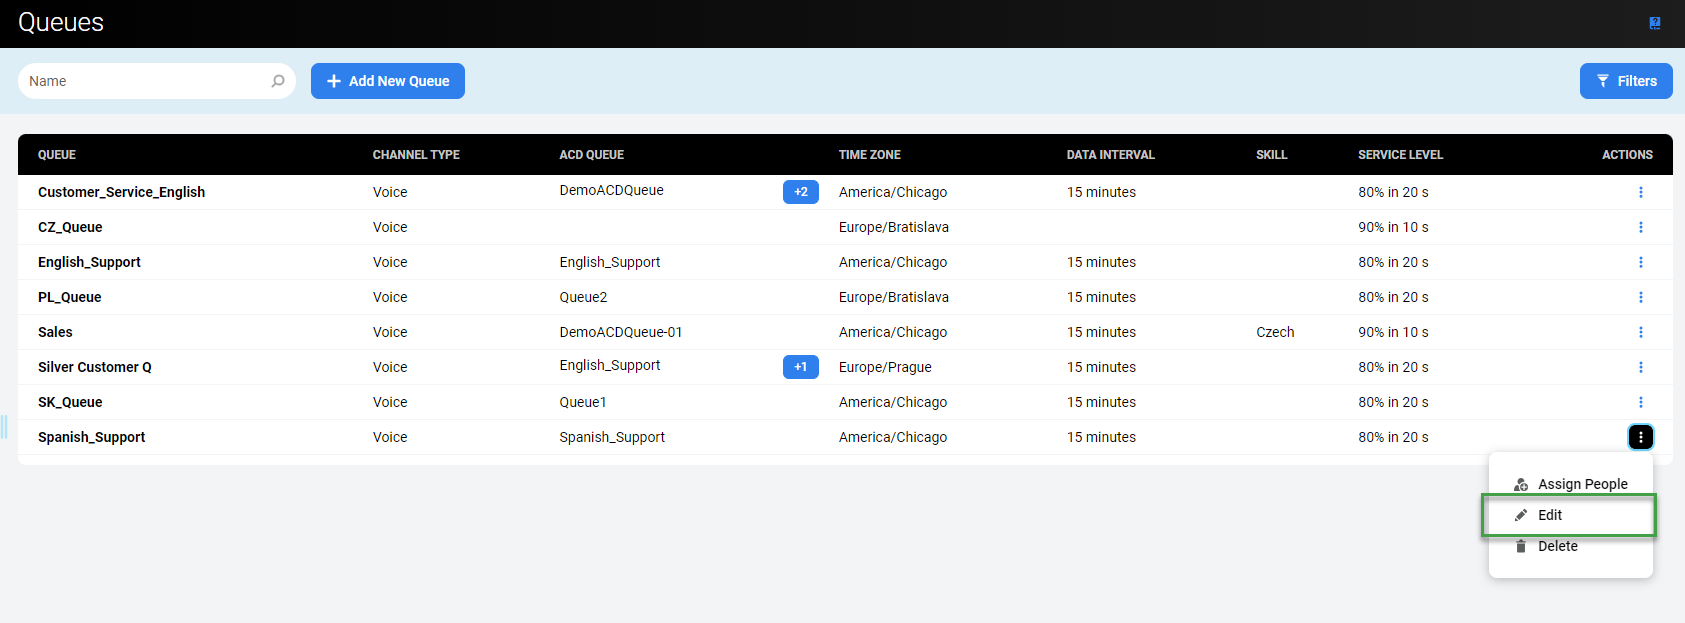
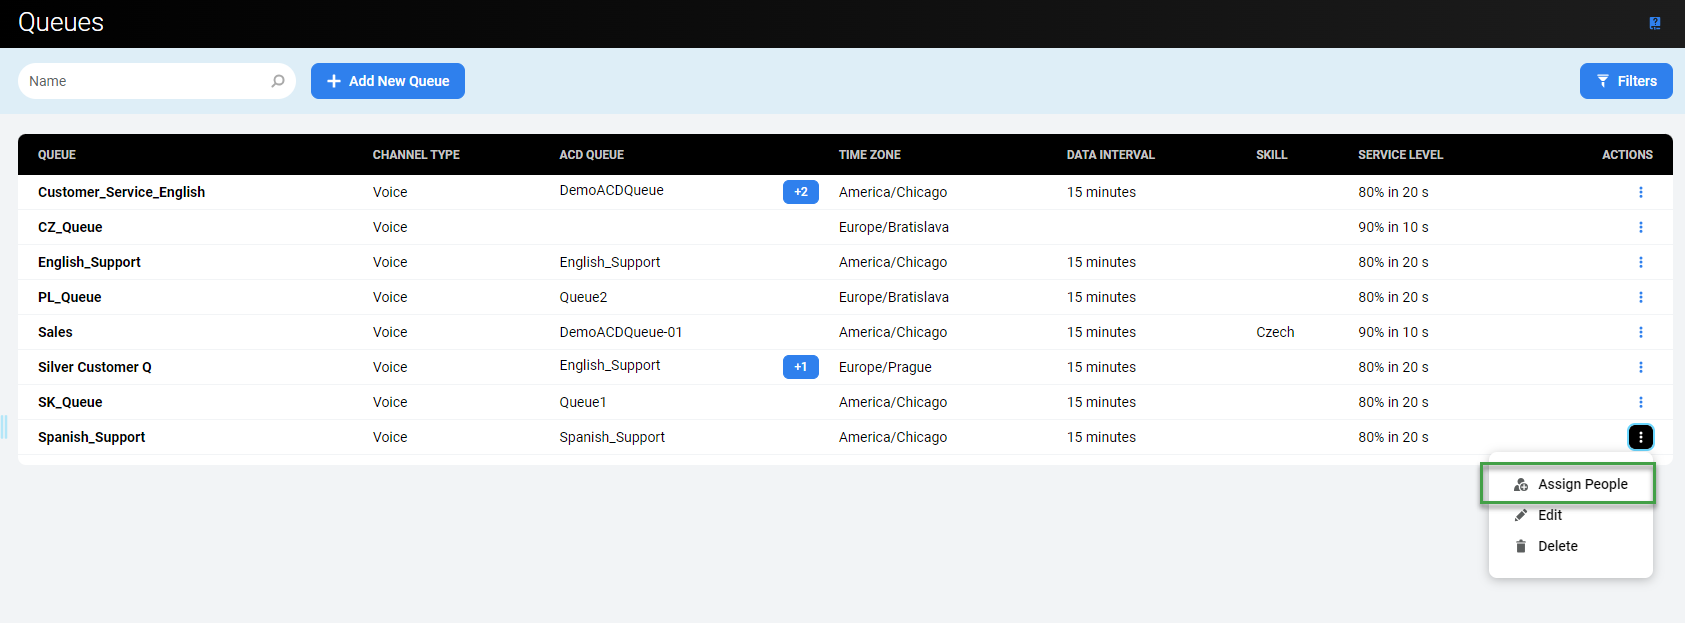
To display queues that already exist in the system, expand the Administration module from within the navigation tree and click Queues. The Queues screen will display.
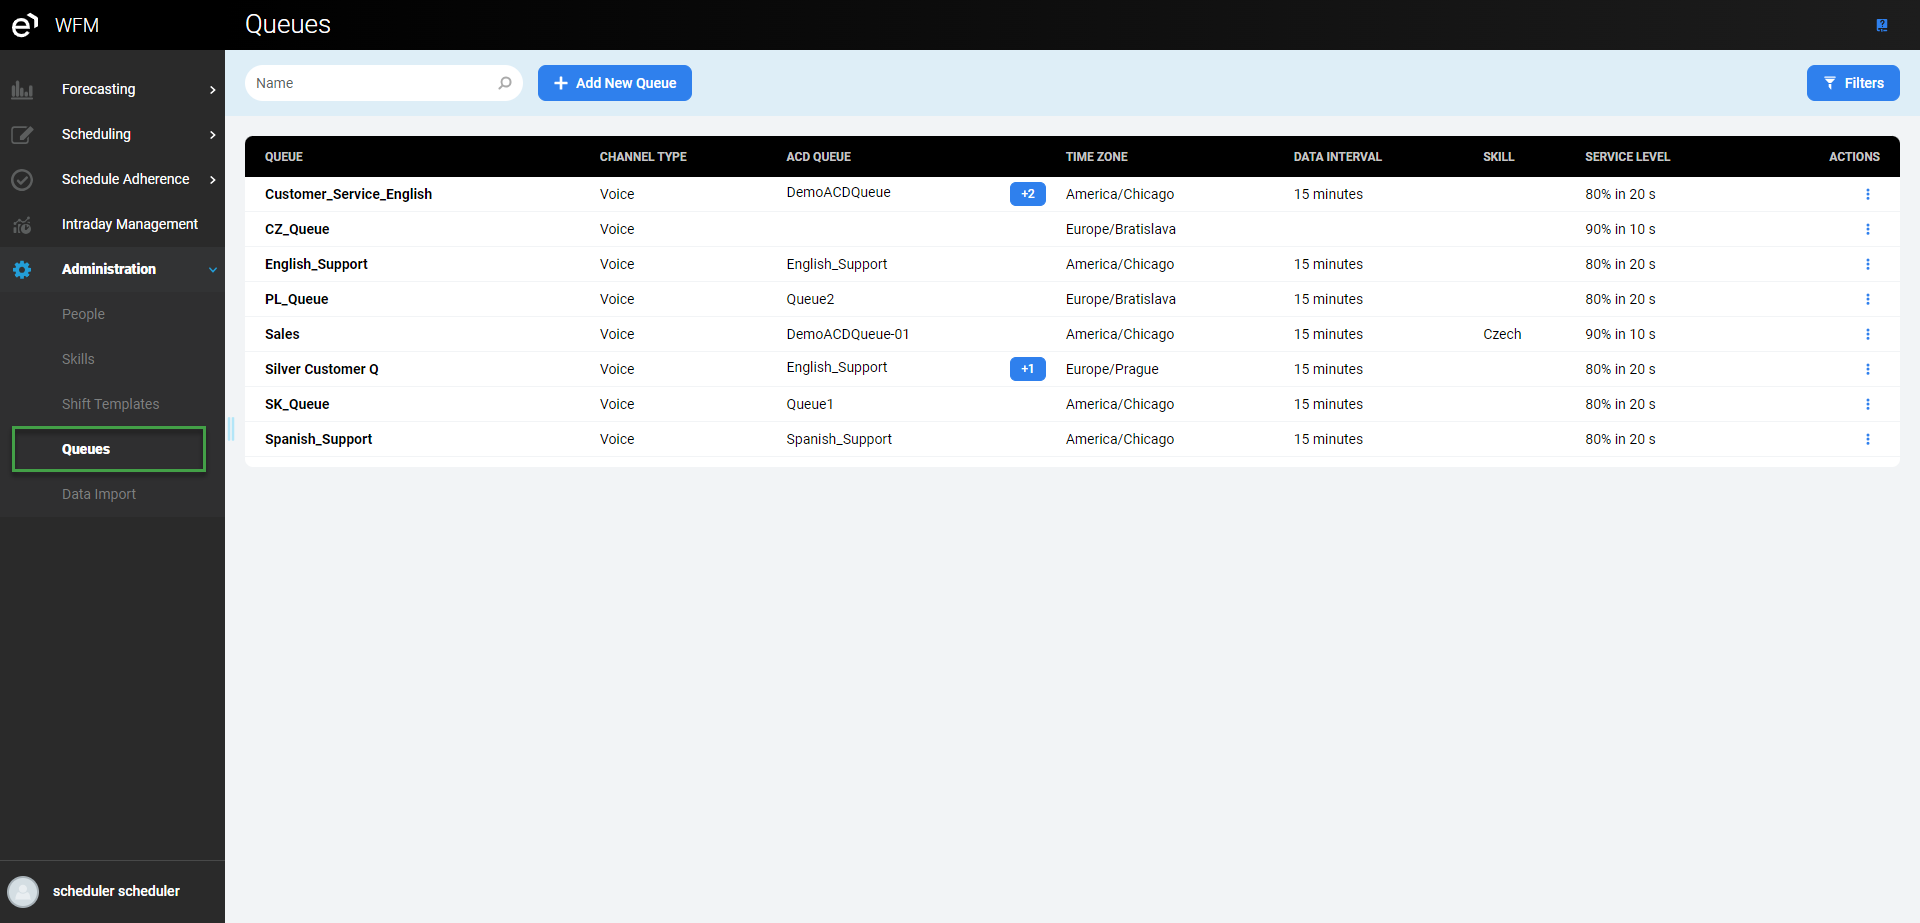
Basic information about each queue is displayed in the following columns:
Queue – the name of the queue (local name in the application)
Channel Type – the means of communication used to handle the queue (Voice, Email or Chat)
ACD Queue – the name of the associated queue in the ACD system
Time Zone – the default time zone in which the queue operates
Data Interval – the default time interval of historical data for the queue (obtained from the selected ACD queue)
Skill – the name of the skill required to handle this queue
Service Level – service level assigned to the queue
Note the following parameters:
ACD Queue – While queues originate within the ACD system, they must also be configured within the Eleveo WFM application. After data for a queue is imported, the ACD queue name will be visible in the drop-down menu. Once visible, users will have a variety of options available when configuring Eleveo queues:
set up the Eleveo queue as a 1:1 match with the ACD queue, with the same naming convention
set up the Eleveo queue with an entirely different name
set up multiple Eleveo queues which map to the same ACD queue
set up a single Eleveo queue that corresponds to multiple ACD queues.
Skill – Note that each queue can have only one skill assigned.
Service Level – Is the percentage of calls that need to be answered within a given amount of time (for example 20% in 60 s means that 20% of calls need to be answered within 60 seconds).
The Actions column enables the following actions for the queue:
Assign People button allows for the assignment of people to the queue – this option is available only to users with the
WFM_ANALYSTrole assignedEdit button allows for the modification of the queue – this option is available only to users with the
WFM_ANALYSTrole assignedDelete button allows for the removal of the queue – this option is available only to users with the
WFM_ANALYSTrole assigned
Adding a New Queue
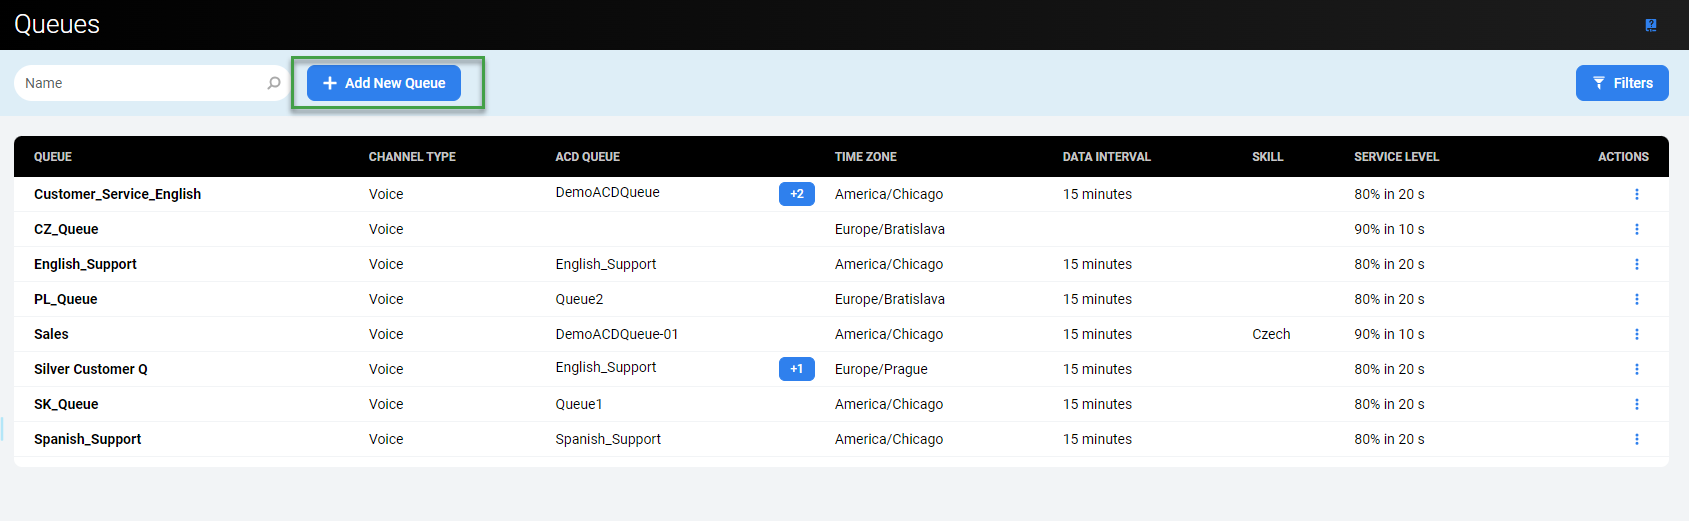
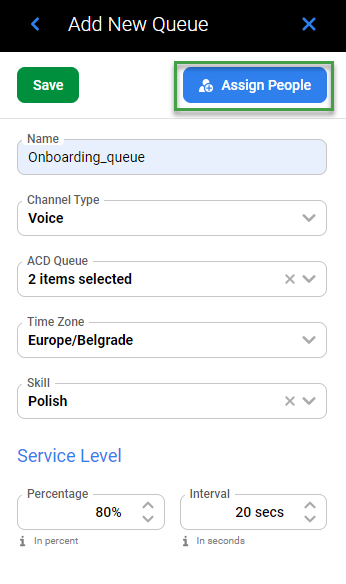
To add a new queue, click the Add New Queue button.
The Add New Queue pane will display.
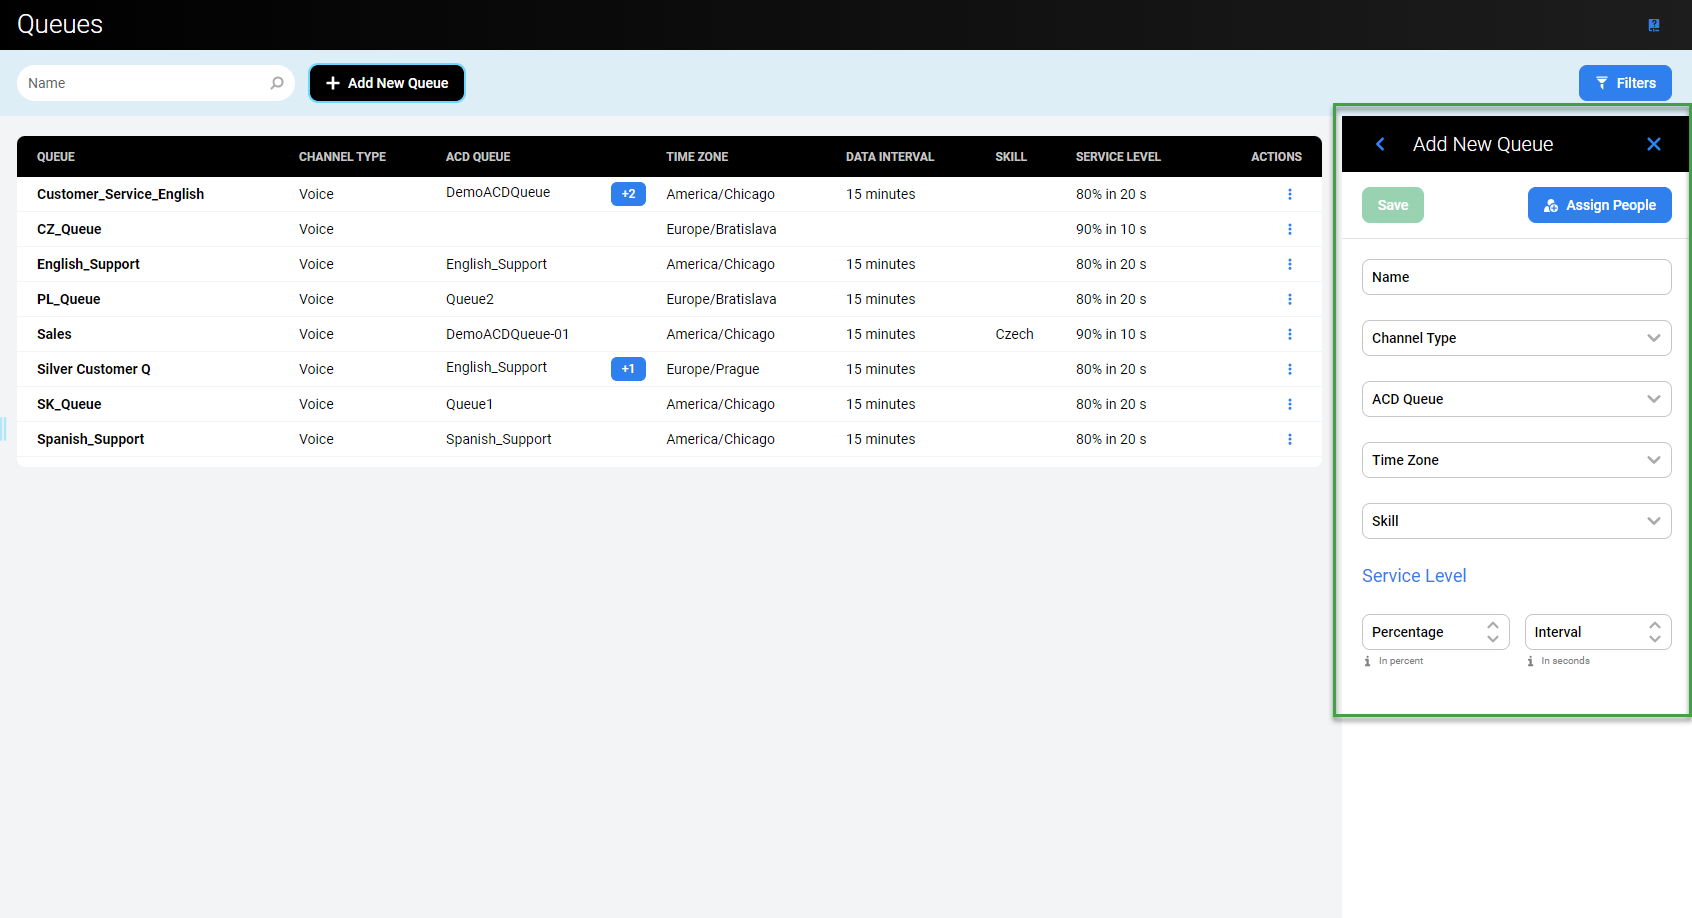
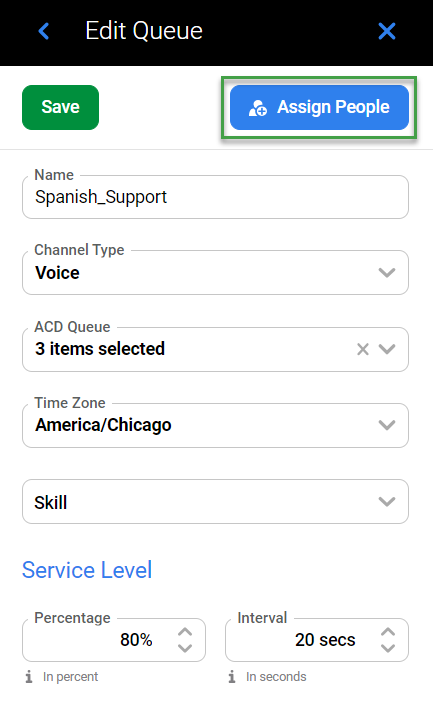
Fill in the following data:
Name – the name of the queue
Channel Type – the means of communication used to handle the queue (select from the drop-down menu)
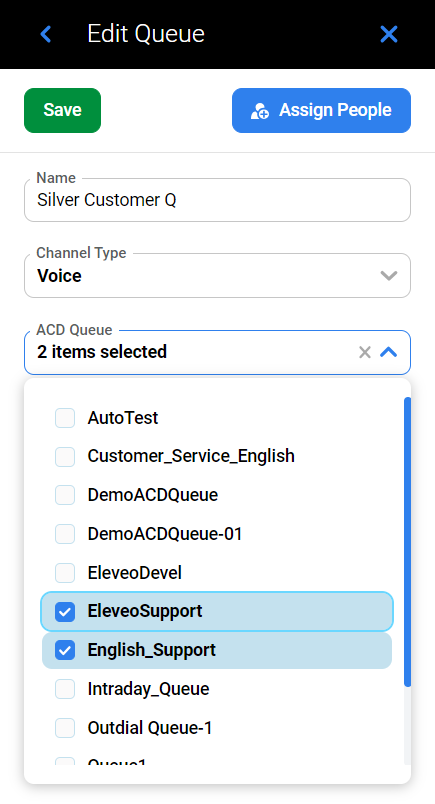
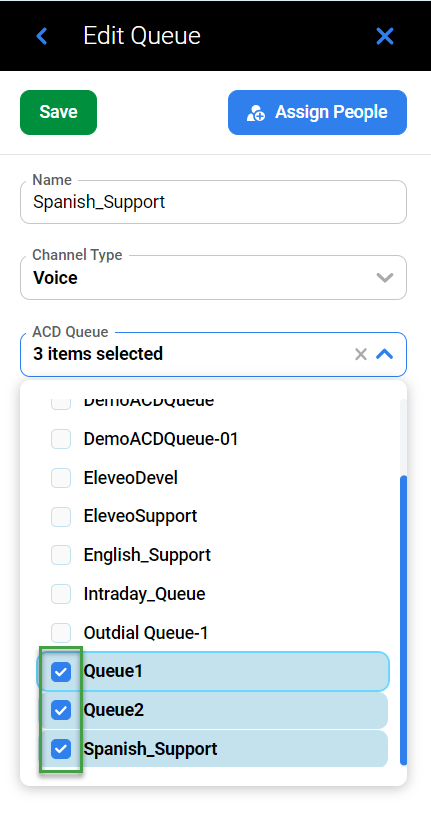
ACD Queue – the name of the associated queue in the ACD system (select from the drop-down menu, it is possible to select more than one ACD queue)
Time Zone – the default time zone in which the queue operates
Skill – the name of the skill required to handle this queue (select from the drop-down menu; all skills which are listed on the Skills screen are displayed)
Service Level: Percentage (%) – service level assigned to the queue
Service Level: Interval (s) – time interval for which the service level is defined
Selecting a skill is not mandatory. If there isn't a skill selected, any person can handle this queue.
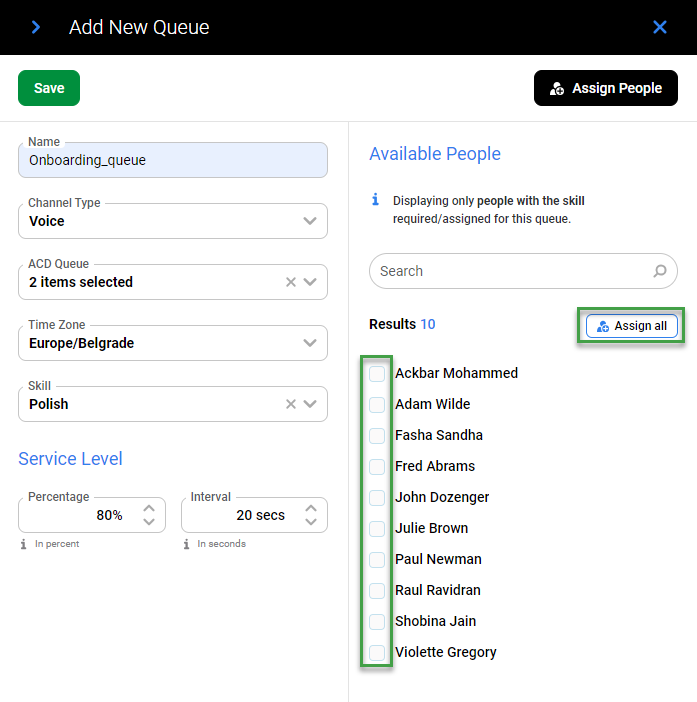
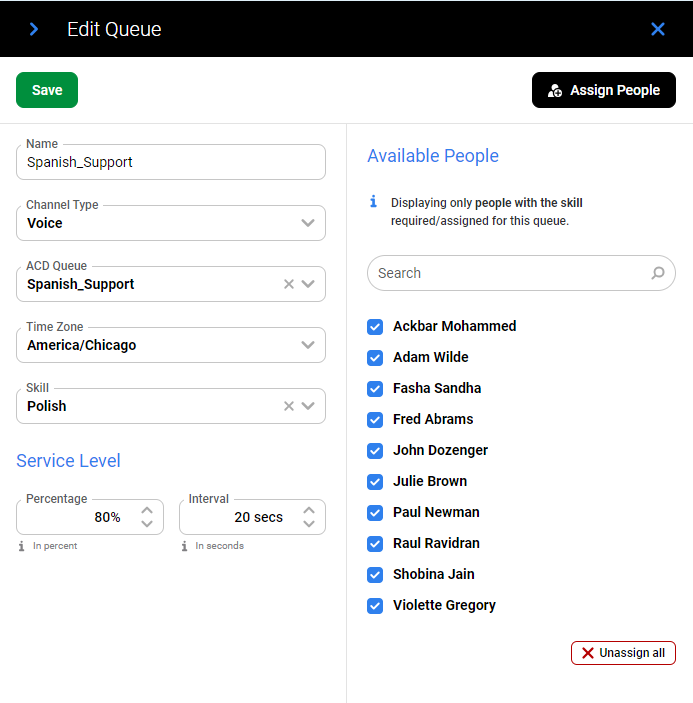
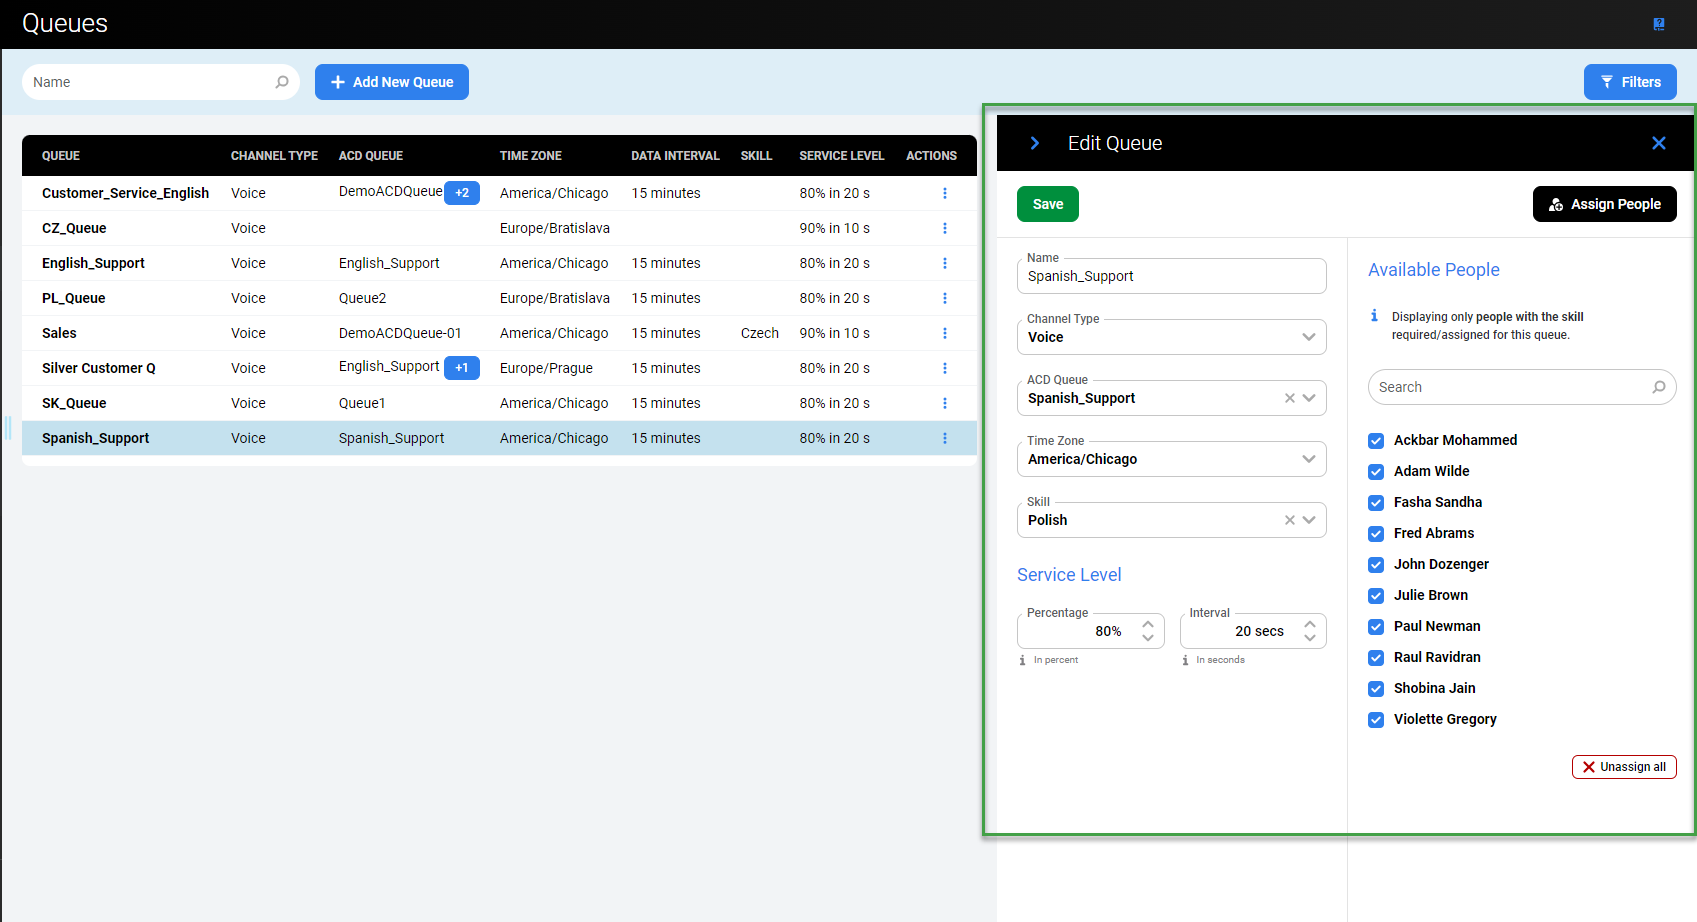
Click the Assign People button or the arrow to expand the Available People pane.
The Available People pane allows for the assignment of people to the queue. Only people with the skill necessary to handle this particular queue are listed.

If no skill is required, all people are listed.
Use checkboxes to select people and assign them to the queue. To assign all available people at once, select the Assign all box. To remove the selection, use the Unassign all button.
Note the following details:
It is not mandatory to assign people at this step. It is also possible to assign people to a queue when adding or editing a person's details from within the People screen. However, if a person is assigned to a queue from within the Queues screen, this configuration change is reflected immediately on the People screen in the Queues column.
If people are already assigned to a queue, but then a skill assigned to this queue is changed, a warning will display:
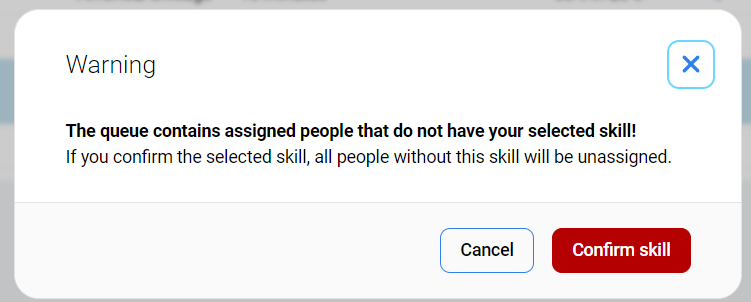
After confirming the change of skill, people without this skill will be removed from the queue.
Click the Assign People button or the arrow to hide the Available People pane.
Click the Save button to confirm.

Alternatively, click Cancel or the Close button to abandon changes.
Merging ACD Queues
It is possible to merge multiple ACD queues while adding a new WFM queue. This functionality is used for multiple low-volume queues defined within an ACD that can all be handled by the same group of people. Individual ACD queues with low-volumes will not (on their own) have that much volume, potentially resulting in the forecast containing many zeros, and thus having no requirement. However, after being combined these same queues may have a large enough volume of contacts to facilitate the creation of a more reliable forecast, one that can be used throughout the schedule period.
When the queues are merged, the Contact Volume will be summed, but the Average Handle Time will be calculated as a weighted average.
It is strongly recommended that the merging of queues be performed under the guidance of a WFM Consultant! Queues should only be merged by individuals with sufficient knowledge and experience of such practices.
Combining queues in Eleveo WFM does not affect the queues on the ACD, all ACD reporting will continue to provide ACD Queue-level reporting.
To merge ACD queues, select more than one ACD queue from the drop-down menu during the WFM queue creation. Only those queues that have the same time interval as that of the historical data can be merged.
Example
There are two ACD queues: "Customer Service Spanish" and "Escalations Spanish". Both require the same skills and can be handled by the same group of people. Neither queue will have that much volume, so the forecast may contain many zeros. After being combined they may have a large enough volume of contacts to facilitate the creation of a more reliable forecast. It is a good idea to merge these queues.
Data for both ACD queues should be imported into the WFM application. Once imported the queues will be visible in the drop-down menu on the Add New Queue pane. We can create a new queue called "Combo_Spanish", and select two ACD queues ("Customer Service Spanish" and "Escalations Spanish") to be merged. As a result of this selection, forecasts and schedules will be created for the local "Combo_Spanish" queue, based on data from the ACD queues called "Customer Service Spanish" and "Escalations Spanish".
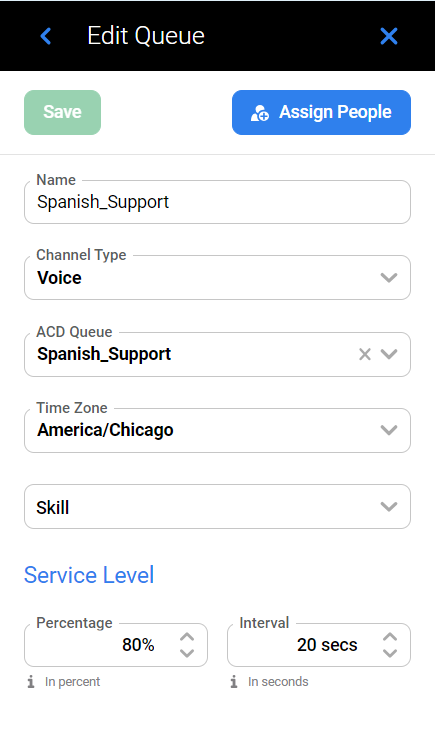
Editing a Queue
To edit a queue, click the Edit button in the Actions column for the queue.
The Edit Queue pane will display. The following rules apply to editing a queue:
if a queue is not used in any forecast or schedule, all queue parameters can be modified
the Name of a queue can be modified at any time
if a queue is already used in a schedule, it is possible to modify its Name, ACD Queues and Time Zone, but it is not possible to modify Channel Type, Skills and SLA
if a queue is already used in a forecast, it is possible to modify its Name, but when trying to modify Channel Type, SLA, ACD Queues, Time Zone or Skills, a warning will display and all draft forecasts for this queue will be recalculated (production forecasts remain unchanged)
if a queue is already used in a forecast, it is not possible to remove all ACD Queues, at least one ACD Queue must remain selected.
A forecast may be recalculated after a change of the time zone of the queue. As a result, both the forecast range and the historical data range are recalculated based on the queue's time zone to start at midnight. If the new historical data range is out of the available data range (the range of imported data for ACD queue/s which the queue is using) and the initially selected range (the range selected during forecast creation) is less than two weeks, an error message will display when trying to edit such forecast: "The forecast cannot be recalculated with time zone assigned to the queue due to missing historical data."
To solve this issue, go back to the queue settings and modify the time zone of the queue. Otherwise, create a new forecast using a different historical range.
To select/deselect ACD queues, expand the drop-down menu and check or uncheck the relevant boxes.
Click the Assign People button or the arrow to expand the Available People pane.
The Available People pane allows for the assignment of people to the queue. Only people with the skill necessary to handle this queue are listed. If no skill is required, all people are listed.
Select boxes to assign/remove people to/from the queue. Read more in the Adding a new queue section above.
Click Save to save changes. If the queue is already in use, a warning will display.
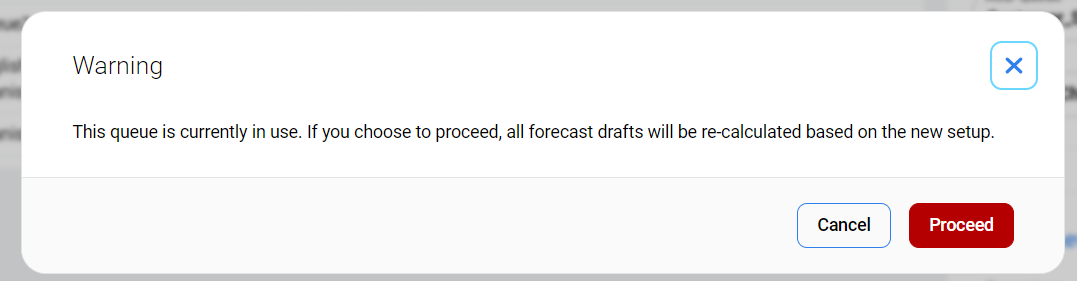
Click Proceed to edit the queue anyway or click Cancel to abandon changes. Alternatively, use the Close button to abandon changes and close the pane.
Note that even though the name of the queue is displayed for all forecasts on the Forecasting Studio screen, there is no indication that the queue was edited after being used in production. It is possible that a queue will contain different ACD queues than were used at the time that the production forecast was calculated.
Assigning and Removing People
To assign people to a queue (or remove them from a queue), click the Assign People button.
The Edit Queue and the Available People panes will display.
It is possible to add/remove people or modify the details of the queue from within this pane. Jump to Adding a new queue section above for details.
Note that if you remove a person from a queue and this person is already used in the production schedule for this queue, a warning will display after clicking the Save button. It is possible to confirm and remove this person anyway, but it will affect the calculation of production schedules in the future time range:
if the person is assigned to other queues in the same schedule, this person will stay assigned to the schedule contributing to the other queues, but the work contribution will be re-calculated
in the event that the person is not assigned to any queue in the same schedule, this person will be displayed as an 'inactive' person and their work contribution will not be included.
Deleting a Queue
To delete a queue, click the Delete button.
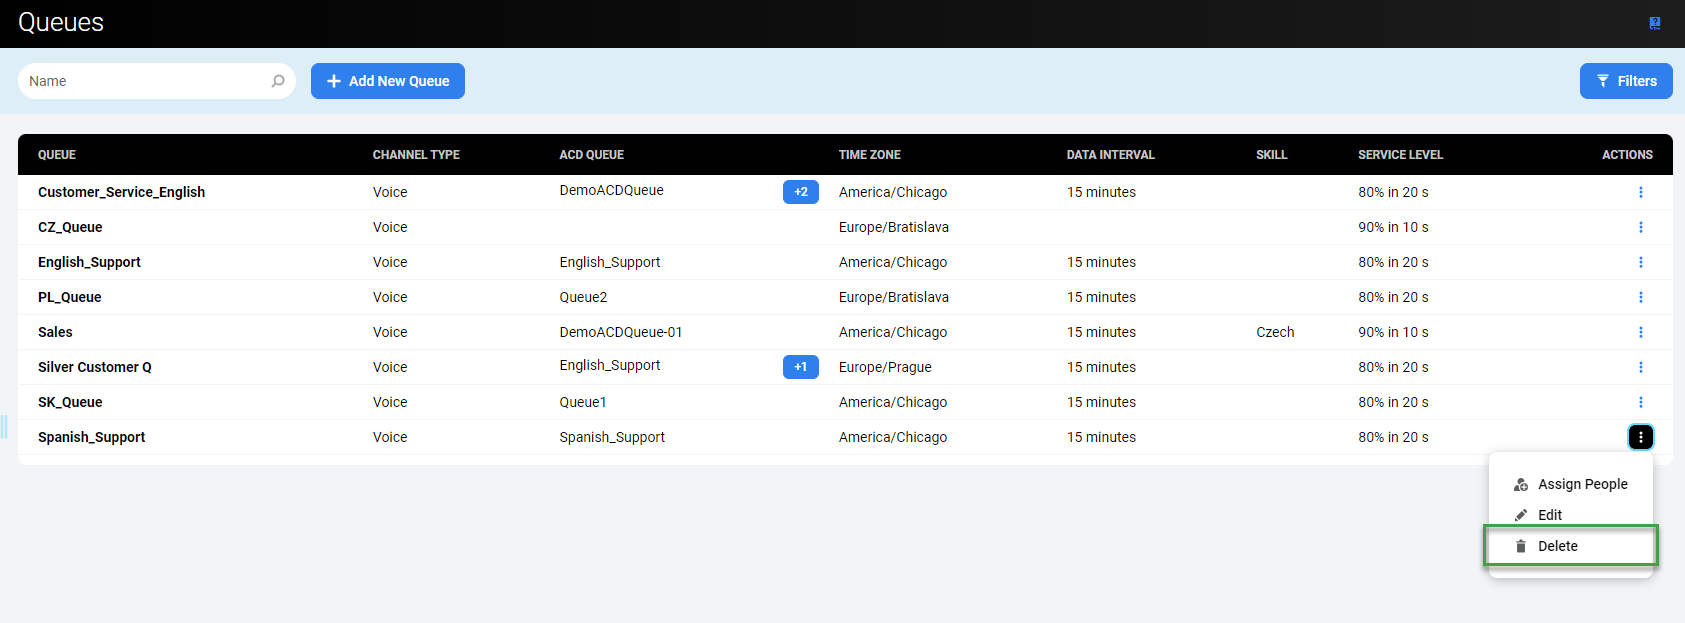
A confirmation dialogue will appear, requesting that you confirm Do you really want to delete the chosen queue <queue name>?
Click Delete to confirm the removal of the queue.

Alternatively, click Cancel to abandon changes.
Note that those queues which are already in use by a forecast or a schedule, or are assigned to a person cannot be deleted!
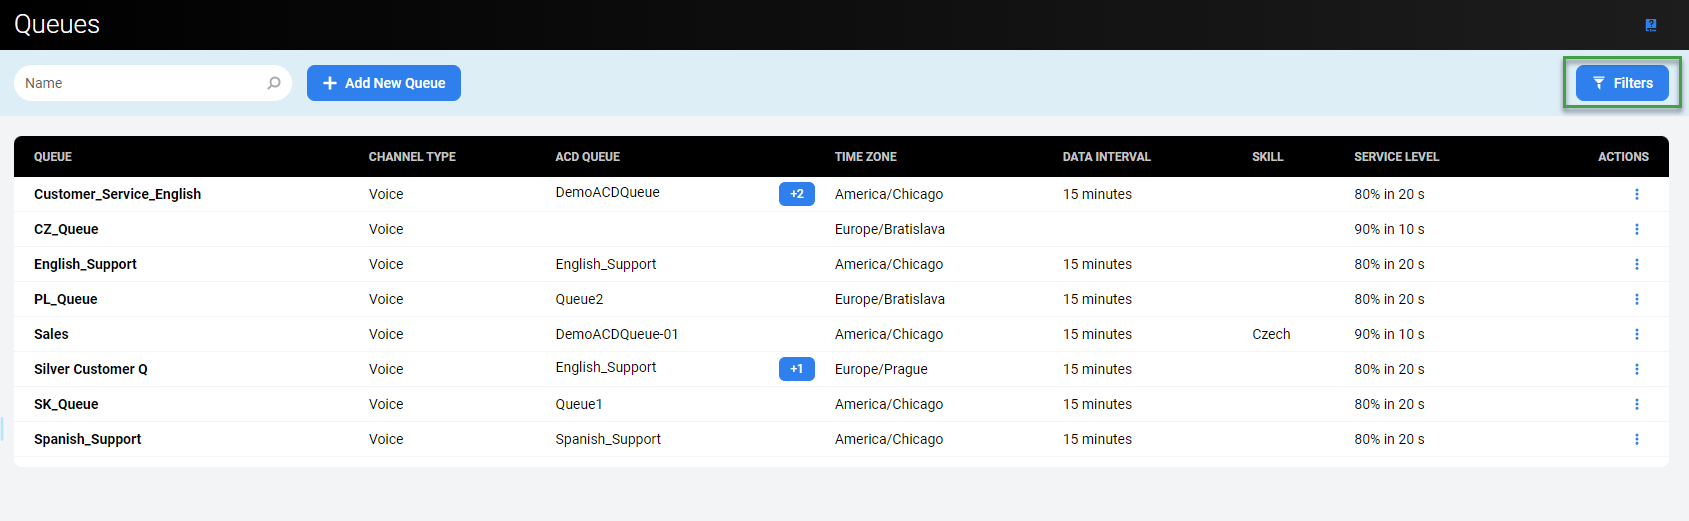
Filtering Queues
It is possible to filter the displayed queues based on a name or based on configured criteria.
Filtering Based on a Name
Enter a Name to find matching queues. Search is not case-sensitive. Results will be dynamically displayed while entering the name. Click the Reset filter button to remove the name.

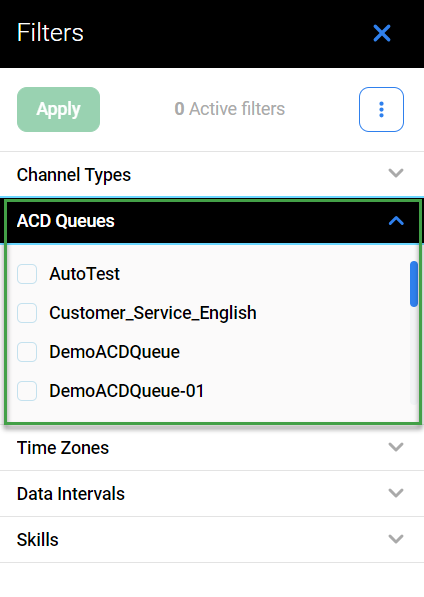
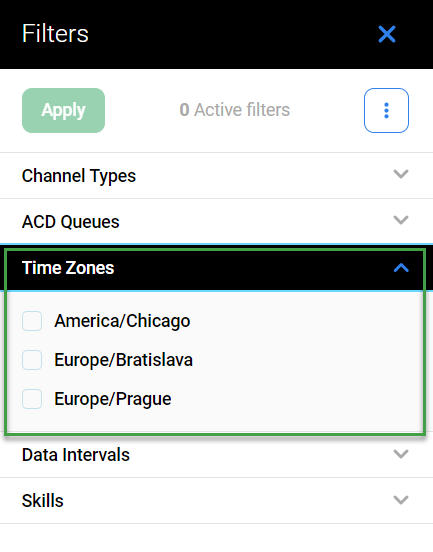
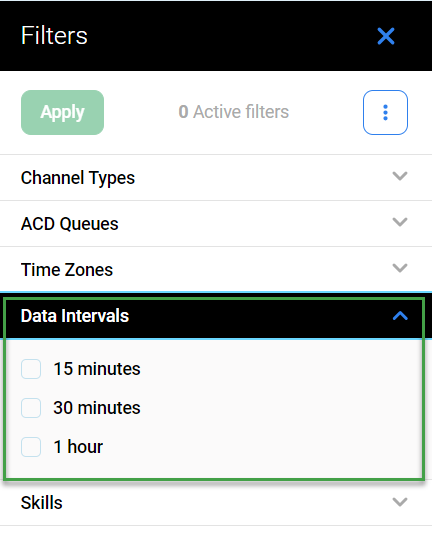
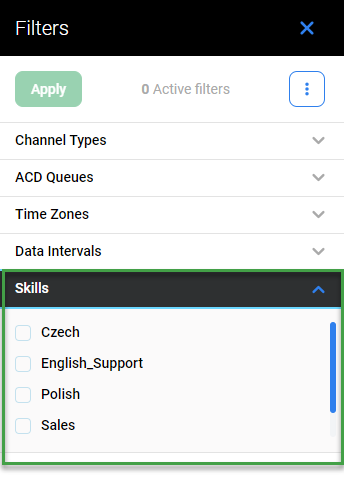
Filtering Based on Criteria (Filters)
To filter queues based on configured criteria, click the Filters button in the top right corner of the screen.
The Filters pane will display.
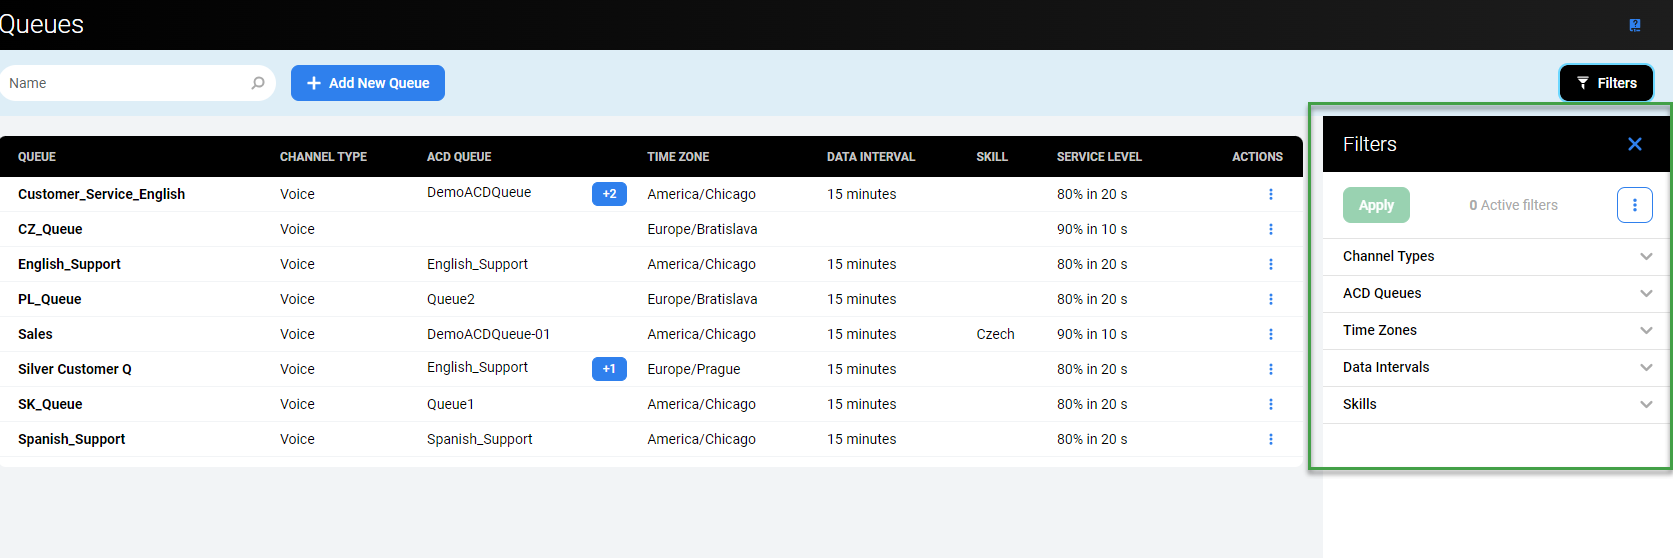
Click the tabs to expand them and display the following filters:
Channel Types – displays only the queues of the selected channel type(s)

ACD Queues – displays only queues with the selected ACD queue(s) assigned
Time Zones – displays only the queue(s) operating within the selected time zone(s)
Data Intervals – displays all queues with the selected data intervals
Skills – displays only queues with the selected skill(s) assigned
To read more about how to use filters, visit the page Using Filters.